View an Attachment
If you have the appropriate permissions, you can view existing attachments
on accounts. This article will help you use lists,
filtering (including custom filter
defaults), and version
history to view attachments. If you experience issues opening TIF
files, you may need to assign
a specific program for them.
Before you can view an account's attachments, you must locate
the account and access the Attachments
area.
Attachments List
Once you have accessed an account's Attachments
page, a list of existing attachments displays below the search bar. The
attachments that display by default depend on your organization's attachment
configuration. One of the following link labels displays in the header:
- Show All Documents:
By default, only attachments with the Mark
as an Important Policy Document checkbox selected display.
Click the Show
All Documents link label to display all attachments (up
to 10,000 added within the last six months).
- Show Only Important Policy Documents:
By default, all attachments display in the list (up to 10,000 added
within the last six months). Click the Show
Only Important Policy Documents link label to display
only attachments with the Mark
as an Important Policy Document checkbox selected.
Note: Your
view filters and search criteria apply only to the attachments that display
based on your link label selection. To ensure that you are filtering or
searching all attachments, make sure to select Show
All Documents first.
If your system is configured to display all documents by default, the
list displays up to 10,000 attachments added within the last six months,
including any system-generated attachments (e.g. proofs, carrier submissions,
and vehicle/driver schedules). You can use the System
Generated search filter to exclude or view only system-generated
attachments in the list if necessary. You can also set Filter
Defaults per entity type (e.g. for all clients or all brokers) to
change the attachments that populate the list automatically.
View Filters
If more than 10,000 attachments exist for the selected search criteria,
only the first 10,000 display in the list. A count of the attachments
currently loaded displays in the lower right corner of the list. When
your search returns more than 10,000 results, this count indicates how
many results exist beyond the first 10,000 (e.g., Viewing
Newest 10,000 of 12,000 Attachments). In this situation, specify
additional search criteria to narrow your search to 10,000 results or
fewer.
- To change the way the attachments display in the list, click
the word Attachments
in the header, then select a display
option.
All displays all attachments
for the selected entity (if fewer than 10,000) or the 10,000 most
recent attachments.
The Search view defaults
blank until you save a Filter Default.
After you create a filter default, the Search
view populates with up to 10,000 attachments that meet your saved
search criteria each time you access the Attachments
list.
- Use the search bar to display attachments that meet specific
criteria.
Apply a Single Filter
You can use the search bar to apply a single filter to narrow the attachments
that display. If you enter search criteria, you must click the Clear Filter link label before beginning
a new search. Otherwise, your new search will use the original criteria
plus your new criteria. The search bar displays in blue when filters are
applied and in gray when filters are cleared.

- Select an option
from the first dropdown menu.
- The choices available in the second dropdown menu vary, depending
on your selection in the first dropdown menu:
- Equals: Enter
the search criterion (e.g., the full description) in the field
to the right, or select a date from the dropdown calendar (if
applicable).
Contains:
Enter at least one character of the search criterion (e.g., part
of the description or folder name) in the field to the right.
Within
Range: Search between two calendar dates. Click the
down arrow to the right of each field to choose dates from the
dropdown calendars.
Yes/No:
Opt to include or exclude attachments when you have selected Client Accessible, Do Not Purge, or Important Policy Document
in the first dropdown menu.
Exclude/Only/Include:
Select to exclude or include items that meet the
criterion selected in the dropdown, or to display only items that
meet that criterion.
- Click Find to
apply the filter. Hover over the Search
where text to see the filter that is currently applied
to the list.
Apply Multiple Filters
You can use multiple criteria in the search bar to help you find one
or more attachments. If you select multiple criteria, the system performs
and "and" search (for example, Client
Accessible attachments with a specific Attached
Date). If you make multiple selections for the same criterion,
however, the system performs an "or" search for that criterion
(for example, attachments associated to either of two Types
of Business). You can make up to eight selections for the Type of Business criterion.
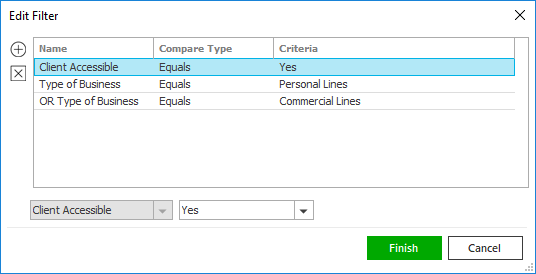
- Click the Edit
Filter button
 to open the Edit Filter pop-up
window.
to open the Edit Filter pop-up
window.
- Click the Add
button
 to add filters.
- Select and/or enter the search criteria
using the dropdown menus and fields. Click the Add button again to apply additional
filters. Enter additional search criteria
as needed.
Click the Delete
button to remove a filter from the list, if necessary.
- Click Finish
when you have applied all of the filters you want. Hover over the
Search where
text to see the filters that are currently applied.

To clear the currently applied filters (for the current session only)
and start over, click the Clear
Filter link label.
Create Filter Defaults
To save time, you can created a customized search filter to apply as
the default for all accounts of the same entity type. You cannot apply
filter defaults on a per-account basis, however, or on an Attachments
list opened from the Access menu
(because Access > Attachments
already provides a filtered view). Your filter default is unique to your
user code and does not affect other users' saved defaults. Even if you
create a filter default, you can still clear it an apply different filters
whenever you need to.

- Select the options you want to use as your filter defaults by doing
any of the following:
- Click the Filter
Defaults link label and select the Use as default checkbox on the Filter Defaults screen to
save your selected filters as the default for all accounts of the
same entity type.
- Click OK
to apply the filter default.
To clear a filter default, click the Clear
Filter link label, click the Filter Defaults link label, select
the checkbox(es)
to clear in the Filter Defaults
window, and click OK.
View Attachment Version
History
To review an attachment's version history, select the attachment in the list and click Access > Version
History in the menubar or options bar. The version history displays,
including the number of times the attachment has been changed, who made
the change(s), and when. Click on any attachment version listed to open
the document.
Attachment Preview
The first two pages of the selected attachment display in the Attachment Preview pane for the
following file types:
DOC
DOCX
GIF
GIFF
JPE
JPEG
JPG
MSG
PDF
PNG
PPT
PPTX
TXT
XLSM
XLSX
Attachment Preview only displays if you are using Applied Epic Browser
and your organization does not have Active Directory Authentication enabled
(that is, if you are prompted for a username and password when signing
in to Epic). Previews only display for attachments added within the last
18 months.
To toggle the pane on or off, click the Display/Hide Preview Pane link label
in the Attachments
header.
Select a Program to
Open TIF Files
Most attachments open automatically in their native program. However,
TIF files are not as common and may not have a default program associated.
If a TIF file does not open automatically, follow these steps to associate
the TIF file type to a specific program:
Note: Before
selecting a program, ensure that the program can open TIF files.
- Locate a TIF file
on you local drive (not in Applied Epic).
- Right-click on the file
and select Properties.
- A pop-up window displays Click the Change button.
- Windows Picture and Fax Viewer
defaults selected, but you can select a different program if you prefer.
- Click OK.
When you return to Epic and access the TIF file, it opens in the selected
program.
