- Locate
the account in question and access the Claims area.
- To access Accounts from the Home screen, do one of the following:
- Click Accounts on the navigation panel.
- Click Areas > Accounts on the menubar.
- Click the down arrow next to Home on the options bar and select Accounts.
- Click the Locate button on the options bar.
To access Accounts from another area of the program, do one of the following:
- Click Home > Accounts on the menubar.
- Click the down arrow next to Home on the options bar and select Accounts.
- Click the Locate button on the options bar.
- In the Locate account dropdown menu, select Client.
- Select
a Locate
by option from the dropdown menu.
You can access claim detail directly from the Account Locate screen by selecting the Claims: Additional Parties, Date of Loss, Insurer Claim #, or Internal Claim # option and double clicking on an item in your search results.
Note: Location by phone number searches all phone numbers associated with client and contact accounts (e.g., residential, mobile, fax). Select the suitable checkbox or checkboxes to the right.
- Insureds
- Prospects
- Active
- Inactive
- Enter the first few letters of the name, policy number, lookup code, etc. (depending on the selection in the Locate by dropdown list) and press [Enter] or click Locate.
- The Results list displays all of the accounts that match the criteria you entered. Click on a column heading to sort the list by that category. For example, click the Last Name column heading to sort by last name in ascending order. To sort in descending order, click the Last Name column heading again.
- Highlight the desired item in the Results list.
Do one of the following:
- Click Claims on the navigation panel.
- Click Areas > Claims on the menubar.
- A
list of claims for the selected account displays. Change
the claims that display in the list if necessary.
- To change the types of claims that display in the list, click the word Claims in the view filter.
A list of choices displays:
- All
- Open
- Closed
- Click
on the appropriate selection.
Use the search bar to display claims that meet specific criteria. Apply a single filter (using the search fields) or multiple filters (using the Edit Filter button ) to narrow the list of claims.
Selecting multiple criteria performs an "and" search (for example, claims with a specific Date of Loss and Loss Type).
- Click the Edit
Filter button .
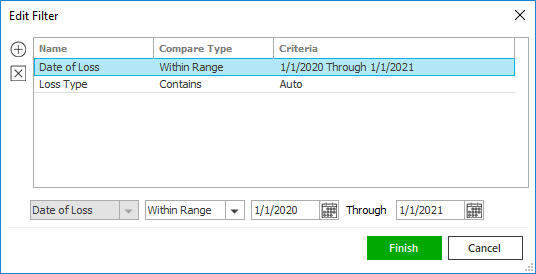
- The Edit Filter
pop-up window displays. Click the Add
button
 to add filters.
 - Select and/or enter search criteria
using the dropdown menus and fields. Click the Add
button again to apply additional filters. Enter additional
search criteria.
Click the Delete button to remove a filter from the list. - Click Finish
when you have applied all of your desired filters.
Hover over the Search where text to see the filter that is currently applied to the list.

To clear the currently applied filter (for the current session only) and start over, click the Clear Filter link label. The search bar displays in blue when filters are applied and in gray when filters are cleared.

- Make a selection in the first dropdown menu.
- The choices available in the second dropdown menu vary, depending on your selection in the first dropdown menu:
- Equals: Enter the search criterion (e.g., the full description) in the field to the right, or select a date from the dropdown calendar (if applicable).
- Contains: Enter at least one character of the search criterion (e.g., part of the description) in the field to the right.
- Within Range: Search between two calendar dates. Click the down arrow to the right of each field to choose dates from the dropdown calendars.
- Click Find
to apply the filter. Hover over the Search
where text to see the filter that is currently
applied to the list.
To clear the currently applied filter (for the current session only) and start over, click the Clear Filter link label. The search bar displays in blue when filters are applied and in gray when filters are cleared.
- Click the Edit
Filter button
To save your currently applied filters as a default for this client or all clients, create Filter Defaults. Filter defaults are unavailable on Claims lists opened from the Access menu, as Access > Claims already provides a filtered view.
Your filter defaults are unique to your user code and will not affect other users’ saved defaults.- Click the Filter Defaults link label.
- Select the Use
as default checkbox to save your selected filters
as the default for all clients that do not already
have a filter default saved.
Filters listed in italics (e.g., Insurer Claims #, Internal Claim #, Policy #) include search criteria that will not apply to all clients. These filters can only be saved as defaults for the selected client.
To replace existing filter defaults for all clients (including clients that already have other filter defaults saved), select the Override existing filters for clients checkbox. - Click OK to apply the filter
default.
To clear a filter default, click the Clear Filter link label, click the Filter Defaults link label, select the appropriate checkboxes in the Filter Defaults window, and click OK.
- The list displays
the claims for the selected customer. Click on a column
heading to sort the list by that category.
Note: You can access policies from the Account Detail screen in the same manner.
 on
the
on
the 
 to
the left of the list.
to
the left of the list. to the right of the field to choose a contact associated with the
account, click on the correct
to the right of the field to choose a contact associated with the
account, click on the correct  . You
are prompted, "Do you wish to delete this record?" Click
. You
are prompted, "Do you wish to delete this record?" Click
