- Locate
the customer in question and access the Proofs of Insurance
area.
- To access Accounts from the Home screen, do one of the
following:
- Click Accounts on the navigation panel.
- Click Areas > Accounts on the menubar.
- Click the down arrow next to Home on the options bar and select Accounts.
- Click Locate on the options bar.
To access Accounts from another area of the program, do one of the following:
- Click Home > Accounts on the menubar.
- Click the down arrow next to Home on the options bar and select Accounts.
- Click Locate on the options bar.
- In the Locate account dropdown menu, select Client.
- To access Accounts from the Home screen, do one of the
following:
- Click Binders under Proofs
of Insurance on the navigation panel.
Note: You can access binders from the Policies area by clicking Access > Proofs > Binders > Open Binders or Closed Binders on the options bar or menubar. - A list of binders for the selected customer displays.
Change the binders
that display in the list if necessary.
Use the search bar to display binders that meet specific criteria. Apply a single filter (using the search fields) or multiple filters (using the Edit Filter button
 ) to narrow the list
of binders.
) to narrow the list
of binders. Selecting multiple criteria performs an "and" search (for example, binders with an effective date range with a specific Line Type).
- Click the Edit
Filter button .
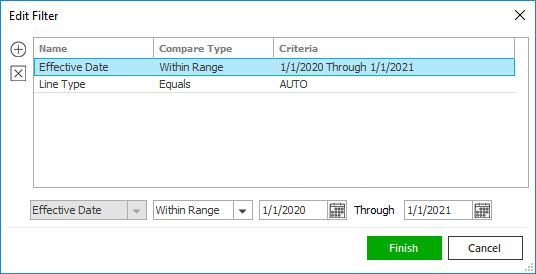
- The Edit Filter
pop-up window displays. Click the Add
button
 to add filters.
 - Select and/or enter search criteria
using the dropdown menus and fields. Click the Add button again to apply
additional filters. Enter additional search criteria.
Click the Delete button to remove a filter from the list. - Click Finish
when you have applied all of your desired filters.
Hover over the Search where text to see the filter that is currently applied to the list.

To clear the currently applied filter (for the current session only) and start over, click the Clear Filter link label. The search bar displays in blue when filters are applied and in gray when filters are cleared.

- Make a selection in the first dropdown menu.
- The choices available in the second dropdown menu vary, depending on your selection in the first dropdown menu:
- Equals: Enter the search criterion (e.g., the full description) in the field to the right, or select a date from the dropdown calendar (if applicable).
- Contains: Enter at least one character of the search criterion (e.g., part of the description) in the field to the right.
- Within Range: Search between two calendar dates. Click the down arrow to the right of each field to choose dates from the dropdown calendars.
- Click Find
to apply the filter. Hover over the Search
where text to see the filter that is currently
applied to the list.
To clear the currently applied filter (for the current session only) and start over, click the Clear Filter link label. The search bar displays in blue when filters are applied and in gray when filters are cleared.
- Click the Edit
Filter button
 or press
 .
The
.
The  to open a new email message from this screen.