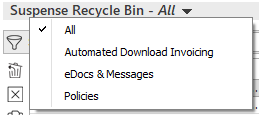
- To change the Recycle Bin items that display in the list, click the words Suspense Recycle Bin in the view filter and make a selection.

- Use the search bar to display recycle items that meet specific
criteria. Apply a single
filter (using the search fields) or multiple filters
(using the Edit Filter
button
 ).
).
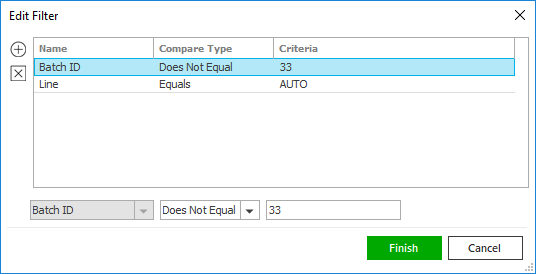
Selecting multiple criteria performs an "and" search (for example, downloads for a specific line of business that exclude a specific Batch ID).

- Click the Edit
Filter button
 .
. - The Edit Filter
pop-up window displays. Click the Add
button
 to add filters.
 - Select and/or enter your search criteria using
the dropdown menus and fields. Click Add to apply additional
filters, enter additional search criteria and continue
clicking Add.
Click the Delete button to remove a filter from the list. - Click Finish
when you have applied all of your desired filters.
Hover over the Search where text to see the filter that is currently applied to the list.

To clear the currently applied filter (for the current session only) and start over, click the Clear Filter link label. The search bar displays in blue when filters are applied and in gray when filters are cleared.

- Make a selection in the first dropdown menu.
- The choices available in the second dropdown menu vary, depending on your selection in the first dropdown menu:
- Equals: Enter the search criterion (e.g., the full account name) in the field to the right.
- Begins With: Enter at least the first character of the search criterion.
- Contains: Enter at least one character of the search criterion in the field to the right.
- Within Range: Search between two calendar dates. Click the down arrow to the right of each field to choose dates from the dropdown calendars.
- Does Not Equal: Enter the text (e.g. the Batch ID) that you want to exclude from your search in the field to the right.
Greater Than: Enter a number in the field on the right to display all items greater than that number.
Less Than: Enter a number in the field on the right to display all items less than that number.
Click Find to apply the filter. Hover over the Search where text to see the filter that is currently applied to the list.
To clear the currently applied filter (for the current session only) and start over, click the Clear Filter link label. The search bar displays in blue when filters are applied and in gray when filters are cleared.
- Click the Edit
Filter button
You can save your currently applied filters as Filter Defaults for the Suspense Recycle Bin. Your filter defaults are unique to your user code and will not affect other users’ saved defaults.
- Click the Filter Defaults link label and select the Use as default checkbox on the Filter Defaults screen.
Click OK to apply the filter default.
To clear a filter default, click the Clear Filter link label, click the Filter Defaults link label, select the appropriate checkboxes in the Filter Defaults window, and click OK.
- Click the Select Columns link label in the header bar.
- The Select Columns
window displays. Select the checkbox
next to each column that should be included in the list.
Deselect the checkbox next to each column that should be removed from the list. - Columns will display in the order in which they are listed.
To move a column up or down in the list, click the column, and then click the up arrow
 or down
arrow
  to change its position.
 - Click OK
or press [Enter]
to save your changes.
Click Cancel to close the window without saving your changes.
 .
.
 .
. .
Print the list as you would any other document. To export the list as
a CSV file (for example, if you want to apply additional sorting and filtering
to the list for other employees to review), select the