To learn more about this capability, click the Launch video button.
- Access
the General Ledger Activities area.
- To access General Ledger from the Home screen, do one of the following:
- Click General Ledger on the navigation panel.
- Click Areas > General Ledger on the menubar.
- Click the down arrow next to Home on the options bar and select General Ledger.
To access the General Ledger from another area of the program, do one of the following:
- Click Home > General Ledger on the menubar.
- Click the down arrow next to Home on the options bar and select General Ledger.
- To access GL Activities,
do one of the following:
- Click Activities on the navigation panel.
- Click Areas > Activities on the menubar.
- A
list of general ledger activities displays. Change
the activities that display in the list if necessary.
- A list of activities displays. To change the types of activities that display in the list, click the word Activities in the view filter.

A list of choices displays:
- Open
- Last Six Months
- Search
- Click on the appropriate selection.
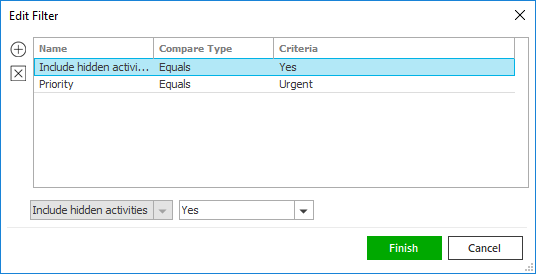
Use the search bar to display activities that meet specific criteria. Apply a single filter (using the search fields) or multiple filters (using the Edit Filter button
 ) to narrow the list
of activities.
 Selecting multiple criteria performs an "and" search (for example, hidden activities with a specific Priority).

- Click the Edit
Filter button
 .
. - The Edit Filter
pop-up window displays. Click the Add
button
 to add filters.
 - Select and/or enter search criteria
using the dropdown menus and fields. Click the Add
button again to apply additional filters. Enter additional
search criteria.
Click the Delete button to remove a filter from the list. - Click Finish
when you have applied all of your desired filters.
Hover over the Search where text to see the filter that is currently applied to the list.

To clear the currently applied filter (for the current session only) and start over, click the Clear Filter link label. The search bar displays in blue when filters are applied and in gray when filters are cleared.

- Make a selection in the first dropdown menu.
- The choices available in the second dropdown menu vary, depending on your selection in the first dropdown menu:
- Equals: Enter the search criterion (e.g., the full description) in the field to the right, or select a date from the dropdown calendar (if applicable).
- Contains: Enter at least one character of the search criterion (e.g., part of the description) in the field to the right.
- Within Range: Search between two calendar dates. Click the down arrow to the right of each field to choose dates from the dropdown calendars.
- Yes/No: Opt to include or exclude hidden activities when you select Include hidden activities in the first dropdown.
Open activities defined as Hidden display in the Activities – Open list by default. However, you must use the Include hidden activities search filter to view closed hidden activities in the Activities – Closed list.
- Click Find
to apply the filter. Hover over the Search
where text to see the filter that is currently
applied to the list.
To clear the currently applied filter (for the current session only) and start over, click the Clear Filter link label. The search bar displays in blue when filters are applied and in gray when filters are cleared.
- You can change
the columns that display in the list if necessary.
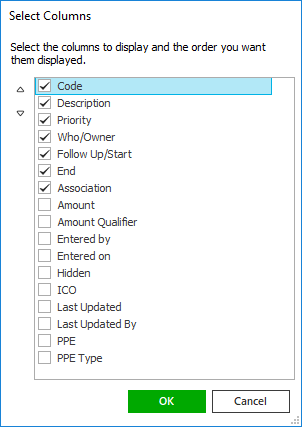
- Click the Select Columns link label on the right side of the header bar.
The Select Columns window displays.
- Select the checkbox next to each column that should be included in the list.
Deselect the checkbox next to each column that should be removed from the list.

- Columns will display in the order in which they are listed.
In the example above, Code
would be the first column and Association
would be the last. To move a column up or down in the list,
click the column
and then click the up
arrow
 or
down
arrow
  to
change its position.
 - Click OK or press [Enter] to save your changes.
Click Cancel to close the window without saving your changes.
 .
. to open the
 to the left of the Notes
list.