Access the Reconciliations area.
- To access the General Ledger from the Home screen, do one of the following:
- Click General Ledger on the navigation panel.
- Click Areas > General Ledger on the menubar.
- Click the down arrow next to Home on the options bar and select General Ledger.
To access the General Ledger from another area of the program, do one of the following:
- Click Home > General Ledger on the menubar.
- Click the down arrow next to Home on the options bar and select General Ledger.
- Click Reconciliations on the navigation panel or Areas > Reconciliations on the menubar.
Click Bank under Reconciliations on the navigation panel.
The Bank Reconciliation screen displays. Change the reconciliations that display in the list if necessary.
- You can filter the list by specifying search criteria. To change the reconciliations that display in the list, click the words Bank Reconciliation in the view filter.
Three choices display:
- Suspended
- Search
- Last Six Months
Click on the appropriate selection.
- If you select Search, make a selection in each dropdown menu in the Search where area to locate the desired reconciliation. The fields vary, depending on the menu options you choose.

These are the choices in the first dropdown menu:
- Bank Account
- Entered Date
- Statement #
- Statement Date
- Statement Ending Balance
The choices available in the second dropdown menu vary, depending on the selection you made in the first dropdown.
- Equals: Enter the search criterion (e.g., the bank account or entered date) in the field to the right, or select the correct date from the dropdown calendar (if applicable). Click Find.
- Within Range: Search between two calendar dates. Click the down arrow to the right of each field to choose dates from the dropdown calendars. Click Find.
- Greater Than: Enter an amount in the field on the right and click Find to display all reconciliations with a Statement Ending Balance greater than that amount. If you enter 100.00, for example, items with a balance of 100.01 or more display.
- Less Than: Enter an amount in the field on the right and click Find to display all reconciliations with a Statement Ending Balance less than that amount. If you enter 100.00, for example, items with a balance of 99.99 or less display.
To see the filter that is currently applied to the list, hover over the Search where text.
You can apply multiple filters if necessary.
- To apply multiple filters to the list, do one of the following:
- Click the Edit
Filter button
 .
. - Press [Ctrl] + E.
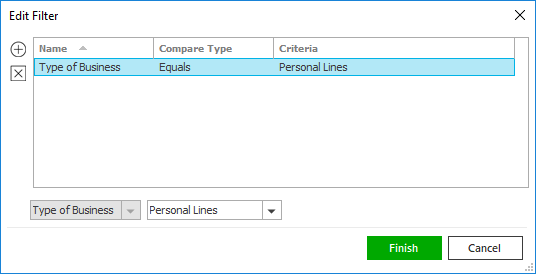
- The Edit
Filter pop-up window displays.
Note: You can also use the Edit Filter button, rather than the search bar, to apply a single filter to the list if you prefer.

- Select and/or enter your desired search criteria using the dropdown menus and fields, and then click the Add button. The Name, Compare Type, and Criteria for your filter display in the list. Click one of these column headings to sort the list by that column. To reverse the sort order, click the column heading again.
- To apply additional filters, enter additional search criteria and continue clicking Add. To remove a filter from the list, select it and click the Delete button.
- Click Finish
when you have applied all of your desired filters.
To exit the dialog without applying any filters, click Cancel.

 ,
,  , and
, and  buttons to specify the number
of pages that should display on the screen.