Automated Download Invoicing (ADI) enables you to invoice various transactions received from the company daily download. ADI saves time and provides you with accurate, automatic invoicing that matches the company accounting records.
ADI automatically invoices HOME and AUTO transactions received from a company download.
When you process data received from a company to update your policy and application details, an invoice for each transaction received is created and then processed when you choose to do so. ADI can invoice all transactions: Renewal, New Business, Endorsement, Reissue, etc. It can process Direct Bill and/or Agency Bill transactions.
The Initial Setup and Company Setup procedures enable you to have full control of what should and should not be invoiced. Before you perform the setup, examine the different levels of options that are available to you.
The first level of options determines how you want CSIO transactions translated in TAM. For instance, if you receive an RWL (renewal transaction) in a download, you must select the equivalent transaction code in TAM. You can define up to nine different transaction codes.
There are also certain pre-classifications that have been defined. Companies may send a number of transaction codes for various reasons, but for the agency and from an accounting point of view, they are invoiced using a single transaction code in TAM. There are also a number of transaction codes may be received, but not all of them have an accounting impact.
The following is a list of the transactions for which an invoice may be created. You must assign a TAM transaction code to use in the invoice.
| Transaction | TAM Transaction Code |
| NBS New Business | New Business code in TAM |
| RWL Renewal | Renewal code in TAM |
| REW Rewrite | Rewrite code in TAM |
| PCH Policy Change | Changed/Endorsed code in TAM. Usually two codes are used, such as +EN and -EN |
| RIX Reissue | Reissue Code in TAM |
| REI Reinstatement | Reinstatement |
| XLC Cancellation Confirmation | Cancellation code in TAM |
You must select the companies you want to invoice using ADI. You may decide to use ADI for some of your companies or for all of them. For each company, you must select what you want invoiced.
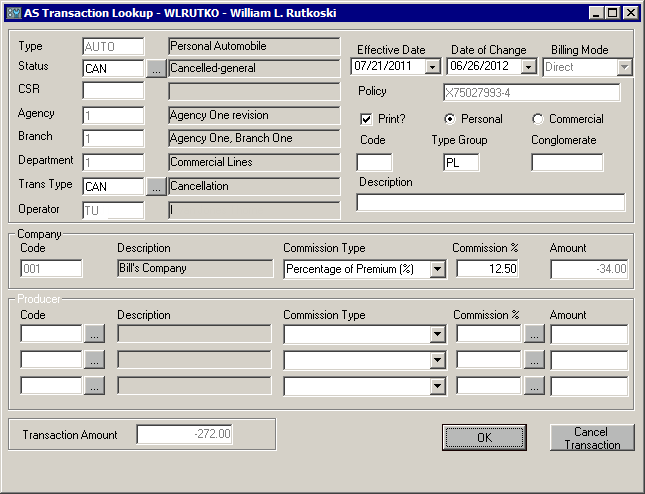
Before you begin, you must make sure that in Company File Interface Setup, on the Download Options tab, Update premiums on billing screen for the chosen policy types is not checked. Otherwise, when you create an invoice or when an invoice is generated through Automated Download Invoicing, the change to the premium occurs twice.
Note: For a New Business, it is important to create the billing screen before it is automatically generated by the Interface module. This is to make sure that it contains the right data, such as the Producer Code and Department. Transactions cannot be added without a department selected on the Policy Detail screen.
Use the following steps to set up Automated Download Invoicing, and then complete the Company Setup for each company for which you create invoices.
For each company, you must select a billing type in order to create invoices for Agency Bill and/or Direct Bill transactions. Double click in the Billing Type field and make the appropriate selection: Invoice Direct Bill, Invoice Agency Bill, or Both. Click OK.
Based on the company transaction received, the system invoices in the proper mode. If, prior to the download, the billing screen is Agency Bill type and the company sends a Direct Bill transaction, the program changes the billing screen to Direct Bill mode.
Note: For the Direct Bill mode, the system does not print the invoice in the Close-Day procedure. If you are using Direct Bill Commission Download or if Record Commissions is your Direct Bill Commission Reconciliation method, it is recommended that you do not use ADI for Direct Bill items.
Choose the desired Premium Option:
Full Term
Once all your setups are complete, use the following steps to run Automated Download Invoicing.
Note: If you add a company to the automatic invoicing process, you must revise the company's setup before you begin the invoicing process. When you click the Invoice button, the program filters all the incoming transactions and rejects all the transactions that do not meet all the conditions. This means that all the transactions for a particular company could be rejected and there would be no way to retrieve them.
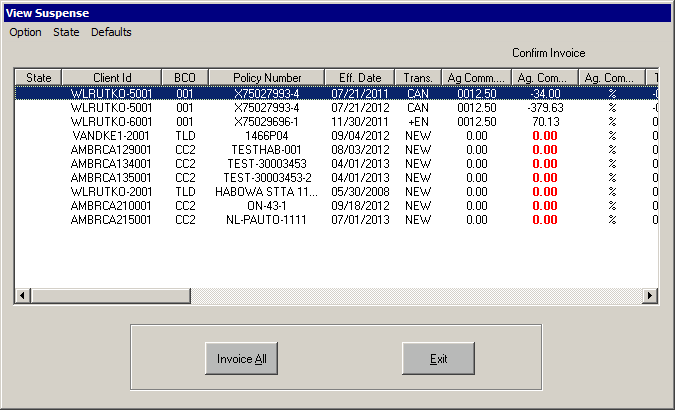
You can process invoices using one of two modes: Batch mode and Confirm mode.
On this screen, you may enter a Description that overwrites the default that has been defined in TAM for the Transaction Type (Trans Type).
If you do not want to print the invoice during Close-Day, deselect the Print check box.
When you are done reviewing or making changes, click OK to move to the next invoice.
If you click Cancel, you advance to the next transaction. The transaction that was skipped is not deleted, but is presented again in your next session. If your next session is processed in batch mode, the invoice will be created.
Once all the transactions are processed, a message displays to confirm completion.
Click the View Log button to display the Rejection Log and Success Log.
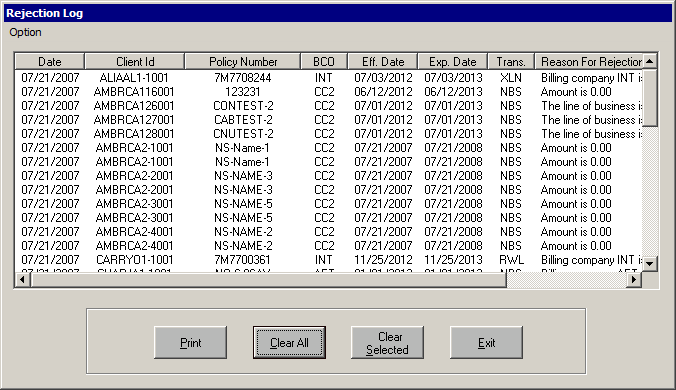
When you click the View Log button, the Rejection Log displays by default. This log lists all transactions that were rejected from the received download and the reasons for rejection. To switch to the Success Log, from the Option menu, select Success Log.
The transactions display in the Success Log or the Rejection Log in the order in which they were invoiced or rejected. To sort the lists by column headings, click the desired column heading.
In both log screens, there are three more options available to you:
Please note that there are no changes in the download workflow to incorporate ADI with your daily download. However, it must be noted that specific exceptions exist for this process to function as required.
If a problem occurs during the download, do not attempt another session. Log a Support call immediately. Ensure that a pack is not turned on for that night in case Support is unable to contact you the same day. Any errors received on the screen (e.g., internal errors stopping download completely, red box messages indicating an error exists, etc.) require a Support call. Failure to do so may result in multiple/inaccurate invoicing when ADI is run.
ADI can be discontinued at any time by selecting the Disable Automatic Download checkbox on the main screen. Once checked, the download continues to process, but no transactions are created from the download.