Close an Activity
When activity entries no longer require further action, they are closed. Activity entries are closed in one of two ways: Successfully or Unsuccessfully. By marking the item as Successful, you indicate that the activity to which the entry relates yielded the desired results. Marking the item as Unsuccessful indicates that the activity to which the entry relates did not produce the desired results. The steps below describe how to close activity entries using either of these options.
Closed Successfully
- From Home Base, click Clients & Files.
- Select the appropriate entity type from the dropdown list and highlight the appropriate entity in the list.
- Click the Activity List button on the button bar.
- Highlight the open activity item in the Activity List.
- Click Options and hover over Close Successfully.
- Choose one of the following sub-options from the list, and click the link below to jump to the next set of steps:
This Item Complete
Use this option if the entry is closed and the subject of the entry requires no further action.
Yes to update the Activity Detail screen.
Expiration Date
Select this option to close the current entry and create a new entry linked to the expiration date of the policy. This entry prompts you to follow up on the policy in question on or near the time the policy is due to expire. For example, if a prospect is interested in a coverage but already has a policy in place, file this type of entry so you are reminded to follow up with the prospect near the expiration date of his current policy.
- Click Yes to update the Activity Detail screen.
- Enter the appropriate information on the Activity Detail screen for the new activity (including policy type and follow-up date).
- Click OK on the Activity Detail screen and click Yes on the Activity screen to file the new entry.
Appointment
Select this option to close the current entry successfully and create a new appointment entry.
- Click Yes to update the Activity Detail screen.
- Enter the appropriate information on the Activity Detail screen for the new appointment activity.
- Click OK on the Activity Detail screen and click Yes on the Activity screen to file the new entry. The entry reminds you to follow up on the appointment date.
Gathering Data
Select this option to close the current entry and advance it to a new entry that indicates you must gather data regarding the subject of the original entry. Use this option when a prospect responds to a solicitation, and a company must be contacted regarding the availability of a coverage.
- Click Yes to update the Activity Detail screen.
- Enter the appropriate information on the Activity Detail screen for the new gathering data activity.
- Click OK on the Activity Detail screen and click Yes on the Activity screen to file the new entry.
App Submission
Select this option to close the current entry successfully and create a new application entry. This entry type allows you to edit the application immediately.
- Click Yes to confirm that you want to update the Activity Detail screen.
- Enter the appropriate information on the New Activity Detail screen.
- Click OK on the Activity Detail screen and click Yes to revise the record.
- You are prompted: Do you wish to jump to associated area now?
Click No if you are not submitting the application at this time. The new activity entry is filed.
Click Yes to edit an application now.
- Click the policy that corresponds to the application to edit and click OK. The program calls the appropriate CSIO application. Once the application has been edited and filed, the new activity entry is filed.
Quoting
Select this option to close the current entry successfully and create a new entry indicating that a premium quote is being generated.
- Click Yes to update the Activity Detail screen.
- Enter the appropriate information on the Activity Detail screen for the new activity.
- Click OK on the Activity Detail screen and click Yes to revise the record.
- You are prompted: Do you wish to jump to associated area now?
Choose No if you are not generating a premium quote at this time. The new activity entry is filed.
Choose Yes to generate a premium quote now. The Policy Selection screen displays.
- Click the policy that corresponds to the premium quote to generate and click OK.
- Use the radio buttons on the left to specify whether the quote is a Current or Future quote.
- Use the radio buttons on the right to choose one of the following options:
- Recall Stored Quote: Access a stored quote from the quote file.
- Quote Existing Policy/App: Add a new quote for an existing policy or application.
- New Quote: Add a basic quote using only name and address information (no application exists).
Proposal
Select this option to close the current entry successfully and create a new entry indicating that a proposal has been sent.
- Click Yes to update the Activity Detail screen.
- Enter the appropriate information on the Activity Detail screen for the new activity.
- Click OK on the Activity Detail screen and click Yes to revise the record.
- You are prompted: Do you wish to jump to associated area now?
If you do not want to generate a proposal at this time, click No. The new activity entry is filed.
To generate a proposal now, click Yes. The Proposal screen displays.
- Select the desired proposal in the Proposal Setups list.
- Select the desired documents to include with the proposal in the Documents list.
Note: Click Select All or Select None to include all documents or none of the documents in the proposal.
- Click OK. The proposal opens in Word. Edit or print the proposal as desired, then save it before exiting Word.
Memo
Select this option to close the current entry successfully and create a new memo.
- Click Yes to confirm you want to update the Activity Detail screen.
- Enter the appropriate information on the Activity Detail screen for the new activity.
- Click OK on the Activity Detail screen and click Yes on the Activity screen.
- You are prompted: Do you wish to jump to associated area now?
If you do not want to create a memo at this time, click No. The new activity entry is filed.
To create the memo now, refer to Add a Memo.
Word
Use this option to Queue a formletter or Edit a Merged formletter.
Queue a Formletter
- Select Queue a formletter.
- Click Yes to revise the record.
- Enter the appropriate information on the New Activity Detail screen.
- Click OK and click Yes to revise the record.
- You are prompted: Do you wish to jump to associated area now? Click Yes.
- To associate the formletter with a policy, click the Selected Policy radio button in the Associations frame and select the policy from the list. In the Documents frame, click the formletter to be queued. To view the letter first in Microsoft Word Viewer, click Preview. Close Microsoft Word Viewer and click OK.
Word opens, the letter merges, and the following screen displays:
")
- Click the checkboxes to create an activity or attach the letter to a policy. Click OK. If you create an activity, the Activity Detail screen displays. Complete the Activity Detail screen and click OK.
Edit Merged Formletter
- Select Edit Merged formletter.
- You are prompted: OK to revise record? Click Yes to update the Activity Detail screen.
- Enter the appropriate information on the Activity Detail screen for the new activity.
- Click OK on the Activity Detail screen and click Yes on the Activity screen.
- You are prompted: Do you wish to jump to associated area now? Click Yes to access the Formletter screen.
- To associate the formletter with a policy, click the Selected Policy radio button in the Associations frame and select the policy from the list. In the Documents frame, click the formletter to be edited. To view the letter first in Microsoft Word Viewer, click Preview. Close Microsoft Word Viewer, and click OK. The formletter opens in Word. Edit the formletter as desired, and then save it in Word.
Sale Made
Select this option to close the current entry successfully and create a new entry indicating that a sale was made. An Activity screen appears. Generally, this option is used after a proposal has been accepted by a prospect. The current entry is closed successfully and a new entry is filed indicating that the sale has been made.
- You are prompted: OK to revise record? Click Yes to update the Activity Detail screen.
- Enter the appropriate information on the Activity Detail screen for the new activity.
- Click OK on the Activity Detail screen and click Yes on the Activity screen. The old activity item is closed and the new activity item is filed.
Other
Use this option to select an activity category from the list of installed categories. Once you have selected an activity category, you may revise the entry.
- You are prompted: OK to revise record? Click Yes to update the Activity Detail screen. The following screen displays:
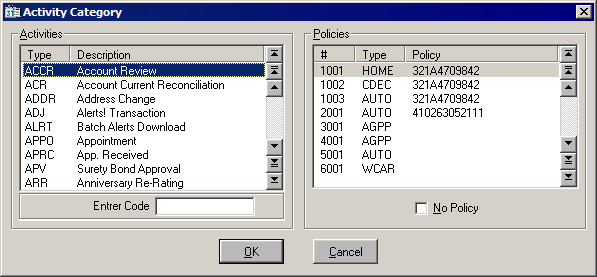
- Select the desired activity code from the list on the left side of the screen. Locate an activity code by using the scroll bars or arrow keys to move up and down. Type the first few characters of the activity code in the Enter Code field to jump to the closest match.
- Click the policy with which the activity item is associated. Locate the policy by using the scroll bars or arrow keys to move up and down. If the activity item is not associated with a specific policy, click the No Policy box.
- Click OK. The Activity Detail screen displays. Enter or revise the information in each field as it applies to the new activity item.
- Click OK on the Activity Detail screen and click Yes to revise the record. The old activity item is closed and the new activity item is filed.
Closed Unsuccessfully
- Highlight the open activity item in the Activity List.
- Click Options and select Closed Unsuccessfully. The following screen displays:
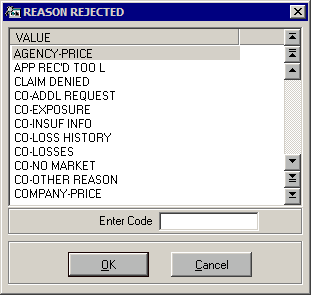
- Select the Reason Rejected code from the list. Locate a rejection code by using the scroll bars or cursor keys to move up and down. Type the first few characters of the rejection code in the Enter Code field to jump to the closest match.
- Click OK. The Activity Detail screen appears with the Rejection Reason Code defaulted in the Reference field at the bottom. The No radio button is selected in the Open frame, and the No radio button is selected by default in the Successful frame.
- Enter or revise the information in each field as it applies to the activity item.
- Click OK on the Activity Detail screen and click Yes on the Activity screen. The activity item is closed and classified as Unsuccessful.
If you are sending a second activity request, close the first request as Unsuccessful and add a new activity with a future Follow-Up Date.
Depending upon the security access rights, revisions to the Activity Detail screen may not be allowed after you click OK.