TAM Word Interface
The TAM document system pulls all requested data into Word. Much of the editing process requires knowledge of Word procedures and features.
Please check the Applied Compatibility Grid to ensure compatibility with your version of Microsoft Office.
The integration of TAM and Word is accomplished via the Word Integration interface. In Word, the Word Integration interface is located under Add-ins, Applied. When accessing documents from different parts of the program, the Word Integration interface performs different functions.
The Word Integration Interface in Document Setup
Word Applied Menu:
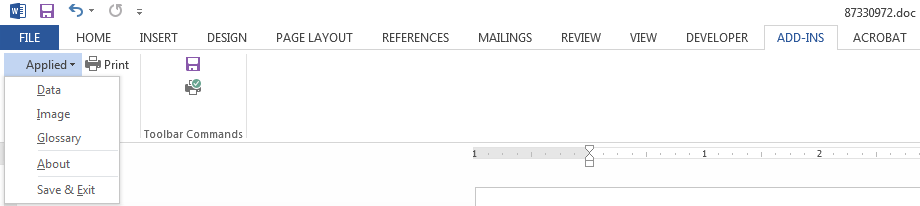
- Data: Inserts TAM data fields into the document.
- Ask Variable: Inserts ask variables (questions that prompt you to enter information when the document is merged).
- If Statement: Inserts conditional (if) statements into the document.
- Glossary: Inserts prewritten definitions of common insurance terms.
- Replicate Commands: Creates a list of scheduled fields inside formletters and proposals.
- Save & Exit: Saves changes to the document and closes it.
Inserting TAM Data Fields
- Highlight Data to insert TAM data into the document.
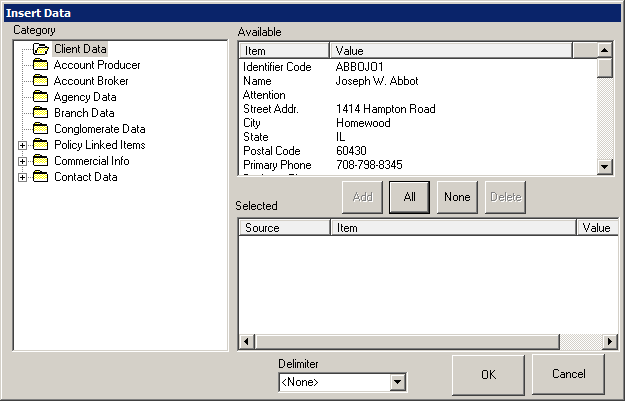
- Choose the appropriate folder to select data from one of the listed categories. When a folder is selected, a list containing fields of that type displays in the Available pane.
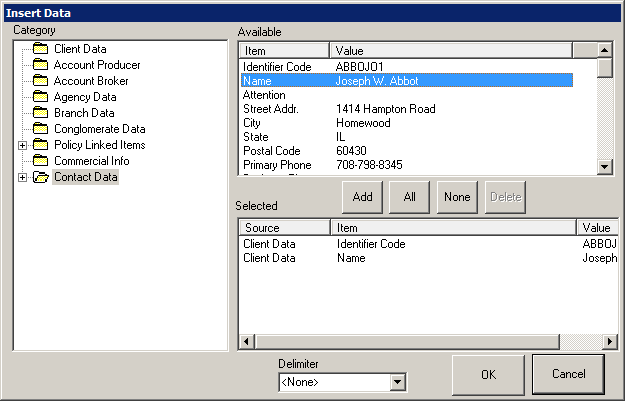
- In the Available list, click the field and click Add, or double click the field's description. Hold the [Shift] key while selecting multiple fields. When you click Add, all selected fields are added to the Selected list. The Select All and Select None buttons select all or none of the fields on the list. The fields are inserted into the document when you click the Insert button.
To remove a field from the Selected pane before inserting, use the same procedures as for adding a field, using the Delete button instead of the Add button.
- Click OK. The selected field or fields are inserted wherever your insertion point (cursor) is positioned in the document. Once a field is inserted, you can move it around in the document like any other piece of text.
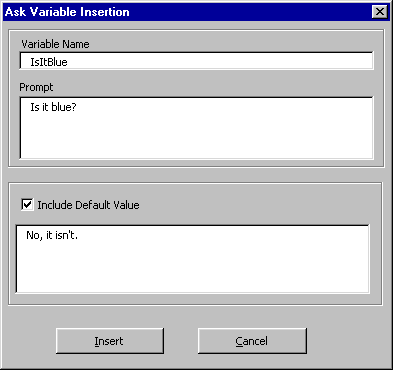
Ask Variables
If you insert an ask variable into a document, anyone who merges that document is asked a question for which he or she must provide an answer before the document displays. The answer is entered into the document wherever the variable is located.
Note: An ask variable cannot be the first line in a TAM document. This may cause errors during the merge process.
- To insert an ask variable, click the Ask Variable button.
-
Type the following information in the fields:
- Variable Name: Assign a name to the variable. Enter the name of the variable without spaces, for example, IsItBlue.
- Prompt: This is the question that is asked when merging. Enter what a user should see when adding a formletter for example, Is it blue?
- Include Default Value: This is optional. Check the box and enter information only if the response is to be defaulted. The person merging the document can press [Enter] to insert the default value to answer the prompt.
- Click Insert to insert the ask variable at the current location of the insertion point or Cancel to abort entering the ask variable fields. When you insert the ask variable, TAM presents the question. Click OK to complete the process.
Note: The ask variable field does not normally appear in the document. Pressing [ALT]+[F9] toggles between showing or hiding the ask variable fields. To show all ask variable fields in the document in Word, click the Microsoft Office button  , and then click Word Options. Select Advanced. Under Show Document Content, click Show field codes instead of their values.
Conditional Statements (If Statements)
- Click the If Statement button to insert an if statement into the document.
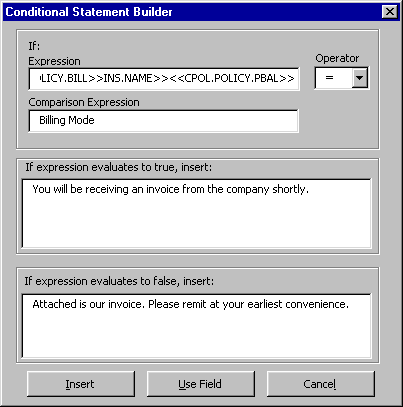
- The Use Field button allows you to enter a TAM Field anywhere in this box. (You can type the field name manually as well.) Position the insertion point where you want the field and click Use Field. The Insert Data Category screen displays.
- Select the applicable data Category folder.
- From the fields Available list, select the applicable field.
- Click Add and click OK.
- Click the down arrow in the Operator field and select the applicable operator.
- Enter the Comparison Expression manually or click Use Field to select from the list.
- In the If expression evaluates to true, insert text box, enter a statement to merge into the formletter if the expression is true; for example, You will be receiving an invoice from the company shortly.
- In the If expression evaluates to false, insert: text box, type a statement to merge into the formletter if expression is false; for example, Attached is our invoice. Please remit at your earliest convenience.
- When the conditional statement is set up correctly, click Insert to insert it at the current location of the insertion point in the document.
Note: The conditional statement field does not normally appear in the document. To show all conditional statement fields in the document, press [ALT]+[F9]. This toggles between showing and hiding the conditional statement fields.
Replicate Commands
- Place the cursor at the point in the document where a replicate command should be inserted.
- Click the Add-Ins tab and then Replicate Command.
- A pair of begin {BEGINREP} and end {ENDREP} replicate commands are inserted into the document. You can put any schedule field inside the begin and end pair to make that data available from your application.
- If you apply special formatting, such as bold text, to a replicate section, you must format the BEGINREP and ENDREP commands themselves with the same formatting. Begin your text selection on the line before the replicate command and extend it to the line following the ENDREP command. Because of the format in which proposal documents are stored, failure to encompass both commands makes it difficult for Word to determine where the replicate section begins and ends.
Inserting Insurance Term Definitions
- Click the Applied menu and select Glossary to insert an insurance term definition into the document.
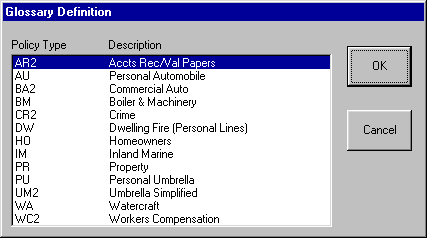
- Click the appropriate policy type and click OK.
- The Glossary Definitions window contains the available terms for the policy type you selected. Select the term to insert and click OK. The Glossary Description screen displays.
- Review the definition before inserting it. To insert only part of the definition, highlight the desired section using the mouse. If this is not the definition you want, click Cancel to return to the Glossary Definition Selection window or Abort to return to your document without entering a term. Click Insert to insert the definition into the document at the current location of the insertion point (cursor).
Note: The definitions included with the system currently cannot be edited, nor can new definitions be added by the user.
Performing Calculations on TAM Data Fields
Word's calculation functions can be used in conjunction with TAM data fields. Refer to Word's on-line Help for details on using the calculation functions.
The following is an example of calculating the net premium using the TAM policy data fields for Commission Amount ({DOCVARIABLE CPOL.POLICY.CO_AMT}) and Premium ({DOCVARIABLE CPOL.POLICY.PREM}).
- Open the master document through Utilities/Document Setup, and position the insertion point where you want the calculation to appear in the document.
- Press [CTRL]+[F9]. This inserts the curly braces used for Word fields. DO NOT type in curly braces using the keyboard. Your insertion point appears between the curly braces.
- Type the = and then click the Data icon in the Word Integration interface. Find the fields that you would like to insert, in this case Commission Amount ({DOCVARIABLE CPOL.POLICY.CO_AMT}) and Premium ({DOCVARIABLE CPOL.POLICY.PREM}). The equation field disappears when you do this. Press [ALT]+[F9] to display it again.
The following complete equation appears:
{ = {DOCVARIABLE CPOL.POLICY.PREM}- {DOCVARIABLE CPOL.POLICY.CO_AMT}}
When this document merges, Word subtracts the commission amount from the premium and displays the result.
The Word Integration Interface at the Client/File Level
At the Client/File level, the Word Integration interface is the Applied menu as it was in Document Setup.
Word:
Three of the options from the Word Integration interface in Document Setup are the same here: Data, Glossary, and Save & Exit. One additional option is present: Image. This option allows you to insert an image that is attached to the Client/File into the document.
If Save & Exit is selected, you are prompted: "Do you want to save the changes made to the current document?"
- If you click No, the merged document is not saved and you return to TAM.
- If you click Yes, the following options display.
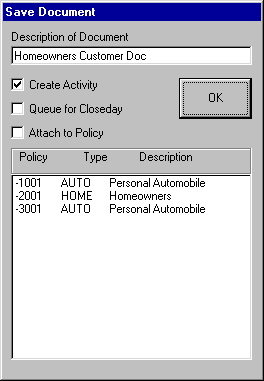
The Document Description can (and should) be edited. It can also be changed any time you revise the document in the future. This is the description that appears on the Document list.
If you select Queue for Close-Day, the Select Close-day Letter Batch screen displays. Select the letter batch with which to include the document. Click OK.