Company File
The information entered in the Company file enables you to send and receive information electronically in batch mode. The information contained in the Company file is used to match incoming data with existing policies in TAM and to send outgoing data to companies.
Before you send or receive data, you must add or revise Company Detail information for each company with which you interface. After the company information is set up, use Company File Interface Setup to electronically transmit information.
Add or Revise Company Information
Use the following steps to enter Company file information.
- At Home Baser, click Clients & Files.
- From the dropdown menu above the list, select Companies.
- To view or revise information for an existing company, type the company code in the Enter Code field and click Detail, or use the scroll bar to highlight and double click a company name. The Company Detail screen displays.
To enter a new company, click Add above the Companies screen. Enter the company code and click OK. The New Company Detail screen displays.
When creating a new company, it is important to know that TAM is able to differentiate between the following three types of companies:
- Issuing Company: Underwrites coverage and displays on policies and ACORD forms. The interface aspects of TAM focus on the issuing company. The issuing company is used to match in a download. The issuing company is also associated with all policy processing functions on the system. The billing screen identifies this code in the ICO field.
- Billing Company: A company that typically does not underwrite the coverage. Usually, the billing company is the parent company for one or more issuing companies that underwrite coverage. The company collects premiums and handles account functions. The billing screen identifies this company code in the BCO field.
- Master Company: Used to identify the relationships between issuing and billing companies of a conglomerate. This code is not displayed on the billing screen. The master company code is filed internally with claims, accounting transactions, and policies. It allows the Claim, Book-of-Business, and Production reports to consolidate figures for the billing and issuing companies of a conglomerate into a single total.
- Enter or revise the following company information as desired.
- Name: Company's name
- Attn: Extension of name or additional address line
- Street: Street address (company's main address—this address prints on CSIO forms)
- City: City of residence
- State: State of residence
- Zip: Zip code
- Email: Company's email address
- Phone: Phone number
- Fax: Fax number
- Notes: Miscellaneous notes
- Company #: Company's client number
- Company Type
-
- Click Carrier if company issues paper, underwrites coverage, or appears on policies and ACORD forms.
- Click Broker if coverage was placed through another agent. Select Regular or Excess/Surplus to define the type of business the broker writes.
Note: This information is stored for reference only.
-
- Billing: Billing company code and description
- Master: Parent company of several associated companies (e.g., Travelers is the master company of Aetna)
- Allow at Billing Screen: Select this checkbox to allow the use of the three-digit company code on the insured's billing screen. This option is usually checked. You may want to uncheck this box in cases where a contract with a company has been terminated but transactions for the company remain in the system.
- Agency Code: Agency Code number assigned to the agency by the company. This information prints on ACORD applications, Account Current Reports, and Company Memos. To enter additional codes, click the Options button and select Agency Codes. (See Company File, Options Button.)
- Best's Rating: Best's company rating (for reference only)
- Foreign Code: Free-form field indicating whether or not the company is International. Enter if company writes business in countries other than U.S. (for reference only).
- NAIC Code: The National Association of Insurance Commissioners (NAIC) code is used for matching download data to the correct company. To enter additional codes, click the Options button and select Company Addresses. (See Company File, Options Button.)
- Pay Mode: Company Pay Mode (Company Statement or Agency Account Current)
- Installments
-
- Use Pennies: Select Use Pennies if you do not want to round the amount processed for installments.
- No Pennies, Add to 1st: Select No Pennies, Add to 1st if you want to round installments to the nearest dollar and add the remaining amount to first installment. For example, if the installments equal $62.50 per month for a year, TAM bills the customer $62.00 each month and adds $6.00 ($0.50 *12 months) to the first installment.
- No Pennies, Add to Last: Select No Pennies, Add to Last if you want to round installments to the nearest dollar and add the remaining amount to last installment.
- Bill Modes: Company Bill Modes (Direct and Agency)
- Commission: Company commission (Percent or Flat Amt.)
To enter a percentage of the total commission earned on a policy, click Options and select Commission Defaults.
- Pay on: Day of each month the company is paid (for reference only)
- Click OK to save all additions or revisions to the Company Detail screen.
To view the options available from the Company Detail screen, Click Options.
To abort editing or viewing Company Detail and return to the Companies screen, click Cancel.
Options
Use the Options menu to further define company information that affects the batch download processes.
Company Address
Use Company Address to enter NAIC codes required for a specific company. Use the following steps to access this option.
- At Home Base of The Agency Manager, click the Clients & Files button.
- From the dropdown menu above the list, select Companies.
- Select the desired company.
- Click Options and select Company Address.
- To add an NAIC code to an existing address in the Company Address List, double click the address to open the Company Address Detail.
To enter a new address (including NAIC code) or a new NAIC code for an existing company, click the Add button above the Companies screen to open the New Company Address Detail.
If you are entering additional NAIC codes for a company, it is not necessary to enter the entire address on subsequent Company Address Detail screens; the subsidiary Name is sufficient. Double click inside the Name field to select the subsidiary name from a list.
- Enter the NAIC code and any other necessary information into the Company Address Detail fields.
- Click OK to save and exit.
Note: Never use the same NAIC code for more than one company.
Commission Defaults
Use the following steps to set company commission defaults.
- At Home Base, click Clients & Files.
- From the dropdown menu above the list, select Companies.
- On the Company List screen, select the company.
- Click Options and select Commission Defaults. The Commission Default List screen appears.
- Click the Add button below the button bar. The New Commission Default Detail window displays.
- Select the Bill Mode.
- Select the Policy Type. Choose All Policies if the company uses the same commission for any policy or Selected Policy if commission varies from policy to policy.
- Select the Commission Default.
- In the Description fields on the right side of the screen, enter commission type descriptions (for example, New Business, Renewal Business, or Rewritten Business).
When you enter a description, the Amount field beside it becomes enabled. Enter the commission amount for that commission type.
Do this for each commission type and amount. You may enter up to twelve.
- When you are finished making selections, click OK.
Agency Codes
This option allows the input of additional codes required by some companies to recognize an agency. Use the following steps to enter agency codes used in transferring data to and from companies.
- From Home Base, click the Clients & Files button.
- From the dropdown menu above the list, select Companies.
- Highlight a company name and click Options.
- Click Agency Codes.
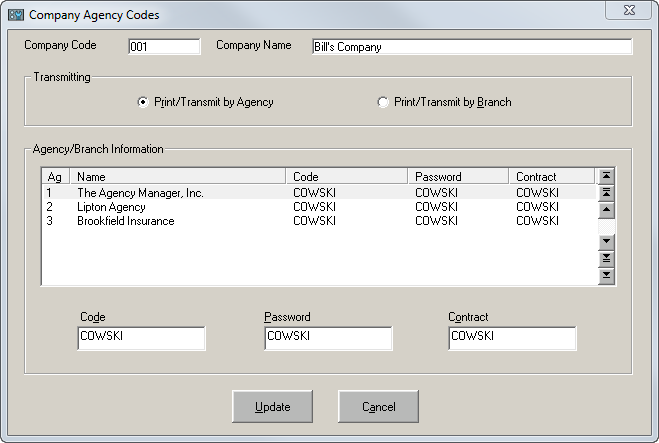
- In the Agency/Branch Information list, select the agency or branch whose code you want to assign. If only one agency is installed, it is selected for you.
If more than one agency exists, you may enter a code for each agency. If branches are installed, you may differentiate between the branches of a given agency.
- Click the desired radio button to Print/Transmit by Agency or Print/Transmit by Branch.
- Enter the agency Code.
- The use of a password is determined by each company. Most companies do not require a password, so the Password field on this screen is usually left blank. If the company provides one, enter the password in the Password field.
- Enter the Contract number, which must be entered for an agency to download. The contract number is always the same as the agency code.
- Click Update, then click Yes to save.
- Click Cancel to exit.
Once you have finished setting up the Company file, you are ready to proceed to Company File Interface Setup.
