- Locate the
account in question and access the Activities area.
To access Accounts from the Home screen, do one of the following:
Click Accounts on the navigation panel.
Click Areas > Accounts on the menubar.
Click the down arrow next to Home on the options bar and select Accounts.
Click Locate on the options bar.
To access Accounts from another area of the program, do one of the following:
Click Home > Accounts on the menubar.
Click the down arrow next to Home on the options bar and select Accounts.
Click Locate on the options bar.
- In the Locate account dropdown menu, select Broker, Client, Company, Employee, Finance Company, Other Interest, or Vendor.
- In the Locate by
dropdown menu, select the appropriate option.
Note: Location by phone number searches all phone numbers associated with client and contact accounts (e.g., residential, mobile, fax). - Select the
suitable checkbox
or checkboxes
to the right.
Insureds (available only if Clients is selected in the Locate Account field)
Prospects (available only if Clients is selected in the Locate Account field)
Additional Interest (available only if Other Interest is selected in the Locate Account field)
Bill to (available only if Other Interest is selected in the Locate Account field)
Certificate Holder (available only if Other Interest is selected in the Locate Account field)
Active
Inactive
Enter the first few letters of the name, lookup code, phone number, etc. (depending on the selection in the Locate by dropdown menu) and press [Enter] or click Locate.
The Results list displays all of the accounts that match the criteria you entered. Click on a column heading to sort the list by that category. For example, click the Last Name column heading to sort by last name in ascending order. To sort in descending order, click the Last Name column heading again.
Highlight the desired item in the Results list.
Do one of the following:
Click Activities on the navigation panel.
Click Areas > Activities on the menubar.
- A
list of activities for the selected account displays. Change
the activities that display in the list if necessary.
- To change the types of activities that display in the list, click the word Activities in the view filter.

A list of choices displays:
- All
- Open
- Closed
- Click on the appropriate selection.
Use the search bar to display activities that meet specific criteria. Apply a single filter (using the search fields) or multiple filters (using the Edit Filter button
 ) to narrow the list of activities.
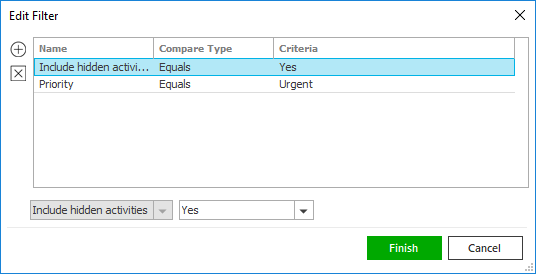
Selecting multiple criteria performs an "and" search (for example, hidden activities with a specific Priority).

- Click the Edit
Filter button
 .
. - The Edit
Filter pop-up window displays. Click the
Add
button
 to add filters.
 - Select and/or enter search criteria
using the dropdown menus and fields. Click the
Add
button again to apply additional filters. Enter
additional search criteria.
Click the Delete button to remove a filter from the list. - Click Finish
when you have applied all of your desired filters.
Hover over the Search where text to see the filter that is currently applied to the list.

To clear the currently applied filter (for the current session only) and start over, click the Clear Filter link label. The search bar displays in blue when filters are applied and in gray when filters are cleared.

- Make a selection in the first dropdown menu.
- The choices available in the second dropdown menu vary, depending on your selection in the first dropdown menu:
- Equals: Enter the search criterion (e.g., the full description) in the field to the right, or select a date from the dropdown calendar (if applicable).
- Contains: Enter at least one character of the search criterion (e.g., part of the description) in the field to the right.
- Within Range: Search between two calendar dates. Click the down arrow to the right of each field to choose dates from the dropdown calendars.
- Yes/No: Opt to include or exclude hidden activities when you select Include hidden activities in the first dropdown.
Open activities defined as Hidden display in the Activities – Open list by default. However, you must use the Include hidden activities search filter to view closed hidden activities in the Activities – Closed list.
- Click Find
to apply the filter. Hover over the Search
where text to see the filter that is currently
applied to the list.
To clear the currently applied filter (for the current session only) and start over, click the Clear Filter link label. The search bar displays in blue when filters are applied and in gray when filters are cleared.
- Click the Edit
Filter button
To save your currently applied filters as a default for all accounts of the same entity type, create Filter Defaults. You cannot apply filter defaults on a per-account basis, or on an Activities list opened from the Access menu. Changing the view filter selection (All, Open, or Closed) clears any filter defaults applied to the list.
Your filter defaults are unique to your user code and will not affect other users’ saved defaults.- Click the Filter Defaults link label and select the Use as default checkbox on the Filter Defaults screen to save your selected filters as the default for all accounts of the same entity type.
- Click OK
to apply the filter default.
To clear a filter default, click the Clear Filter link label, click the Filter Defaults link label, select the appropriate checkboxes in the Filter Defaults window, and click OK.
- You can change
the columns that display in the list if necessary.
- Click the Select
Columns link label on the right side of the header
bar.
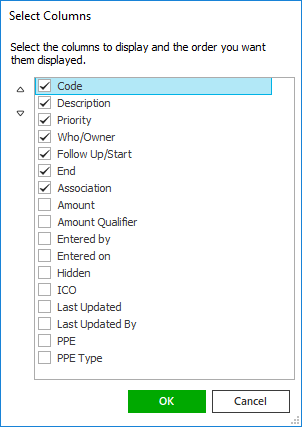
The Select Columns window displays. - Select the checkbox
next to each column that should be included in the list.
Deselect the checkbox next to each column that should be removed from the list.

- Columns will display in the order in which they are listed.
In the example above, Code
would be the first column and Association
would be the last. To move a column up or down in the list,
click the column
and then click the up
arrow
 or
down
arrow
  to
change its position.
 - Click OK
or press [Enter]
to save your changes.
Click Cancel to close the window without saving your changes.
- Click the Select
Columns link label on the right side of the header
bar.
 .
. to open the
 or collapse
 the children.
 to the left of the Notes
list.