Click the down arrow to the right of the Home options bar button and select Procedures.
Click Home > Procedures on the menubar.
Click Interface Management > Assign Items in Suspense on the navigation panel.
Click Actions > Update Items in Suspense on the options bar and select the desired option:
-
- The Communication Log Recipients - Suspense Policies screen displays.
Specify where (or to whom) the communication log is sent. Current User, meaning the person who is running the update, is an automatic recipient. You can do the following here:
-
Do one of the following:
- Click the Add
button
 .
. - Press [Insert] on your keyboard.
- Click the Add
button
Choose the recipient Name in the dropdown menu.
Select the Notify Only checkbox to provide only a notification and not a copy of the log.
Click the Change Notification Settings link if applicable.
Select the appropriate radio button:
- Notify only if successful
- Notify if successful or unsuccessful
- Notify only if unsuccessful
- Click Finish or press [Enter].
If you do not select the Notify Only checkbox, choose the Printer, Email, and/or Fax # to which to send the document, or type the information into the appropriate field.
If you send the document to an email address, select the report format in the Attach as dropdown menu.If any recipient is to receive the document via email or fax, enter an Email/Fax Subject.
If the recipient will receive the document via fax, select a Cover page in the dropdown menu. To change the Language of the selected Cover page, select it from the Language dropdown menu.
Note: you must set up a Cover page in all desired languages in Fax Cover Page Configuration to make these languages available for selection from this dropdown menu.Click Finish to save the changes.
Click Add to add another recipient.
Click Cancel to close the window without adding the recipient.
-
Click on the name of the recipient whose information you want to change.
Do one of the following:
- Click the Edit
button
 .
. Double click the recipient name.
- Click the Edit
button
Select the Notify Only checkbox to provide only a notification and not a copy of the log.
Click the Change Notification Settings link label if applicable.
Select the appropriate radio button:
- Notify only if successful
- Notify if successful or unsuccessful
- Notify only if unsuccessful
- Click Finish or press [Enter].
If you do not select the Notify Only checkbox, choose the Printer, Email, and/or Fax # to which to send the report, or type the information into the appropriate field.
If you send the document to an email address, select the report format in the Attach as dropdown menu.
If the recipient is to receive the document via email or fax, enter an Email/Fax Subject.
If the recipient will receive the document via fax, select a Cover page in the dropdown menu. To change the Language of the selected Cover page, select it from the Language dropdown menu.
Note: you must set up a Cover page in all desired languages in Fax Cover Page Configuration to make these languages available for selection from this dropdown menu.Click Finish to save the changes.
Click Add to add another recipient.
Click Cancel to close the window without adding the recipient.
-
- In the list, click on the recipient that you want to remove.
- Click the Delete
button
 .
.
- Enter the appropriate information on the following tabs:
- Delivery
Options
If needed, click the Change printer settings link label in the Delivery Options section to send the log to a different printer or edit the printer settings.
In the Scheduling section, opt to run the report Now, or Schedule the report to run later.
If you choose Schedule, enter or select a date and time. Select a Recurrence option.
If you select anything but One Time Only, the email is sent automatically at the interval and time selected in this section. Consider scheduling lengthier updates to run after business hours.
- Select
Items to Process
- The Select Items to Process tab lists all policies in Suspense that are assigned and ready to be processed.
- The Select
Items to Process list initially loads
all assigned policies in suspense. Filter
the list if necessary.
Use the search bar to display policies in Suspense that meet specific criteria. Apply a single filter (using the search fields) or multiple filters (using the Edit Filter button
 ).
).
Selecting multiple criteria performs an "and" search (for example, policies with a specific Line associated to a specific Agency).
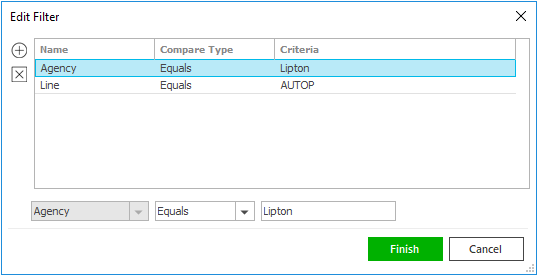
- Click the Edit
Filter button .
- The Edit
Filter pop-up window displays.
Click the Add
button
 to
add filters.
to
add filters. - Select and/or enter search
criteria
using the dropdown menus and fields.
Click the Add
button again to apply additional
filters. Enter additional search
criteria.
Click the Delete button to remove a filter from the list. - Click Finish
when you have applied all of your
desired filters.
Hover over the Search where text to see the filter that is currently applied to the list.
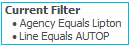
To clear the currently applied filter (for the current session only) and start over, click the Clear Filter link label. The search bar displays in blue when filters are applied and in gray when filters are cleared.

- Make a selection in the first dropdown menu.
- The choices available in the second dropdown menu vary, depending on your selection in the first dropdown menu:
- Equals: Enter the search criterion (e.g., the full account name) in the field to the right.
- Begins With: Enter at least the first character of the search criterion.
- Within Range: Search between two calendar dates. Click the down arrow to the right of each field to choose dates from the dropdown calendars.
- Does Not Equal: Enter the text (e.g. the full policy number) that you want to exclude from your search in the field to the right.
- Click Find
to apply the filter. Hover over
the Search
where text to see the filter
that is currently applied to the
list.
To clear the currently applied filter (for the current session only) and start over, click the Clear Filter link label. The search bar displays in blue when filters are applied and in gray when filters are cleared.
You can save your currently applied filters as Filter Defaults for policies in Suspense. Your filter defaults are unique to your user code and will not affect other users’ saved defaults.
- Click the Filter Defaults link label and select the Use as default checkbox on the Filter Defaults screen.
Click OK to apply the filter default.
To clear a filter default, click the Clear Filter link label, click the Filter Defaults link label, select the appropriate checkboxes in the Filter Defaults window, and click OK.
- Click the Edit
Filter button
- To change
the columns that display,
click the Select
Columns link in the header.
- The Select Columns window displays.
- Select the checkbox next to each column that should be included in the list.
- Deselect the checkbox next to each column that should be removed from the list.
- Columns will display in the order
in which they are listed. To move
a column up or down in the list, click
the column
and then click the up arrow
 or
down
arrow
or
down
arrow  to change the order.
 - Click OK
or press
[Enter] to save your changes.
Click Cancel to close the window without saving your changes.
- If you do not want to include a policy for processing, deselect the checkbox beside it. If you want to include only a few policies, click Deselect All and then select the checkboxes for the policies you want to include.
- Click
Finish to run the update (or click Cancel to exit the screen
without running the update), then click OK on the Submitted
for processing message.
If you have processed all Policy items in the Suspense list, the system returns you to the main Assign Items in Suspense screen automatically, where you can select another Suspense area to begin processing items. If any policies remain in the Suspense list, you can repeat the previous steps to process them or click Cancel to return to the main Assign Items in Suspense screen.
-
- The Communication Log Recipients - Automated Download Invoices in Suspense screen displays.
- Specify where (or to whom) the communication log is
sent. Current User,
meaning the person who is running the update, is an automatic
recipient. You can do the following here:
- Add a Recipient
Do one of the following:
- Click the Add
button .
- Press [Insert] on your keyboard.
- Click the Add
button
Choose the recipient's Name in the dropdown menu.
Select the Notify Only checkbox to provide only a notification and not a copy of the log.
Click the Change Notification Settings link if applicable.
Select the appropriate radio button:
- Notify only if successful
- Notify if successful or unsuccessful
- Notify only if unsuccessful
- Click Finish or press [Enter].
If you do not select the Notify Only checkbox, choose the Printer, Email, and/or Fax # to which to send the document, or type the information into the appropriate field.
If you send the document to an email address, select the report format in the Attach as dropdown menu.If any recipient is to receive the document via email or fax, enter an Email/Fax Subject.
If the recipient will receive the document via fax, select a Cover page in the dropdown menu. To change the Language of the selected Cover page, select it from the Language dropdown menu.
Note: you must set up a Cover page in all desired languages in Fax Cover Page Configuration to make these languages available for selection from this dropdown menu.Click Finish to save the changes.
Click Add to add another recipient.
Click Cancel to close the window without adding the recipient.
- Edit Recipient
Information
Click on the name of the recipient whose information you want to change.
Do one of the following:
Click the Edit button
.Double click the recipient name.
Select the Notify Only checkbox to provide only a notification and not a copy of the log.
Click the Change Notification Settings link label if applicable.
Select the appropriate radio button:
- Notify only if successful
- Notify if successful or unsuccessful
- Notify only if unsuccessful
- Click Finish or press [Enter].
If you do not select the Notify Only checkbox, choose the Printer, Email, and/or Fax # to which to send the report, or type the information into the appropriate field.
If you send the document to an email address, select the report format in the Attach as dropdown menu.
If the recipient is to receive the document via email or fax, enter an Email/Fax Subject.
If the recipient will receive the document via fax, select a Cover page in the dropdown menu. To change the Language of the selected Cover page, select it from the Language dropdown menu.
Note: you must set up a Cover page in all desired languages in Fax Cover Page Configuration to make these languages available for selection from this dropdown menu.Click Finish to save the changes.
Click Add to add another recipient.
Click Cancel to close the window without adding the recipient.
- Delete a Recipient
- In the list, click on the recipient that you want to remove.
- Click the Delete
button .
- Add a Recipient
- Enter the appropriate information on the following tabs:
- Delivery
Options
If needed, click the Change printer settings link label in the Delivery Options section to send the log to a different printer or edit the printer settings.
In the Scheduling section, opt to run the report Now, or Schedule the report to run later.
If you choose Schedule, enter or select a date and time. Select a Recurrence option.
If you select anything but One Time Only, the email is sent automatically at the interval and time selected in this section. Consider scheduling lengthier updates to run after business hours.
- Select
Items to Process
- The Select Items to Process tab lists all Automated Download Invoicing items in Suspense that are assigned and ready to be processed.
- The Select
Items to Process list initially loads
all assigned automated download invoicing
items in suspense. Filter the list
if necessary.
Use the search bar to display Automated Download Invoicing items in Suspense that meet specific criteria. Apply a single filter (using the search fields) or multiple filters (using the Edit Filter button
).
Selecting multiple criteria performs an "and" search (for example, ADI items with a specific Line associated to a specific Agency).
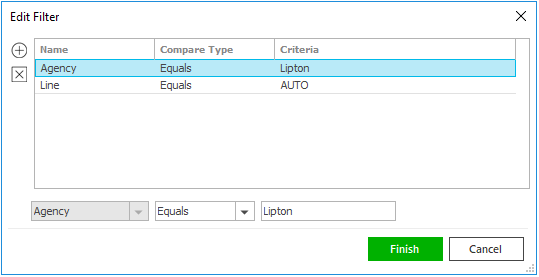
- Click the Edit
Filter button .
- The Edit
Filter pop-up window displays.
Click the Add
button to
add filters.
- Select and/or enter search
criteria
using the dropdown menus and fields.
Click the Add
button again to apply additional
filters. Enter additional search
criteria.
Click the Delete button to remove a filter from the list. - Click Finish
when you have applied all of your
desired filters.
Hover over the Search where text to see the filter that is currently applied to the list.
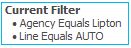
To clear the currently applied filter (for the current session only) and start over, click the Clear Filter link label. The search bar displays in blue when filters are applied and in gray when filters are cleared.
- Make a selection in the first dropdown menu.
- The choices available in the second dropdown menu vary, depending on your selection in the first dropdown menu:
- Equals: Enter the search criterion (e.g., the full account name) in the field to the right.
- Begins With: Enter at least the first character of the search criterion.
- Within Range: Search between two calendar dates. Click the down arrow to the right of each field to choose dates from the dropdown calendars.
- Click Find
to apply the filter. Hover over
the Search
where text to see the filter
that is currently applied to the
list.
To clear the currently applied filter (for the current session only) and start over, click the Clear Filter link label. The search bar displays in blue when filters are applied and in gray when filters are cleared.
You can save your currently applied filters as Filter Defaults for Automated Download Invoicing items in Suspense. Your filter defaults are unique to your user code and will not affect other users’ saved defaults.
- Click the Filter Defaults link label and select the Use as default checkbox on the Filter Defaults screen.
- Click OK
to apply the filter default.
To clear a filter default, click the Clear Filter link label, click the Filter Defaults link label, select the appropriate checkboxes in the Filter Defaults window, and click OK.
- Click the Edit
Filter button
- To change
the columns that display,
click the Select
Columns link in the header.
- The Select Columns window displays.
- Select the checkbox next to each column that should be included in the list.
- Deselect the checkbox next to each column that should be removed from the list.
- Columns will display in the order
in which they are listed. To move
a column up or down in the list, click
the column
and then click the up arrow
or
down
arrow
to change the order.
- Click OK
or press
[Enter] to save your changes.
Click Cancel to close the window without saving your changes.
- If you do not want to include an Automated Downloading Invoicing item for processing, deselect the checkbox beside it. If you want to include only a few items, click Deselect All and then select the checkboxes for the Automated Download Invoicing items you want to include.
- Click
Finish to run the update (or click Cancel to exit the screen
without running the update), then click OK on the Submitted
for processing message.
If you have processed all Automated Download Invoicing items in the Suspense list, the system returns you to the main Assign Items in Suspense screen automatically, where you can select another Suspense area to begin processing items. If any Automated Download Invoicing items remain in the Suspense list, you can repeat the previous steps to process them or click Cancel to return to the main Assign Items in Suspense screen.
-
- The Communication Log Recipients - eDocs & Messages in Suspense screen displays.
Specify where (or to whom) the communication log is sent. Current User, meaning the person who is running the update, is a recipient automatically. You can do the following here:
- Add a Recipient
Do one of the following:
- Click the Add
button .
- Press [Insert] on your keyboard.
- Click the Add
button
Choose the recipient Name in the dropdown menu.
Select the Notify Only checkbox to provide only a notification and not a copy of the log.
Click the Change Notification Settings link if applicable.
Select the appropriate radio button:
- Notify only if successful
- Notify if successful or unsuccessful
- Notify only if unsuccessful
- Click Finish or press [Enter].
If you do not select the Notify Only checkbox, choose the Printer, Email, and/or Fax # to which to send the document, or type the information into the appropriate field.
If you send the document to an email address, select the report format in the Attach as dropdown menu.If any recipient is to receive the document via email or fax, enter an Email/Fax Subject.
If the recipient will receive the document via fax, select a Cover page in the dropdown menu. To change the Language of the selected Cover page, select it from the Language dropdown menu.
Note: you must set up a Cover page in all desired languages in Fax Cover Page Configuration to make these languages available for selection from this dropdown menu.Click Finish to save the changes.
Click Add to add another recipient.
Click Cancel to close the window without adding the recipient.
- Edit Recipient
Information
Click on the name of the recipient whose information you want to change.
Do one of the following:
- Click the Edit
button .
- Double click the recipient name.
- Click the Edit
button
Select the Notify Only checkbox to provide only a notification and not a copy of the log.
Click the Change Notification Settings link label if applicable.
Select the appropriate radio button:
- Notify only if successful
- Notify if successful or unsuccessful
- Notify only if unsuccessful
- Click Finish or press [Enter].
If you do not select the Notify Only checkbox, choose the Printer, Email, and/or Fax # to which to send the report, or type the information into the appropriate field.
If you send the document to an email address, select the report format in the Attach as dropdown menu.
If the recipient is to receive the document via email or fax, enter an Email/Fax Subject.
If the recipient will receive the document via fax, select a Cover page in the dropdown menu. To change the Language of the selected Cover page, select it from the Language dropdown menu.
Note: you must set up a Cover page in all desired languages in Fax Cover Page Configuration to make these languages available for selection from this dropdown menu.Click Finish to save the changes.
Click Add to add another recipient.
Click Cancel to close the window without adding the recipient.
- Delete a Recipient
- In the list, click on the recipient that you want to remove.
- Click the Delete
button .
- Add a Recipient
- Enter the appropriate information on the following tabs:
- Delivery
Options
If needed, click the Change printer settings link label in the Delivery Options section to send the log to a different printer or edit the printer settings.
In the Scheduling section, opt to run the report Now, or Schedule the report to run later.
If you choose Schedule, enter or select a date and time. Select a Recurrence option.
If you select anything but One Time Only, the email is sent automatically at the interval and time selected in this section. Consider scheduling lengthier updates to run after business hours.
- Select
Items to Process
- The Select Items to Process tab lists all eDocs & Messages in Suspense that are assigned and ready to be processed.
- The Select
Items to Process list initially loads
all assigned eDocs & Messages in Suspense.
Filter
the list if necessary.
Use the search bar to display eDocs and messages in Suspense that meet specific criteria. Apply a single filter (using the search fields) or multiple filters (using the Edit Filter button
).Selecting multiple criteria performs an "and" search (for example, eDocs with a specific Line associated to a specific Agency).
- Click the Edit
Filter button .
- The Edit
Filter pop-up window displays.
Click the Add
button to
add filters.
- Select and/or enter search
criteria
using the dropdown menus and fields.
Click the Add
button again to apply additional
filters. Enter additional search
criteria.
Click the Delete button to remove a filter from the list. - Click Finish
when you have applied all of your
desired filters.
Hover over the Search where text to see the filter that is currently applied to the list.
To clear the currently applied filter (for the current session only) and start over, click the Clear Filter link label. The search bar displays in blue when filters are applied and in gray when filters are cleared.
- Make a selection in the first dropdown menu.
- The choices available in the second dropdown menu vary, depending on your selection in the first dropdown menu:
- Equals/Greater Than/Less Than: Enter the search criterion (e.g. the full account name) in the field to the right.
- Begins With: Enter at least the first character of the search criterion.
- Within Range: Search between two calendar dates. Click the down arrow to the right of each field to choose dates from the dropdown calendars.
- Click Find
to apply the filter. Hover over
the Search
where text to see the filter
that is currently applied to the
list.
To clear the currently applied filter (for the current session only) and start over, click the Clear Filter link label. The search bar displays in blue when filters are applied and in gray when filters are cleared.
You can save your currently applied filters as Filter Defaults for eDocs & messages in Suspense. Your filter defaults are unique to your user code and will not affect other users’ saved defaults.
- Click the Filter Defaults link label and select the Use as default checkbox on the Filter Defaults screen.
- Click OK
to apply the filter default.
To clear a filter default, click the Clear Filter link label, click the Filter Defaults link label, select the appropriate checkboxes in the Filter Defaults window, and click OK.
- Click the Edit
Filter button
- To change
the columns that display,
click the Select
Columns link in the header.
- The Select Columns window displays.
- Select the checkbox next to each column that should be included in the list.
- Deselect the checkbox next to each column that should be removed from the list.
- Columns will display in the order
in which they are listed. To move
a column up or down in the list, click
the column
and then click the up arrow
or
down
arrow
to change the order.
- Click OK
or press
[Enter] to save your changes.
Click Cancel to close the window without saving your changes.
- If you do not want to include a eDoc & Message for processing, deselect the checkbox beside it. If you want to include only a few eDocs & Messages, click Deselect All and then select the checkboxes for the eDocs & Messages you want to include.
- Click
Finish to run the update (or click Cancel to exit the screen
without running the update), then click OK on the Submitted
for processing message.
If you have processed all eDoc & Message items in the Suspense list, the system returns you to the main Assign Items in Suspense screen automatically, where you can select another Suspense area to begin processing items. If any eDoc & Messages remain in the Suspense list, you can repeat the previous steps to process them or click Cancel to return to the main Assign Items in Suspense screen.
When you return to the Assign Items in Suspense screen after updating items from Suspense, click the Refresh link label in the list header to update the item count.
