To learn more about this capability, click the Launch video button.
Click the Add button
 to the left of the email list.
 Click File > New on the menubar.
To learn more about this capability, click the Launch video button.
Applied Epic allows you to launch an integrated email client from within the system for all routine email workflows except those initiated by Distribution Manager. Your organization may opt to use Microsoft Outlook or an Epic custom message window for this integration, or allow you to make an individual selection in Email Settings Configuration. The workflow for composing an email varies, depending on which of these options you are using.
Regardless of the option you use, do one of the following to access your email:
From the Home screen, click Email on the navigation panel or Areas > Email on the menubar.
To access email from any other part of the program, click the down arrow next to Home on the options bar and select Email.
Note: If you are using Microsoft Outlook, Outlook opens to the last window you accessed. This window may open in focus or minimized in the taskbar.
From your Epic Email inbox, do one of the following:
Click the
Add
button
to the left of the email list.
Click File > New on the menubar.
There are three ways to enter an email address:
Type the address in the To, Cc, or Bcc field.
Use this option to send emails to people who are listed as contacts in your system.
You can enter email addresses for account contacts on the account detail screen or on the contact detail screen.
 on
the toolbar.
on
the toolbar. If you do not know the account
code, click the lookup
button  to the right of the field. Enter
at least the first letter of the Account
code, and then click Locate
or press [Enter].
Double click on the appropriate account, or click on the account
and then click Finish
or press [Enter].
to the right of the field. Enter
at least the first letter of the Account
code, and then click Locate
or press [Enter].
Double click on the appropriate account, or click on the account
and then click Finish
or press [Enter].
Select the contacts for the To, Cc, and Bcc fields separately. To list one contact in the To field and another in the Cc field, for example, select the checkbox for the contact to list in the To field and click To. Then select the checkbox for the contact to list in the Cc field and click Cc.
To remove a contact from the
email, select the checkbox
next to the contact in the bottom list and click the Delete
 button.
 on the toolbar
The
attach button  on the toolbar is selected, indicating
that the email will be attached to an account or item in Applied Epic.
If you do not want to attach the email to an account or item in the
system, click on the Attach
button to deselect it.
on the toolbar is selected, indicating
that the email will be attached to an account or item in Applied Epic.
If you do not want to attach the email to an account or item in the
system, click on the Attach
button to deselect it.
Add an attachment if desired.
To
set the importance of the email, click the High
Importance  or Low
Importance
or Low
Importance  button. This step is optional.
Type your message in the body of the email. If you want to change the font or formatting in the email body, do one of the following before typing, or highlight the existing text that you would like to format and do the following:
Click the Font button on the toolbar.
Click Format > Font on the menubar.
The standard Font window displays. Format your text as you normally would.
When
your email is complete, click Send  .
.
If you did not deselect the Attach button in step 4, the Attach to window displays. Attach this email as you would any other item.
To look up the code, click the lookup button
. Enter at least the first letter of the account
code and
then click Locate
or press [Enter].
Select the account
in the list and click Finish
or press [Enter].
.If you selected Account, the account code defaults in the field.
If you selected one of the other options,
click the lookup
button to the right of the field. Select the item in the
window that displays and press [Enter]
or click Finish.
Note: Click the Select closed or Include history checkbox to include closed and/or historical items in the list.
Click Cancel or press [Esc] to exit the workflow without adding the attachment. You are prompted, "Do you wish to discard changes?" Click Yes.
Compose emails as you normally would through Microsoft Outlook. Use the Applied Epic Outlook Add-in (if installed) to locate Applied Epic contacts or attachments when composing, replying to, or forwarding email messages. You can also easily attach received messages to the corresponding Epic account, or attach messages to the corresponding account when sending them:
Use this option to address email messages to contacts from accounts in the system. If you initiate the email workflow from Applied Epic, contacts from the last account you accessed default in the list, but you can look up other contacts if necessary.

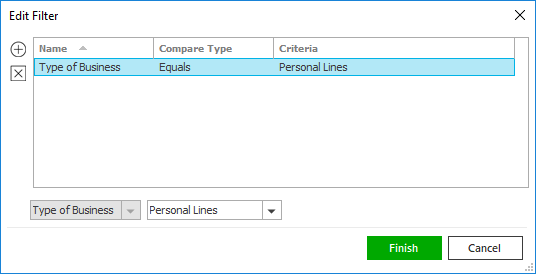
Make a selection in the first dropdown menu:
The choices in the second dropdown menu vary, depending on the option you selected in the first dropdown.
To see the filter that is currently applied to the list, hover over the Search where text. Click the Clear Filter link label to reset the filter.
You can apply multiple filters if necessary.
 .
. 
You can also enter email addresses manually, but these addresses are not saved back to Applied Epic. Separate multiple email addresses with semicolons.
To exit the dialog without adding any contacts, click Cancel.
Use this option to apply a preconfigured Email Template to your message. You can only select a preexisting template using this option, not create a new one. If the template you need does not exist, users with permission can create it in Email Template Configuration. If you begin a new email workflow from Applied Epic, the primary contact from the open account populates in the To: field, and this Account defaults in the Insert Email Template pop-up window.
The Contact and Preview tabs display for all templates to allow you to select a contact and preview your message. Depending on the merge variables in your template, additional tabs may display, where you can select a Policy, Claim, or Transaction/Invoice to populate the variables. All policies and claims for the selected account populate on the Policy and Claim tabs, but you must use the search bar to populate the Transaction/Invoice tab before you can select a transaction or invoice.
Once you have applied a template to your message, you can include additional recipients using the Epic Contacts option from the Applied frame of the Outlook ribbon. However, the merge variables in the template will only populate with information for the contact you selected in the Insert Email Template pop-up window.
Please note that if you make any manual edits to the message after applying a template and then change your template selection, your manual edits are discarded.
to open the Account
Lookup pop-up window and use the search bar to
locate an account.
.
.Use this option to locate and add attachments from an account in the system to your email message. If you initiate the email workflow from Applied Epic, attachments from the last account you accessed default in the list, but you can look up other attachments if necessary.
Make a selection in the first dropdown menu.
The choices in the second dropdown menu vary, depending on the option you selected in the first dropdown.
To see the filter that is currently applied to the list, hover over the Search where text. Click the Clear Filter link label on the right to reset the filter.
You can apply multiple filters if necessary.
.
Make a selection in the first dropdown menu.
The choices in the second dropdown menu vary, depending on the option you selected in the first dropdown.
 to
the right of each field to choose dates from the dropdown
calendars. Click Find.
to
the right of each field to choose dates from the dropdown
calendars. Click Find.To see the filter that is currently applied to the list, hover over the Search where text.
Click the Clear Filter link label on the right to reset the filter.
You can apply multiple filters if necessary.
.
To exit the dialog without adding attachments, click Cancel.
You can attach messages from Microsoft Outlook to the corresponding Applied Epic account in either of the following ways:
Quickly and easily attach one or more email messages to Applied Epic directly from your Outlook Inbox (or any other mail folder in Outlook) by selecting the Attach to Epic option on the Outlook ribbon. You can also attach the email you are reading the same way.
Make a selection in the first dropdown menu.
The choices in the second dropdown menu vary, depending on the option you selected in the first dropdown.
To see the filter that is currently applied to the list, hover over the Search where text.
Note: Click the Clear Filter link label on the right to reset the filter.
You can apply multiple filters if necessary.
.
Note: Click the Select closed or Include history checkbox to include closed and/or historical items in the list.
The email Subject defaults in the Description field, but you can change it if necessary.
On the Detail tab, choose a Folder in which to save the attachment to make it easy to find later. For instructions on creating, editing, and deleting these folders, see Attachment Folder Configuration.
Select Subfolders if applicable.
The current system date defaults as the Received date. Change it if necessary.
Choose a security Access level if applicable. Only employees with the select access level will be able to access the attachment. See Attachment Access Level Configuration for instructions on adding, editing, and deleting these access levels.
Select the Client accessible checkbox if you want to enable the client to view the attachment. Optionally select an Expire on date from the calendar to make the attachment accessible for only a limited time.
To add comments, click the Comments tab and enter text in the field.
Click Finish or press [Enter] to add the attachment.
Click Cancel or press [Esc] to exit the workflow without adding the attachment.
Use this option to attach an email you are composing (whether a new message, a reply, or a forwarded message) to Applied Epic when you send it. If you initiated the email workflow from an Epic account, this option defaults selected and the email is attached to that account by default. However, you can select a different account if necessary. You must complete the entire workflow before the email can be sent and attached to the account you select.
Make a selection in the first dropdown menu.
The choices in the second dropdown menu vary, depending on the option you selected in the first dropdown.
Contains: Enter at least one character of the search criterion (e.g. part of the account name) in the field to the right. Click Find.
To see the filter that is currently applied to the list, hover over the Search where text.
Note: Click the Clear Filter link label on the right to reset the filter.
You can apply multiple filters if necessary.
.
Note: Click the Select closed or Include history checkbox to include closed and/or historical items in the list.
Click Cancel or press [Esc] to exit the workflow without adding the attachment. You are prompted, "Do you wish to discard changes?" Click Yes.
