Add a CSIO Loss Notice
Use the following workflows to add a CSIO Loss Notice.
If you need to add a claim for a policy not in TAM, modify the current policy/billing screen to reflect expired policy period information. Follow the steps in Add a CSIO Loss Notice from the Claim List, and then modify current policy/billing screen to reflect information as it appeared prior to revising it.
Add a CSIO Loss Notice from the Claim List
- At Home Base, click Clients & Files.
- Select Customers from the dropdown menu above the list.
- In the list, select the customer for whom you are adding a loss notice and click the Claim List button.
- From the Claim List, select the claim.
- Click Options and select the type of claim (Automobile, Property, or Loss Notice ).
- Click Yes to confirm that this is a new loss notice. If you are entering an automobile loss or property loss notice, you may be prompted to select a vehicle or location. Make the appropriate selection and click OK.
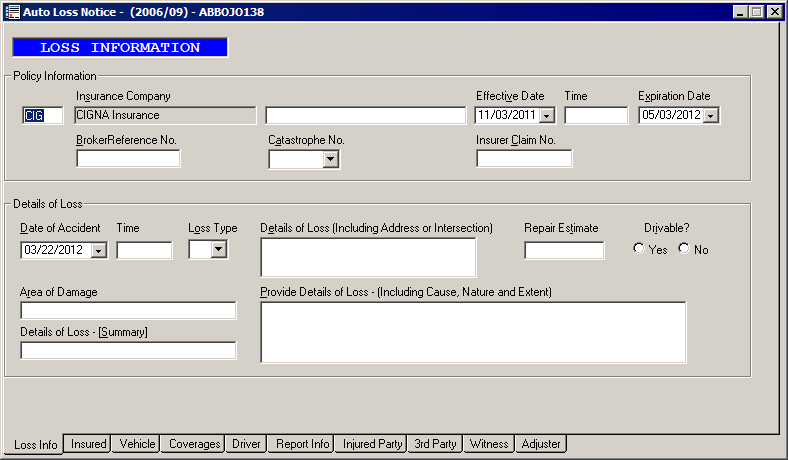
- Review and complete all sections of the loss notice by clicking the tabs on the bottom or using the [Page Up] and [Page Down] keys.
- From the File menu, click Print.
- Select your options on the Print/Communication window.
- Select the appropriate Printer from the dropdown list.
Note: Click Printer Setup and make any necessary changes if you need to amend the settings for the selected printer.
- The Date defaults to the current system date but can be revised if necessary.
- Determine whether the contact for this claim is a Producer or Employee.
- Double click in the Contact field to select from a list of producers or employees in your system. Click OK.
- Enter Phone, Fax, and/or Email information for the contact.
- To change the Company, double click in the field to the right and make the appropriate selection. Delete the contents of the Company field if you do not want the company's name to print on the form.
- Change the Agency or Branch if necessary.
- Enter the Number of Copies.
- You can select to Queue the form for printing, to Print it immediately, or to Preview it before printing.
- Once you have finished filling out the screen, click OK.
- Revise the Activity Detail screen as necessary and click OK.
Note: As an alternative to running individual claim follow-ups, you can run a Claim Report through TAM Reports and select only Open claims on the Criteria tab.
- Click Yes to confirm revision of the record.
- Click File > Exit.
CSIO Loss Notice, claimants must be added through the workflow.
To send a letter related to a loss, see .
Add a CSIO Loss Notice from a History Policy
- From the Customer List, select the applicable customer.
- Click the Policies button.
- On the Policy List screen, click the History tab.
- Select the policy associated with claim.
Note: Policies that display in red are expired.
- Click the Options button and select Add a Claim.
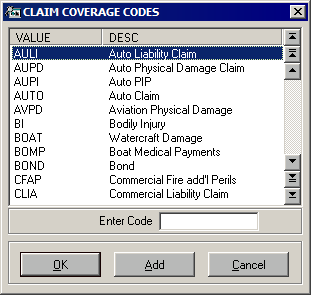
- Select the applicable claim code and click OK. The New Claim Detail screen displays.
- Enter or revise any relevant information on the Claim Detail screen in the fields provided and click OK.
- In the Risk field, enter the description of the item or individual involved in the claim. This information will not print on the CSIO Loss Notice.
- The information in the Description text box will default into CSIO Loss Notice.
- Click Claims.
- From the Claim List, select the claim for which you are adding a loss notice.
- Click Options and select the type of claim (Automobile, Property, Liability, or Workers Comp).
- Click Yes to confirm that this is a new loss notice. If you are entering an automobile loss or property loss notice, you may be prompted to select a vehicle or location. Make the appropriate selection and click OK.
- Review and complete all sections of loss notice by clicking the tabs on right or using the [Page Down] key.
- From the File menu, click Print.
- Select your options on the Print/Communication window.
- The Date defaults to the current system date but can be revised if necessary.
- Determine whether the contact for this claim is a Producer or Employee.
- Double click in the Contact field to select from a list of producers or employees in your system. Click OK.
- Enter Phone, Fax, and/or Email information for the contact.
- To change the Company, double click in the field to the right and make the appropriate selection. Delete the contents of the Company field if you do not want the company's name to print on the form.
- Change the Agency or Branch if necessary.
- Enter the Number of Copies.
- You can select to Queue the form for printing, to Print it immediately, or to Preview it before printing.
- Once you have finished filling out the screen, click OK.
- Revise the Activity Detail screen as necessary and click OK.
Note: As an alternative to running individual claim follow-ups, you can run a Claim Report through TAM Reports and select only Open claims on the Criteria tab.
- Click Yes to confirm revision of the record.
- Click File > Exit.
In addition to the Loss Notice, claimants must be added through the Add a Claimant workflow.
To send a letter related to a loss, see Create a Letter Pertaining to Loss.
Create a Letter Pertaining to Loss
Use the following steps to create a letter pertaining to a loss.
- Select the applicable claim from the Claim List.
- Click the Options button and select Workflows > Letters > Formletter.
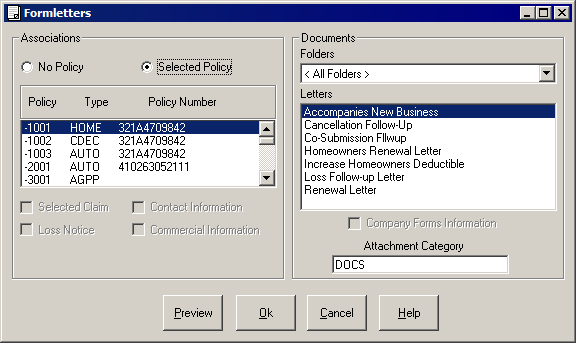
- Select the applicable policy.
- Select the applicable formletter.
- Select the French and/or English checkbox(es) to indicate the language(s) in which the letter(s) should print.
- Select an attachment category.
- Click OK. The formletter opens in Word, and the data merges. (It may take a few moments for the data to merge.) For further information, see The Word Integration Interface at the Client/File Level.