Report Picture
Note: The Field radio button, Object Position frame, and Center picture checkbox can be disregarded, as they apply to a functionality that is not implemented in TAM.
- To place a picture on the Report Designer canvas, click the Picture tool.
- Click the point on the screen at which to place the upper left corner of the picture and drag the mouse pointer to place the opposite corner of the picture frame. Release the mouse and the Report Picture screen displays.
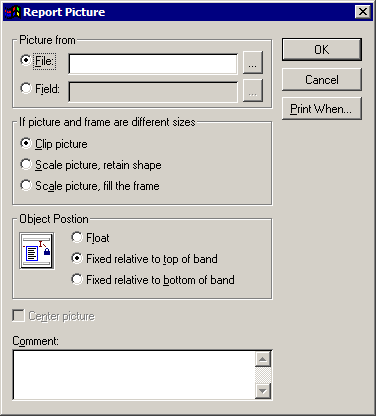
- In the Picture from frame, select the File radio button. The
- Type the file path in the File field or click the ellipsis button to browse to the appropriate file.
- Make the appropriate selection in the If picture and frame are different sizes frame.
- Clip picture: Do not alter the size or shape of the picture. Only include as much of the picture as fits in the frame.
- Scale picture, retain shape: Scale the picture to fit the frame, but retain the picture's original height to width ratio. This might mean that the picture does not entirely fill the frame.
- Scale picture, fill the frame: Scale the picture to fit the frame, and adjust the picture's height to width ratio so that the frame does not contain any empty space.
- Enter any applicable comments in the Comment field. Comments are for reference only and will not display in the output.
- To determine when the picture should print, click the Print When button.
- When you have finished making selections on the Report Picture window, click OK.
The picture is added to the canvas. Double click the picture to bring up the Report Picture window again and revise any properties.