Applied TAM Job Management Administration
With the Applied TAM Night Utility Job Management system, the scheduled job maintenance options are run by the Job Server and Execution Server services, without user intervention or anyone logged into the system. The Applied TAM Job Management Administration panel, available only to on-premise users, allows you to configure and monitor the processes and jobs defined by your Applied TAM system. For Applied TAMCloud users, Applied Cloud Administrators will configure and monitor the processes on your behalf.
The Job Management Administration utility is comprised of two server components. You can install the Job Server and Execution Server on the same server, or on different servers to help balance loads.
- Job Server: This component communicates with Applied TAM, and it queues and schedules the Night Utility jobs for the execution service.
- Execution Server: The execution service performs the actual work defined by each queued job. Applied TAM must be installed on the same computer as the Execution Service.
If the services are installed on different servers, each service must be administered from the console of their respective servers – only the tabs applicable to the service(s) installed on each server display. The Job Management Administration utility determines all of these values when starting up, and displays only options appropriate to your configuration. Therefore, your screens may differ slightly from what you see in this document.
Permissions and Access
In order for your system administrators to access the Job Management Administrative panel, it is required that they have access and server permissions to the server(s) on which the services are installed. The system administrators referred to here are users who have administrative rights to the network domain as well as local administrator rights to the Job Server(s), not Applied TAM administrators, though an individual may be both.
In Applied TAM On-premise environments, users can have full rights or no rights to the Applied TAM Job Management Administration panel. These groups are explained below:
- Full Rights: Administrators have full rights to the Job Management Administration panel. This will provide them the rights to manage any settings in addition to viewing History Viewer, Job Viewer, and Data Paths tabs.
- No Rights: Any users who are not administrators have no access to the TAM Job Management Administration panel.
Access the Applied TAM Job Management Administration utility from your server desktop by selecting Start and then Applied Systems > TAM Job Management > TAM Job Management Administration.
The installations on your system affect the content of the Applied TAM Job Management Administration utility. Only tabs for the services installed on the server currently being accessed will be visible: some tabs may not be applicable to your system, and therefore will not be visible.
TAM Job Management Administration Panel
Server/Execution Service
The TAM Night Utility Job Server Service controls all of the Night Utility processes. It also defines the start and finish times within which all Night Utility jobs must run.
The jobs set to run for each day, as well as the actual time to start processing the day’s jobs, are defined in the Night Utility Job System Setup utility.
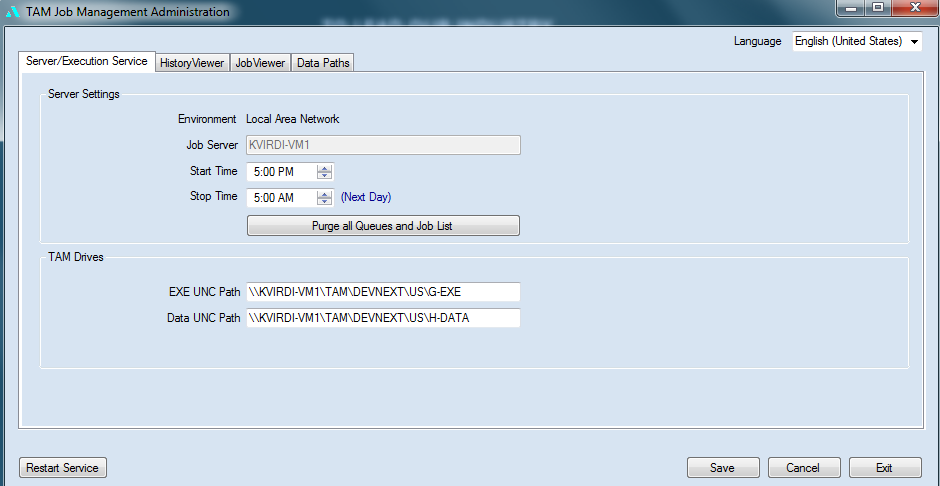
Server Settings
The server settings manages the job queues on a daily basis. The Job Server has Start and Stop times defined, which drive when the server begins to queue the jobs, and when it stops delivering jobs to the Execution Server service.
- The Start Time defines the time to start processing the current day’s tasks. This is the earliest time that any part of the Night Utility process can begin. Any changes made to Night Utility jobs in the Night Utility Job Setup utility after the start time will not be queued until the next day.
- The Stop Time indicates the time that all jobs must begin executing before the Job Server’s Stop Time is reached. Jobs that are currently being processed when the Stop Time is reached will continue to process. Jobs that did not begin processing before the Stop Time was reached are purged and the record of the job is included in the History Viewer tab. Users are notified of which jobs were purged or not completed when they next open the Job Output Viewer.
- The Purge all Queues and Job List button allows all currently executing jobs to complete, but removes all currently waiting jobs from the queues, and restarts the Job Server and Job Execution services. The service will not begin queueing jobs until again reaching the Start Time. Details of the jobs purged update the Night Error Log, and the log can be accessed from the Job Output Viewer.
TAM Drives
TAM Drives section contains the UNC paths for your TAM Server settings. The UNC path fields are required fields.
- EXE UNC path: Indicates the network path for the TAM EXE drive.
- Data UNC Path: Provides the network path to which your TAM DATA is mapped.
History Viewer
The History Viewer allows you to monitor your completed Night Utility jobs. You can view what jobs have processed, their statuses, and their start and finish times. All of the columns are sortable and you can use the Filter by: options to customize your view.
By default, the History Viewer displays 15 days of history.
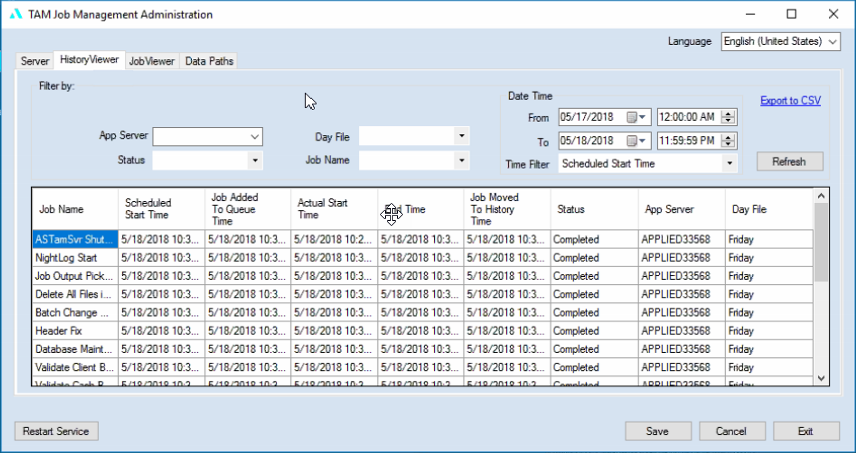
The History/Viewer tab provides a Filter by: section to allow you to refine the list details in your view:
- The first section provides filtering options for the following:
-
- App Server – If you have more than one App Server, you can select the server to view.
- Day File – Specify the specific day to review.
- Status – Select a specific Job Status to filter your view settings. Status options are defined below.
- Job Name – set the view by to review a specific job.
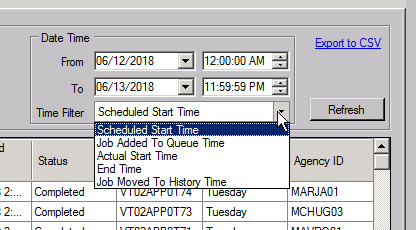
- The Date Time section provides you filtering options by day, time, and a specific Time Filter.
-
- From/To: Set the date and time range for the view results.
- Time Filter: Select from the defined criteria to filter your view results.
-
- Scheduled Start Time: the time that is scheduled to run the job.
- Job added to the Queue Time: indicates the time that it was added to queue.
- Actual Start Time: provides the time the Execution Server service started the job.
- End Time: is the time the Execution Server service sent the job status to the Job Server.
- Job Move to History Time: indicates the time the job was moved to the History/Viewer tab.
- Export to CSV – Exports the view listings to a CSV file. Click the Export to CSV link label; you are prompted to browse and save the file. Once the file is saved, the system prompts you; click OK.
- Refresh – With any filtering applied, click Refresh to apply the set filters to your view.
The History Viewer list displays is comprised of the following details:
- Job Name: The name of the job as defined in Applied TAM Night Utility System Setup.
- Scheduled Start Time: The scheduled time to run the job as defined in Applied TAM Night Utility System Setup.
- Job Added to Queue Time: This reflects the time that the job was added to the Job Queue.
- Actual Start Time: The time the Execution Server service started to process the job.
- End Time: The time the Execution Server service reported that the job completed.
- Job Moved to History Time: The time that the job was moved to History/Viewer tab.
- Status: The current status of each job is defined as one of the following.
-
- Failed – the job did not complete successfully, and execution of other scheduled jobs continued.
- Completed – the job completed successfully.
- NotRun – the job would have the status of NotRun when it has a status of Locked, Unlocked, Queued, or Ready at the designated stop time. This indicates the job has not been processed or executed once the Job Server stop time is reached.
- Unknown – If the Job status was In Process by the time the Job Stop time is reached, and the status of that specific job is updated to Unknown.
- NotRunPurged – If the Job Server queues are purged manually, the Execution Server service is stopped and the job was purged from the queue.
- UnknownPurged – If a System Administrator purges the queues while a jobs is in process, the job status lists as UnknownPurged.
- App Server: The application server that executed the job.
- Day File: The day of the week that the job is executed and the name of the day log file that can be retrieved.
If any jobs fails, it is recommended that you check for log files found in Utility Manager > Night Utility Job System > View/Print Job System Files (Job Output Viewer) to obtain more details on why the job failed.
Job Viewer tab
The Job Viewer displays all jobs currently in progress and their statuses.
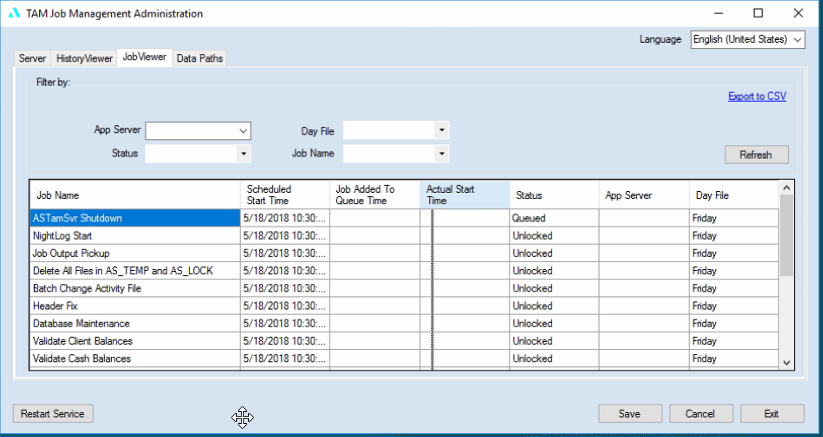
The possible statuses for jobs are, in run order, Locked, Unlocked, Ready, Queued, and In Process. Once a job has reached the queued state, it is ready to be executed, and will change to in process once the execution service begins work on it. Completed jobs display in the History Viewer tab.
The Job Viewer tab provides a Filter by: section to allow you to refine the list details in your view:
- App Server – If you have more than one App Server, you can select the server to view.
- Day File – Specify the specific day to review.
- Status – Select a specific Job Status to filter your view settings.
-
- Locked – this status indicates that the Job schedule start time hasn’t been reached. The Job retains the Locked status until the job passes the scheduled start time.
- Unlocked – when the Scheduled Start Time is reached, all the jobs are updated to a status of Unlocked. An unlocked job is waiting for any In Progress jobs to complete before updating to the next status.
- Ready - a single job is processed at a time, and the first item in the list that is updated to a Ready status to indicate it can be queued by the Job Management Service.
- Queued – this status indicates a Job is ready to be picked up by the Execution Server.
- In Progress - the job that the Execution Server is running will have a status of In Progress.
The possible statuses for jobs are, in run order, Locked, Unlocked, Ready, Queued, and In Process. Once a job has reached the queued state, it is ready to be executed, and will change to in process once the execution service begins work on it. Completed jobs display in the History Viewer tab.
- Job Name – set the view by to review a specific job.
- Export to CSV – Exports the view listings to a CSV file. Click the Export to CSV link label, you are prompted to browse and save the file. Once the file is saved, the system prompts you and click OK.
- Refresh – With any filtering applied, click Refresh to apply the set filters to your view.
Data Paths
This tab is only viewable to an organization that has multiple data shares. Configuring the additional data paths allows you to run jobs for multiple branches or organizations in a hosted environment. It also enables you to identify and sort jobs by their Agency ID in the History and Log Viewer tabs of this utility.
Note: To enable configuration of multiple shares, check the Agency has multiple data locations checkbox on the Data Paths tab.
You also need to ensure that you run the Update UNC Paths utility in TAM Utility Manager for all of your branches/organizations. Use the Data Drive Location option to configure Applied TAM and your workstations to enable UNC paths.
If your organization has multiple data shares, check the Agency has multiple data locations check box.
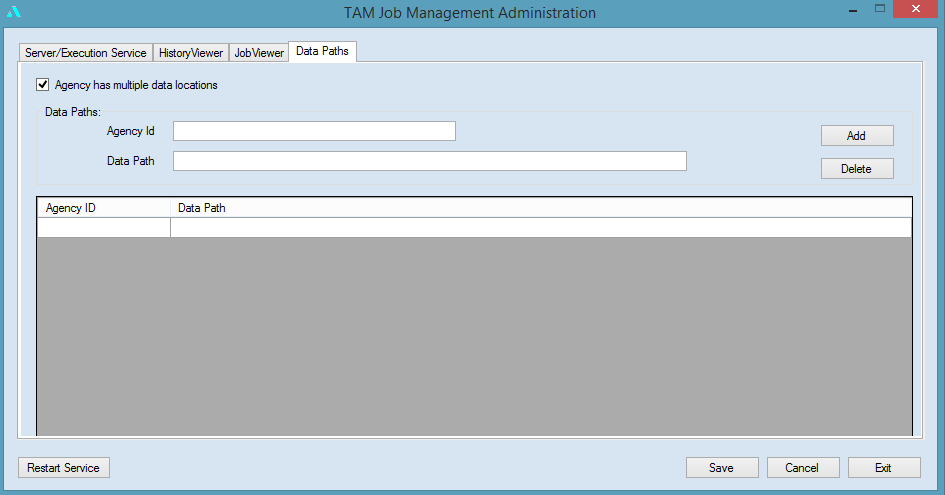
You can configure each data share location in this tab by defining an Agency ID value and entering the full UNC path to the data share in the Data Path field.
Managing your Data Paths
The Data Path value is the UNC path for the particular data share. The Agency ID value identifies the configured data path while enabling you to filter by and identify the locations of log items in the Job and History viewers. Each Agency ID value entered must be unique. It is recommended that you use your branch’s Applied TAM License number or Client ID for these values.
- To add a new data path, enter the values for the Agency ID and the Data Path, and click the Add button.
- To delete an existing data path, select the item in the list and click the Delete button.
Saving your changes
To commit the changes, click Save to save all settings on this screen to both the Job Server and Execution Server services configuration files. It is important that you click the Restart Service button for the changes to take effect. Click the Restart Service button after you make changes to Job Server settings and click Save. You must restart both the Job Server and Execution Server services.
- Click Restart Service –Any time any change is made to the Administration Panel, it is recommended to restart the Job and/or Execution Server service.
- Click Cancel to undo any changes made before saving.
- Click Exit to close the TAM Job Management Administration Panel.