Night Utility Job System Setup
The Night Utility Job System automates your data maintenance tasks to keep your system running smoothly while maintaining the integrity of your data. Inside this utility you can view scheduled jobs, modify these existing jobs and settings, set up new jobs to run, or make changes required to the job execution time and duration.
After Night Utility runs, review the Job Output Viewer to verify that your jobs successfully processed. Your review and management of the messaging system may require you to adjust to the Start Times of the scheduled day: if you receive messages that you your jobs are not completing or are being purged for a particular night’s processing, consider modifying the defined Start Time or extending your defined duration times. To manage these settings, review the View/Modify Start time section of this article.
Access Night Utility Job System Setup
To access Night Utility Job System Setup, complete the following steps:
- From Home Base, click the Utilities button.
- On the Utility Manager screen, open the System Administrative folder, then the Night Utility Job System folder, and select Night Utility Job System Setup.
- Click the arrow
 to continue.
Managing your view
In the Night Utility Job System, you assign predefined jobs for each selected day. To view your list of scheduled jobs, assigned queue times, or to assign a job to a day, use the Filter by: dropdown menu to select the day to view and modify.
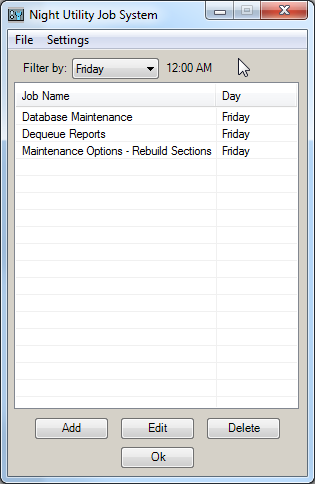
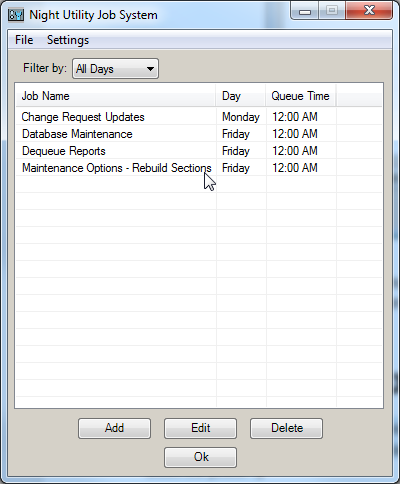
The Filter by: dropdown menu defaults to the current day of the week. When you select the All Days option, all currently defined jobs for each day of the week display in a single list. If you select All Days, the list displays all defined jobs for every day. Selecting the All Days option displays the Queue Time column that displays the start times for all days in one view.
Note: The Database Maintenance job is assigned and required to run on Fridays— this job cannot be removed, nor can the run day be modified.
Scheduling your Jobs
To define which processes run each day as part of your Night Utility Job System, use the provided workflows to add or modify your schedule and settings for the desired jobs.
Add a Job
To add a job, complete the following steps:
- Select the day from the Filter by: dropdown menu, then click the Add button.
- The Day defaults based on your Filter by: selection; however, it can be updated from the Add Jobs list.
Note: To have a particular job run daily, add that job for each day.
- Select the job you wish to add to the specified day from the Available Jobs dropdown list.
- If you want to add a job, but wish to delay the job from running, select the Suspend checkbox.
- If applicable, configure the options needed/available for the selected job. Details regarding each job and their options are found here.
- Click Add.
- After you have completed defining your jobs, click Save and Exit to finish, or Cancel to undo.
Edit a Job
To edit a job, complete the following steps:
- Select a day from the Filter by: dropdown menu.
- Select the specific job you want to modify.
- Click the Edit button.
- If you selected a job in the list, it will be selected in the Edit Jobs window.
Note: If you did not select a job in step 2, select a job from the Available Jobs dropdown menu.
- After making specific job setting changes, click Save.
- When finished, click Exit.
Note: If you have unsaved changes, you are prompted to save them.
Suspend a Job
If you are not ready for a job to process, or in the event that a job is preventing the completion of Night Utility Job System, you can suspend the job. A suspended job remains in the list of jobs and keeps all of its settings, but it will not run while suspended. Once a job is suspended, an asterisk (*) displays before jobs in the Jobs List allowing the job to be easily identifiable at a glance.
To suspend a job,
- Select a day from the Filter by: dropdown menu.
- Highlight the job from the list you want to suspend.
- Click the Edit button.
- Check the Suspend checkbox, and click Save.
When troubleshooting the issue is completed and the job is ready to run again, deselect the Suspend checkbox and save.
- Select a day from the Filter by: dropdown menu.
- Highlight the job from the list you want to suspend.
Note: For easily locate the suspended job, an asterisk will display in front of the job name.
- Click the Edit button.
- Deselect the Suspend checkbox and click Save.
Delete a Job
Deleting a job removes the defined job, and its settings, permanently. In most cases, the best practice is to Suspend a Job, as doing so prevents the job from running, but maintains the job and its settings for future use. If you only require to postpone a job from processing to perform troubleshooting see the Suspend a Job section. Otherwise, to delete a job, complete the following steps:
- Select a day from the Filter by: dropdown menu.
- Highlight the job from the list you want to delete.
- Click the Delete button.
- Click Yes to confirm the deletion from the validation window.
Adjust Day Settings
To support the automated process of the Night Utility Job System, Adjust Day Settings establishes and manages your Night Utility Job queue times and the duration of your maintenance window, as well as establishes the notification window for your users to exit the system.
Below are the key considerations in managing your Night Utility start time settings.
- Some jobs take longer to run, so consider adjusting the start times for days that have those jobs assigned, as well as spreading out longer running jobs throughout the week. To determine the job schedule that works best for you, review this list of available jobs and their descriptions.
- Night Utility start times are both time and day specific. For example, if you want a job to run at 12:30 on Monday night, schedule the job to run at 12:30 AM on Tuesday. As long as the start time for your jobs is before midnight on the night of your choosing, your jobs will run as expected.
- (Applied Cloud users only) Night Utility jobs are processed through your Applied TAMCloud environment. Applied recommends that you review the following document to determine the best start times for your jobs, given your time zone and your Applied TAMCloud environment.
Important! Whether or not the Job System is still running, the system lock is released and users are allowed to log in to the system when the Night Utility Job Server’s Maintenance Duration time has passed. Therefore, it is crucial to ensure that your Maintenance Duration is set to cover the entire expected maintenance time.
View/Modify Start Times
The Day Settings managed your daily Night Utility start time, maintenance duration, and delay start time. To modify your Day Settings, complete the following steps:
- Click the Settings menu.
- Select Adjust Day Settings.
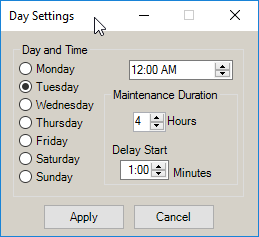
- Select the day to configure, and set the start time.
- Adjust the Maintenance Duration value as necessary.
Important! When Night Utility Job System runs, the Maintenance Duration determines how long all users will be locked out of the system; the system lock is released and users are allowed to log in to the system when the Night Utility Job Server’s Maintenance Duration time has passed.
If Night Utility finishes processing before this value expires, the lockout is removed and users may log in. However, if the Maintenance Duration expires before Night Utility finishes processing, users will be allowed to log in. Therefore, it is crucial to ensure that your Maintenance Duration is set to cover the entire expected maintenance time.
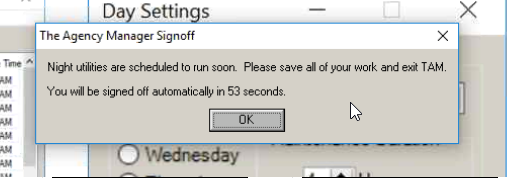
- The Delay Start value allows you to define how much time users have to save their work and exit the system after receiving the message that the Night Utility process is starting.
After this time has elapsed, all users are disconnected to allow Night Utility to begin. The default length is 1 minute; this value can be set for each day.
- Once all times have been set, click Save to save your changes and return to the Job Setup list. Night Utility will begin automatically at the time(s) selected.
Important! Setting changes do not take effect until you exit the Night Utility Job System. Click Ok at the Night Utility Job System screen to save your changes completely.
Available Jobs
Provided here is a list of all available jobs, their brief description, and the job’s intended use.
- Delete All files in AS_TEMP and AS_LOCK: This utility deletes all remaining temporary files on the two subdirectories. These temporary files should exist only while users are working.
- Batch Change Activity File: Run queued changes specified in the Change Activity File Utility Report.
- Database Maintenance: Database Maintenance job is automatically added if your settings for Friday do not include one and Scan for Corrupt Records is selected. If your settings for Friday already include a Database Maintenance job, but Scan for Corrupt Records is not selected, that option will be selected automatically. No other settings will be changed.
-
- Scan for corrupt records: The Scan utility searches the selected databases for damage. Database damage is caused by server problems or power problems, or by manually turning off stations or the server while TAM is running. Run the Scan utility daily for all databases, especially if you process daily company downloads.
-
- Print scan results: Print the results of the scan.
- Fix corrupt records: This option is available only when Scan for corrupt records has been selected.
- Delete unfixed records: This option is available only when Scan for corrupt records has been selected. Selecting this option automatically unchecks the Pack Data Files option in the Reindex Data Files job. Important Note: This option should never be selected unless a Support technician indicates otherwise.
- Reindex data files: The Reindex utility searches selected databases and recreates the index files (*.NDX). Index files help the program find specific records in the database more quickly (such as a customer code, claim number, etc.) and allow the program to sort on specific fields. Run the Reindex utility daily for all databases.
- Pack data files: This option is available only when Reindex data files has been selected. The Pack utility searches selected database(s) and removes any previously deleted records. Selecting this option automatically unchecks the Delete Unfixed Data Files option in the Scan for Corrupt Records job. It is generally recommended to run this option only once or twice a week.
Note: If problems occur with hardware, software, data disappearing, or data corruption, change the pack routine to reindex only.
- Backup data files before pack: Database Maintenance automatically creates a copy of the DBF on the hard drive prior to beginning the pack. In the event that a DBF becomes corrupt during packing, this copy can be used to replace the corrupt file.
Warning: This should not be considered a substitute for a tape backup. This is not a backup solution, as the copy is deleted once the pack is completed. Applied recommends that you have a complete tape backup before running a pack.
There are two special considerations for this option: disk space and time. If this option is selected but there is not enough disk space available, the file will not be packed; it will still be reindexed. This option also increases the time required to run a pack and reindex. However, in the event that the DBF becomes corrupt during the pack, the copy created by this utility automatically replaces the corrupt file. The copy is then reindexed.
-
- Smaller than: This option enables you to exclude large DBFs from the automatic backup. If you have elected to make copies of files being packed, you can specify that only files under a certain size (determined by you) be included. The larger DBFs are packed and reindexed regardless of the available disk space. If one of the larger DBFs becomes corrupt, it can be restored from the tape backup.
-
- Data File Selection frame:
-
-
- All Files: The selected maintenance operations are performed on all files.
Note: Applied recommends the All Files selection.
- TAM only: The selected maintenance operations are performed on TAM files only.
- FIM only: The selected maintenance operations are performed on FIM files only.
-
- Processing Mode frame: Keep the defaulted StandAlone selection.
- Validate Client Balances: This utility verifies the customers' balances. If the balances are incorrect, it generates an error report. This utility can be run for all customers or for a range of customers.
- Validate Cash Balances: This utility compares the Balance on File (which is a plugged number in the database) to the Proper Balance (a calculated number that should agree with a Status of Accounts). Run Validate Cash Balances once a week.
- Validate Receivables: This utility verifies that the subledger for Accounts Receivable (customers, lienholders, brokers, and finance companies) matches the General Ledger Accounts Receivables account.
- Prepare Company Reconciliations: When a Company Statement Reconciliation is done through the Reconciliation menu, the system prompts with a message to Begin Immediately or Queue for Processing Later. If you select Queue for Processing Later, the parameters selected in the Reconciliation menu are held in CO_STMT.TXT on TAM\SAV\ACCTCUR>. If the option to Prepare Company Reconciliation is selected in Night Utilities, this utility checks this subdirectory for this file to determine if there are any reconciliations to prepare. If the file does not exist, the system proceeds to the next option in Night Utilities. Once the preparation is complete, the file is deleted and can be recreated through the Reconciliation menu only.
This option is helpful for agencies with a large TRANSACT database because it can occupy a workstation for a long time if run during the day.
Run Prepare Company Reconciliations daily if your agency uses this feature.
- Run Pseudo Post: This utility updates the pseudo Month-End entries for the month that is unposted (last month posted plus 1). This option is also available when running Balance Sheet, Income Statement and Status of Accounts. On large systems, this routine can take a long time to compile the figures. When run in Night Utilities, it updates the files held on TAM\SAV\MONTHEND with the updated figures. It also creates a file on \TAM\SAV\MONTHEND called GLGEN.PST. GLGEN.PST holds the date, time and operator ID of the last person who ran the Pseudo Post. When one of the financials mentioned above runs, it displays a message stating the last time the entries were generated. This message displays the date and time the Pseudo Post routine was run as part of Night Utilities based on the information held in GLGEN.PST. Run this procedure daily.
- Change Request Updates: This procedure processes unprocessed change requests with an effective date on or before the system date. This procedure DOES NOT print Change Request Forms. It can be run for updating purposes only instead of running through Reports or through Close-Day. Run this utility as needed.
If the organization chooses to use this option rather than the option through Reports or Close-Day, run this job nightly.
If the information entered on the change request is incorrect, or if there is a problem updating the application, an error report will be logged.
- Maintenance Options: These options are available every day of the week. However, Applied recommends that these options be selected only on Fridays, Saturdays, or Sundays. If either of these options is selected for any other day, a message recommends that this utility be run only on the weekends.
- Rebuild Sections: Recalculates which applications are attached to which policies and rebuilds the SECTIONS and SECTIONS_F fields in POLICY.DBF. If applications are missing, run this utility; otherwise, run it only when an Applied Systems technician instructs you to do so.
- Rename Codes: Renames clients that have been previously queued in Utility Manager > General > Rename Codes. As a general rule, you should not rename more than fifteen client codes per night. Before running any data-changing utility, make sure a successful backup has been run. After running the utility, turn Rename Codes off so that it does not run again the following week.
- Dequeue Reports: Use this option to print reports that were run using Queue Report as an Output Destination.
- IVANS Transmission: This utility is a nightly feature set up with the Interface Support Team if your office is interfacing electronically with companies for batch download. If this option is selected, Batch Update From Files cannot not be selected; these jobs cannot be run on the same day. IVANS Transmission requires you to enter a valid Applied TAM user code in the configuration that has permissions to Company Interface Batch Transmission. If no user is selected, the IVANS Transmission job will fail. This value must be set for each scheduled instance. Only user codes that have permissions display in the Select User list.
- Batch Update From Files: Use this option if your organization is communicating electronically with your companies via Download. If this option is selected, IVANS Transmission cannot be selected; they cannot be run on the same day. Batch Update From Files requires you to enter a valid Applied TAM user code in the configuration that has permissions to Company Interface Batch Processing. If no user is selected, the Batch Update From Files job will fail. This value must be set for each scheduled instance. Only user codes that have permissions display in the Select User list.
- Real-Time Alerts: Real-Time Alerts are a way for companies to send agencies information that is not specific to a certain policy. For example, you could receive confirmation that the company received something, or you could receive a message indicating changes in how a company writes business in a particular state. Real-Time Alerts requires you to select a valid Applied TAM user code. If no user code is set, that job will fail. This value must be set for each scheduled instance.