Policies in Suspense
After a transmission, the program attempts to match and update the policy(ies) received to an existing policy on the agent’s system. If no match is found, the policy is placed in the Suspense file.
This process is a single-user process and cannot be run at the same time as any other batch interface process. Options available in the Suspense file include:
Transactions are displayed in the Suspense File list. Use the scroll bar to select and highlight the transaction you wish to assign. The following information from the highlighted transaction displays in the middle section of the screen: name, address, transaction type, transaction sequence number, package, and net change premium.
Enter Customer ID
- From the Home Base of The Agency Manager, click the Utilities button.
- Expand the Company Interface treeview branch.
- Expand the Suspense File treeview branch.
- Click Policies in Suspense, then click the arrow
 to continue. The Suspense File screen displays.
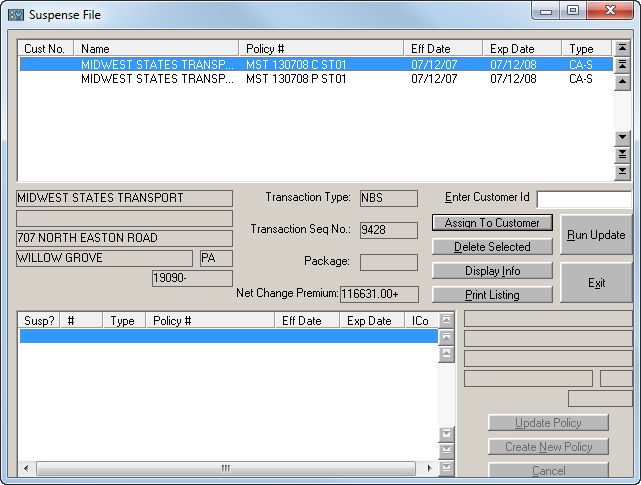
The Enter Customer ID field allows you to enter a new Customer ID for the highlighted transaction. If the Customer ID already exists, see Assigning an already existing customer ID.
- Type the new customer ID into the Enter Customer ID field, then press [Enter] or click the Assign to Customer button.
- If this customer number does not already exist in TAM, the following question displays: This is a new customer, ok? Click No to clear the customer number and select a new customer number. Click Yes to display any policies already assigned through Suspense but not yet updated.
- The following question displays: This is a new policy, ok? Click No to exit without assigning to this customer. Select Yes to assign the customer number and section number.
- Enter Policy number: Enter the policy section number (valid section numbers are 1-99) to which the policy should be assigned. If this is a new policy, do not enter a section number already assigned through Suspense but not yet updated, unless it is the same policy as the assigned policy or another line of business for a package policy already assigned.
- The customer number displays in the Suspense table next to the Name when assigned.
- After the questions have been answered, you are returned to the Suspense File screen to continue assigning policies.
Assign an Already Existing Customer ID
- Make sure the selected transaction is highlighted in the Suspense list.
- Double click the Enter Customer ID field.
- Select the Customer ID from the list of customers. Click OK.
- The question, Customer Verification Required? displays if the customer number entered already exists in TAM. The name and address of the existing customer display in this box. Compare this name and address to the name and address from the policy in Suspense, which displays in the middle of the screen. Select Yes to display all existing policies for the customer, including any that have already been assigned through Suspense but not yet updated. Click No or Cancel to select another Customer ID.
- Once the Customer is selected, the current policies for that Customer ID appear in the list at the bottom of the screen. Three buttons display in the lower right corner.
- Update Policy: This button allows you to update an existing policy for that Customer ID or send that policy directly to history. Once this button is clicked, a few windows display.
-
- Do you wish to create a new section? Click Yes to create a new section. Click No to update the current item and display the Move suspense item to history? screen.
- Move suspense item to history? Click Yes to move the policy from suspense directly to the History file instead of updating the current application. Click No to display the Update Verification screen.
-
Are you sure you want to update this application? Click Yes to update that policy.
Ordinarily, Verification to Update is answered Yes; however, if the effective date of the policy in Suspense is prior to the effective date of the policy in TAM, click Yes, to Move suspense item to history. This may occur when a renewal has already been received, but an endorsement effective before the renewal date was made to the policy.
Once all questions are answered, the Customer Number displays in the Suspense list.
- Create New Policy: When this button is clicked, a series of windows displays.
-
- This is a new Policy, ok? Click Yes to create a new policy. This allows you to enter the desired policy number. Click No to cancel. The customer number displays in the Suspense list next to the Name when assigned.
- Enter Policy Number. Type the policy number in the field and click OK.
- Cancel: This button cancels the current policies listed and allows you to select another Customer ID.
After the questions have been answered, you are returned to the Suspense File screen to continue assigning policies.
Delete Selected Button
To delete a transaction, highlight the desired policy in the suspense list and click the Delete Selected button. You are prompted, Verification Required to Delete. Click Yes to Delete. Click No to cancel.
Display Info Button
To view transaction information, highlight a policy in the suspense list and click the Display Info button. The following information displays: Policy Number, Effective Date, Expiration Date, Policy Type, Transaction Type, Transaction Sequence Number, Package, Name, Address, and Net Change Premium. Click OK to close the window.
Print Listing Button
Click this button to print or preview a listing of the policies in the Suspense file.
- Print: Click the Print Listing button to select a printer and print a report that lists the policy number, customer name, net change premium, policy type, company code, transaction type, cycle business purpose, and the sequence number of the policies in Suspense. Click Cancel to return the Suspense File screen without printing.
- Preview: Click the Preview button to view the report on the screen. A report displays, listing the policy number, customer name, net change premium, policy type, company code, transaction type, cycle business purpose, and the sequence number of the policies in Suspense. The option to print the page(s) displays at the top of the preview screen.
Run Update Button
This option updates the databases for each line of business or the History file with the policies assigned from Suspense. If this option is not selected after assigning the client IDs, the customer data is not updated. When this function is complete, a Communication Log prints. The updated policies are listed on the Policies Received section of the Communication Log.