To learn more about this capability, click the Launch video button.
- Access
the Accounts area.
To access Accounts from the Home screen, do one of the following:
- Click Accounts on the navigation panel.
- Click Areas > Accounts on the menubar.
- Click the down arrow next to Home on the options bar and select Accounts.
- Click Locate on the options bar.
To access Accounts from another area of the program, do one of the following:
- Click Home > Accounts on the menubar.
- Click the down arrow next to Home on the options bar and select Accounts.
- Click Locate on the options bar.
- Locate
a specific account.
- Select the type of account you are locating in the Locate account dropdown menu.
- Select a Locate by option.
- Select the applicable checkbox(es) to provide additional filtering:
- Insureds (available for Client accounts only)
- Prospects (available for Client accounts only)
- Additional Interest (available for Other Interest accounts only)
- Bill to (available for Other Interest accounts only)
- Certificate Holder (available for Other Interest accounts only)
- Active
- Inactive
- Enter the first few characters of the name, lookup code, phone number, etc. (depending on your Locate by selection) and press [Enter] or click Locate.
- The Results list displays all accounts that match the search term you entered. Click on a column heading to sort the list by that category. For example, click the Last Name column heading to sort by last name in ascending order. To sort in descending order, click the Last Name column heading again.
- Highlight the account in the Results list and do one of the following:
- Click File > Open on the menubar.
- Click Account Detail or any other option in the navigation panel.
- Click the Edit
 button.
 - Double click the account in the list.
- You can either navigate
directly to the Attachments area or use the menubar or options bar to
add an attachment from a different account screen
(e.g. contacts, policies, or claims).
Depending on the account screen from which you begin the workflow to add an attachment, the attachment association may default to the item you are viewing, for your convenience. If you begin the workflow on a client’s Claims list, for example, the attachment will be associated to the claim that is highlighted in the list.
Do one of the following:
- On the menubar, click File > New > Attachment and select the type of attachment you want to add.
- On the options bar, click New > Attachment and select the type of attachment you want to add.
- While viewing an account, do one of the following to navigate to the Attachments area:
- Click Attachments on the navigation panel.
- Click Areas > Attachments on the menubar.
- To add the attachment, do one of the following:
- Click the Add
button
 .
. - Press [Insert] on your keyboard.
- Press [Ctrl] + N.
- Select the attachment type and complete the workflow:
- Acquire and Attach Image (only available if Applied Epic is installed locally on your computer)
- Document
- Select the Template Folder in which the document is located, if applicable.
- Choose the Template from the dropdown menu.
- If the template exists in multiple languages, select the Language.
- Make selections on the following tabs:
- Contact
Select the checkbox for each contact to include in the document. Some contacts may be selected by default.
- Opportunity
- Select the Include closed checkbox if you want to associate the document to a closed opportunity.
- Select the checkbox for each opportunity to include.
- Service
- Select the Include closed checkbox if you want to associate the attachment to a closed service.
- Select the checkbox for each service to which the attachment applies.
- Quotes (not applicable to North America organizations)
- Policy/Claim
- Select the Include history checkbox in the Policy/line section if you want to associate the attachment to a historical policy or line of business.
- Select the checkbox
for each policy/line, claim, and/or
loss notice to be included.
Note: Selecting Policy may affect the Mark as an Important Policy Documents checkbox selection after you complete this step of the workflow. However, you can change this selection if necessary.
- Related
Accounts
Select the checkbox for each related account to include in the document.
- Click Continue.
- Optionally edit the attachment’s Description.
- If necessary, select the Mark
as an Important Policy Document checkbox
for the attachment.
Note: The checkbox may default selected if the attachment is assigned to a policy, depending on your organization's attachment configuration settings. - In the Detail frame, choose a Folder in which to save the attachment to make it easy to find later. The Folder field is required for attachments designated Client accessible. For instructions on creating, editing, and deleting these folders, see Attachment Folder Configuration.
Make Sub-folder selections if applicable.
The current system date defaults as the Received date. Change this if necessary.
Select a security Access level if applicable. Only employees with the selected access level will be able to access the attachment. See Attachment Access Level Configuration for instructions on adding, editing, and deleting these access levels.
Select Do not purge to exclude this attachment from the Purge Attachments utility. If you select an Expire on date, the attachment will be excluded from purges until that date, after which it will become eligible for purging.
Add Comments if necessary.
If the Client Access frame is enabled in System Settings, you can specify whether and for how long this attachment is accessible by the client through Applied CSR24 Self Service. If the attachment’s availability should not expire, leave the Expire on field blank.
Click Finish or press [Enter] to add the attachment.
Click Cancel or press [Esc] to exit the workflow without adding the attachment. You are prompted, "Do you wish to discard changes?" Click Yes.
- Existing
File
- The Select Files pop-up window displays. Enter the file path or browse to the file you want to attach. Select the file and click Open.
- The Attach To window displays. If Applied Epic is installed locally on your computer, you can remove the files from their original location by selecting the Delete original after attaching checkbox. If you access Epic through a web browser, you must delete the file manually after completing the workflow if you no longer need the original.
- Depending on the screen from which you added the attachment, the Attach To dropdown menu selection may default, but you can select a different type of item if necessary.
- If you selected Account in the Attach To dropdown, the code for the selected account defaults.
If you selected an option other than Account, click the lookup button to the right of the field. Select the item in the window that displays and press [Enter] or click Finish.
Note: Select the Include closed checkbox to include closed items in the list.
- If you selected Policy in the Attach To dropdown, the Mark as an Important Policy Document checkbox may default selected, but you can change this selection if necessary.
- The file name defaults as the Description, but you can enter a different Description if necessary.
- Select a Folder in which to save the attachment to make it easy to find later. The Folder field is required for attachments designated Client accessible. For instructions on creating, editing, and deleting these folders, see Attachment Folder Configuration.
- Make Sub-folder selections if applicable.
- The current system date defaults as the Received date. Change this if necessary.
- If the Client Access frame is enabled in System Settings, you can specify whether and for how long this attachment is accessible by the client through Applied CSR24 Self Service. If the attachment’s availability should not expire, leave the Expire on field blank.
- Select a security Access level if applicable. Only employees with the selected access level will be able to access the attachment. See Attachment Access Level Configuration for instructions on adding, editing, and deleting these access levels.
Select Do not purge to exclude this attachment from the Purge Attachments utility. If you select an Expire on date, the attachment will be excluded from purges until that date, after which it will become eligible for purging.
To add comments, click the Comments tab and enter text in the field.
- Click Finish or press [Enter] to add the attachment.
Click Cancel or press [Esc] to exit the workflow without adding the attachment. You are prompted, "Do you wish to discard changes?" Click Yes.
- eForm
- Select the checkbox next to each ACORD and/or CSIO form you want to attach and then click Continue.
Note: Forms listed with an asterisk are available only as non-fillable PDFs, as ACORD and CSIO do not provide fillable versions of all forms. State-specific ACORD 50 Auto ID cards vary; not all fields on duplicate cards are fillable for all states.
- The Attach To window displays. Make a selection in the Attach To dropdown menu.
- If you selected Account in the Attach To dropdown, the code for the selected account defaults.
If you selected an option other than Account, click the lookup button to the right of the field. Select the item in the window that displays and press [Enter] or click Finish.
Note: Select the Include closed checkbox to include closed items in the list.
- If you selected Policy in the Attach To dropdown, the Mark as an Important Policy Document checkbox may default selected, but you can change this selection if necessary.
- Click the item in the list and click Finish.
- Enter a Description of the attachment.
- Select a Folder in which to save the attachment to make it easy to find later. The Folder field is required for attachments designated Client accessible. For instructions on creating, editing, and deleting these folders, see Attachment Folder Configuration.
- Make Sub-folder selections if applicable.
- The current system date defaults as the Received date. Change it if necessary.
- If the Client Access frame is enabled in System Settings, you can specify whether and for how long this attachment is accessible by the client through Applied CSR24 Self Service. If the attachment’s availability should not expire, leave the Expire on field blank.
- Select a security Access level if applicable. Only employees with the selected access level will be able to access the attachment. See Attachment Access Level Configuration for instructions on adding, editing, and deleting these access levels.
- Select Do not purge to exclude this attachment from the Purge Attachments utility. If you select an Expire on date, the attachment will be excluded from purges until that date, after which it will become eligible for purging.
To add comments, click the Comments tab and enter text in the field.
- Click Finish or press [Enter] to add the attachment.
Click Cancel or press [Esc] to exit the workflow without adding the attachment. You are prompted, "Do you wish to discard changes?" Click Yes.
Note: Your newly added attachment will display in the Attachments list only if it matches the criteria for your current search filter. To change the attachments that display in the list, edit your Search where options and click Find.
Attachments for the selected entity display in the list below the search bar. The attachments that display by default depend on your organization's attachment configuration. One of the following link labels displays in the Attachments frame header:
Show All Documents: By default, only attachments with the Mark as an Important Policy Document checkbox selected display. Click the Show All Documents link label to display all attachments (up to 10,000 added within the last six months).
Show Only Important Policy Documents: By default, all attachments display in the list (up to 10,000 added within the last six months). Click the Show Only Important Policy Documents link label to display only attachments with the Mark as an Important Policy Document checkbox selected.
Note: Your view filters and search criteria apply only to the attachments that display based on your link label selection. To ensure that you are filtering or searching all attachments, make sure to select Show All Documents first.
If your system is configured to display all documents by default, the list displays up to 10,000 attachments added within the last six months, including any system-generated attachments (e.g. proofs, carrier submissions, and vehicle/driver schedules). You can use the System Generated search filter to excluded or view only system-generated attachments in the list if necessary. You can also set Filter Defaults per entity type (e.g. for all clients or all brokers) to change the attachments that populate the list automatically.
If more than 10,000 attachments exist for the selected search criteria, only the first 10,000 display in the list. A count of the attachments currently loaded displays in the lower right corner of the list. When your search returns more than 10,000 results, this count indicates how many results exist beyond the first 10,000 (e.g., Viewing Newest 10,000 of 12,000 Attachments). In this situation, specify additional search criteria to narrow your search to 10,000 results or fewer.
- To change the way attachments display in the list, click the word Attachments in the view filter to display additional options.
The All view displays all attachments for the selected entity (if fewer than 10,000), or the 10,000 most recent attachments.
The Search view defaults blank until you save a Filter Default. It will then populate with up to 10,000 attachments that meet your saved search criteria each time you access the Attachments list.
- Select an option. A checkmark displays beside your active selection.
- Use the search bar to display attachments that
meet specific criteria. Apply a single filter
(using the search fields) or multiple
filters (using the Edit
Filter button
 ) to narrow
the list of attachments.
) to narrow
the list of attachments.
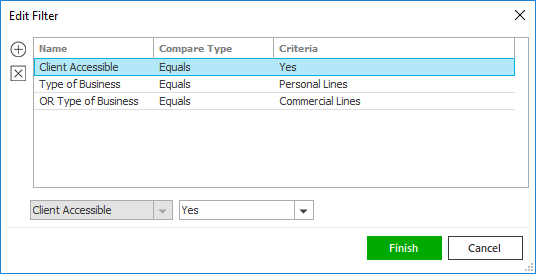
Selecting multiple criteria performs an "and" search (for example, Client Accessible attachments with a specific Attached Date). Making multiple selections for the same criterion performs an "or" search for that criterion (for example, attachments associated to either of two Types of Business). You can make up to eight selections for the Type of Business criterion.
- Click the Edit
Filter button .
- The Edit
Filter pop-up window displays.
Click the Add
button to
add filters.
- Select and/or enter search criteria
using the dropdown menus and fields.
Click the Add
button again to apply additional filters.
Enter additional search criteria.
Click the Delete button to remove a filter from the list. - Click Finish
when you have applied all of your
desired filters.
Hover over the Search where text to see the filter that is currently applied to the list.

To clear the currently applied filter (for the current session only) and start over, click the Clear Filter link label. The search bar displays in blue when filters are applied and in gray when filters are cleared.

- Make a selection in the first dropdown menu.
- The choices available in the second dropdown menu vary, depending on your selection in the first dropdown menu:
- Equals: Enter the search criterion (e.g., the full description) in the field to the right, or select a date from the dropdown calendar (if applicable).
- Contains: Enter at least one character of the search criterion (e.g., part of the description or folder name) in the field to the right.
- Within Range: Search between two calendar dates. Click the down arrow to the right of each field to choose dates from the dropdown calendars.
- Yes/No: Opt to include or exclude Client Accessible, Do Not Purge, or Important Policy Document attachments, based on your selection in the first dropdown.
- Exclude/Only/Include: Select to exclude or include items that meet the criterion selected in the dropdown, or to display only items that meet that criterion.
- Click Find
to apply the filter. Hover over the
Search
where text to see the filter
that is currently applied to the list.
To clear the currently applied filter (for the current session only) and start over, click the Clear Filter link label. The search bar displays in blue when filters are applied and in gray when filters are cleared.
- Click the Edit
Filter button
To save your currently applied
filters as a default for any account of the same entity type,
create Filter
Defaults. You cannot apply filter defaults
on a per-account basis, or on an
Attachments list opened from the Access
menu as Access > Attachments
already provides a filtered view.
Your filter defaults are unique to your user code and will
not affect other users’ saved defaults.
- Click the Filter Defaults link label and select the Use as default checkbox on the Filter Defaults screen to save your selected filters as the default for all accounts of the same entity type.
- Click OK
to apply the filter default.
To clear a filter default, click the Clear Filter link label, click the Filter Defaults link label, select the appropriate checkboxes in the Filter Defaults window, and click OK.
If you are using the Applied Epic Outlook Add-in for Microsoft Outlook, you can easily attach received email messages by using the Attach to Epic option in the Outlook ribbon. You can also attach outgoing email messages directly to a recipient’s Applied Epic account by selecting the Attach to Epic checkbox in the Outlook ribbon at the time you send the email. For more information on accessing your Applied Epic contacts and attachments in Outlook, see Compose an Email Message, Reply to an Email Message, or Forward an Email Message.
You can attach messages from Microsoft Outlook to the corresponding Applied Epic account in either of the following ways:
- Attach
received email messages
Quickly and easily attach one or more email messages to Applied Epic directly from your Outlook Inbox (or any other mail folder in Outlook) by selecting the Attach to Epic option on the Outlook ribbon. You can also attach the email you are reading the same way.
- In your Microsoft Outlook Inbox (or another mail folder), select one or more email messages. You can also follow these steps to attach an email message you are viewing in the Reading Pane.
- Click Attach to Epic in the Home ribbon. If Applied Epic is not already open, you are prompted to log in. This login only gives you access to the Attach To window. You must launch Epic separately to perform any other work in the system.
- In the Attach To window that displays, select the account Type from the dropdown menu.
- Enter the account Code or use the lookup button to open the Account Lookup window:
- Use the search
bar to locate the desired
account.

Make a selection in the first dropdown menu.
The choices in the second dropdown menu vary, depending on the option you selected in the first dropdown.
- Begins with: Enter at least the first character of the account Code. Click Find.
- Contains: Enter at least one character of the search criterion (e.g. part of the account name) in the field to the right. Click Find.
To see the filter that is currently applied to the list, hover over the Search where text.
Note: Click the Clear Filter link label on the right to reset the filter.
You can apply multiple filters if necessary.
- To apply multiple filters to the list, do one of the following:
- Click the Edit
Filter button .
- Press [Ctrl] + E.
- The Edit
Filter pop-up window displays.
Note: You can also use the Edit Filter button, rather than the search bar, to apply a single filter to the list if you prefer.
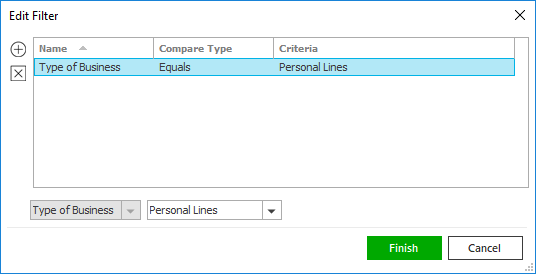
- Select and/or enter your desired search criteria using the dropdown menus and fields, and then click the Add button. The Name, Compare Type, and Criteria for your filter display in the list. Click one of these column headings to sort the list by that column. To reverse the sort order, click the column heading again.
- To apply additional filters, enter additional search criteria and continue clicking Add. To remove a filter from the list, select it and click the Delete button.
- Click Finish
when you have applied all of your desired filters.
To exit the dialog without applying any filters, click Cancel.
- Click to highlight the Account in the list.
- Double click the account, press Enter, or click Finish to select it and return to the Attach To window.
- To delete the original email from your Outlook Inbox and move it to your Deleted Items folder, select the Delete original after attaching checkbox.
- In the Attach To dropdown menu, select the type of item to which you would like to attach the email. Click the lookup button.
- If you selected Account, the account code defaults in the field. If you selected a different option, click the lookup button to the right of the field. Select the item in the window that displays and press [Enter] or click Finish.
Note: Click the Select closed or Include history checkbox to include closed and/or historical items in the list.
If you selected Policy in the Attach To dropdown, the Mark as an Important Policy Document checkbox may default selected, but you can change this selection if necessary.
The email Subject defaults in the Description field, but you can change it if necessary.
On the Detail tab, choose a Folder in which to save the attachment to make it easy to find later. For instructions on creating, editing, and deleting these folders, see Attachment Folder Configuration.
Select Subfolders if applicable.
The current system date defaults as the Received date. Change it if necessary.
Select the Client accessible checkbox if you want to enable the client to view the attachment. Optionally select an Expire on date from the calendar to make the attachment accessible for only a limited time.
Choose a security Access level if applicable. Only employees with the select access level will be able to access the attachment. See Attachment Access Level Configuration for instructions on adding, editing, and deleting these access levels.
Select Do not purge to exclude this attachment from the Purge Attachments utility. If you select an Expire on date, the attachment will be excluded from purges until that date, after which it will become eligible for purging.
To add comments, click the Comments tab and enter text in the field.
Click Finish or press [Enter] to add the attachment.
Click Cancel or press [Esc] to exit the workflow without adding the attachment.
- Attach
outgoing email messages
Use this option to attach an email you are composing (whether a new message, a reply, or a forwarded message) to Applied Epic when you send it. If you initiated the email workflow from an Epic account, this option defaults selected and the email is attached to that account by default. However, you can select a different account if necessary. You must complete the entire workflow before the email can be sent and attached to the account you select.
- In the email message window, select the Attach to Epic checkbox in the Message ribbon. Compose the email and click Send. If Applied Epic is not already open, you are prompted to log in. This login only gives you access to the Attach To window. You must launch Epic separately to perform any other work in the system.
- In the Attach To window that displays, select the account Type from the dropdown menu.
- Enter the account Code or use the lookup button to open the Account Lookup window:
- Use the search
bar to locate the desired
account.
Make a selection in the first dropdown menu.
The choices in the second dropdown menu vary, depending on the option you selected in the first dropdown.
- Begins with: Enter at least the first character of the account Code. Click Find.
Contains: Enter at least one character of the search criterion (e.g. part of the account name) in the field to the right. Click Find.
To see the filter that is currently applied to the list, hover over the Search where text.
Note: Click the Clear Filter link label on the right to reset the filter.
You can apply multiple filters if necessary.
- To apply multiple filters to the list, do one of the following:
- Click the Edit
Filter button .
- Press [Ctrl] + E.
- The Edit
Filter pop-up window displays.
Note: You can also use the Edit Filter button, rather than the search bar, to apply a single filter to the list if you prefer.
- Select and/or enter your desired search criteria using the dropdown menus and fields, and then click the Add button. The Name, Compare Type, and Criteria for your filter display in the list. Click one of these column headings to sort the list by that column. To reverse the sort order, click the column heading again.
- To apply additional filters, enter additional search criteria and continue clicking Add. To remove a filter from the list, select it and click the Delete button.
- Click Finish
when you have applied all of your desired filters.
To exit the dialog without applying any filters, click Cancel.
- Click to highlight the Account in the list.
- Double click the account, press Enter, or click Finish to select it and return to the Attach To window.
- In the Attach To dropdown menu, select the type of item to which you would like to attach the email. Click the lookup button.
- If you selected Account, the account code defaults in the field. If you selected a different option, click the lookup button to the right of the field. Select the item in the window that displays and press [Enter] or click Finish.
Note: Click the Select closed or Include history checkbox to include closed and/or historical items in the list.
- The email Subject defaults in the Description field, but you can change it if necessary.
- On the Details tab, choose a Folder in which to save the attachment to make it easy to find later. For instructions on creating, editing, and deleting these folders, see Attachment Folder Configuration.
- Select Subfolders if applicable.
- The current system date defaults as the Received date. Change it if necessary.
- Select the Client accessible checkbox if you want to enable the client to view the attachment. Optionally select an Expire on date from the calendar to make the attachment accessible for only a limited time.
- Choose a security Access level if applicable. Only employees with the selected access level will be able to access the attachment. See Attachment Access Level Configuration for instructions on adding, editing, and deleting these access levels.
- Select Do not purge to exclude this attachment from the Purge Attachments utility. If you select an Expire on date, the attachment will be excluded from purges until that date, after which it will become eligible for purging.
- To add comments, click the Comments tab and enter text in the field.
- Click Finish or press [Enter] to add the attachment.
Click Cancel or press [Esc] to exit the workflow without adding the attachment. You are prompted, "Do you wish to discard changes?" Click Yes.
You can drag files into Applied Epic from any folder on your computer, or drag email messages from Microsoft Outlook, or Epic's Email area. Drop the files onto any list or detail screen in the Accounts area (for example, Policies or Claims) to add them as attachments.
When you drop files or emails into Applied Epic, they automatically attach to the currently selected item. If you drop an email onto the Locate screen and have a client account highlighted in the list, it attaches to that account. If you drop files onto a client’s auto policy detail, they automatically attach to that policy.
- Locate the item (e.g., account, activity, or claim) to which you want to attach the files. If the item is in a list, click on the item to select it.
- Browse to the file(s) or email message(s) that you want to attach from your workstation or email program. You can select multiple items to drag and drop.
- Drag and drop the files or email messages onto the Applied Epic screen. The Attach To window displays.
- If Applied Epic is installed locally on your computer,
the Delete original after
attaching checkbox is selected by default. Deselect
it if you want to keep the files saved in their current location
as well as attaching them. If you access Epic through a web
browser, you must delete the files manually after completing
the workflow if you no longer need the originals.
If you are attaching email messages directly from Microsoft Outlook or Epic email, this checkbox does not display. - The current account or selected list item defaults in the
Attach To frame.
You can change
this selection if necessary.
- In the Attach to dropdown menu, select the type of item to which you want to attach the file.
- Click the lookup
button
 .
.
If you selected Account, the account code defaults into the field.
If you selected any other option, click the lookup button
to the right of the field. Select
the item
in the window that displays and press [Enter]
or click Finish.Note: Select the Include closed checkbox to include closed items in the list.
Click the item in the list and click Finish.
- If you selected Policy in the Attach To dropdown, the Mark as an Important Policy Document checkbox may default selected, but you can change this selection if necessary.
- The file name(s) or email subject(s) default as the Description, but you can change it if necessary.
- On the Description tab, choose a Folder in which to save the attachment to make it easy to find later. The Folder field is required for attachments designated Client accessible.
- Make Sub-folder selections if applicable. For instructions on creating, editing, and deleting these folders, see Attachment Folder Configuration.
- The current system date defaults as the Received date. Change it if necessary.
- If the Client Access frame is enabled in System Settings, you can specify whether and for how long this attachment is accessible by the client through Applied CSR24 Self Service. If the attachment’s availability should not expire, leave the Expire on field blank.
- Select a security Access level if applicable. Only employees with the selected access level can access the attachment. See Attachment Access Level Configuration for instructions on adding, editing, and deleting these access levels.
- Select Do not purge to exclude this attachment from the Purge Attachments utility. If you select an Expire on date, the attachment will be excluded from purges until that date, after which it will become eligible for purging.
- To add comments, click the Comments tab and enter text in the field.
- Click Finish or press [Enter] to add the attachment.
