Policy Checking Results
Applied Epic Policy Checking, powered by Coupa,
automates the tedious work of identifying differences between policy documents.
Once this automated work is complete, however, you must review the differences
that Policy Checking has identified
to decide if and how to act on them. For information on how to use Policy
Checking effectively and how it can improve your policy comparison workflows,
see the Policy Checking FAQ.
Policy Checking comparisons remain available for review for 60 days
after the automated check is complete.
Note: This
article contains printing instructions that are only applicable if Applied
Epic is installed locally on your computer. If you access Epic through
a web browser such as Google Chrome, Mozilla Firefox, or Microsoft Edge,
you cannot print directly from within the system. See Printing
for more information about the printing capabilities available from Epic
Browser. All other steps in this article are applicable to both methods
of accessing Epic unless stated otherwise.
Accessing Policy Checking Results
Once you have submitted a Policy Check, you can check the status of
the submission.
- Locate the
account and access the Attachments area.
- To access and review Policy Checking results, do one of the following:
- Click Access
> Policy Checking Results on the options bar.
- Click Access
> Policy Checking Results on the menubar.
- The Policy Checking Results
screen displays, with a list of Policy Checking comparisons for the
selected account. Use
the search bar to filter the list if necessary.
The Status column displays
one of the following statuses for each Policy Checking comparison:
- Submitted: The policy
check has been sent for processing.
- Processing: The automated
comparison of the documents is in progress.
- Ready: The automated
comparison is complete, and you may begin reviewing the results.
- In Progress: Manual
review of the comparison is not yet complete.
- Complete: Manual review
of the comparison is complete. Complete
comparisons display in the list only when you select the Completed Items criterion in
the Search Where filter.
To repopulate the list with any Status
changes, click the Refresh
link label in the header. To print the list of policy checking results,
click the Print
 button. Print the list as you would any other document.
To delete a policy checking comparison, do
the following:
- Select a comparison.
- Click the Delete
button

- The Delete Verification
pop-up window displays. Click Yes.
Note: You can only delete checking
comparisons more than 60 days old with statuses other than
Completed.
To reassign
a policy checking comparison to another user, do one of the following:
- Select a comparison.
- Click Reassign.
- The Reassign Policy Checking
pop-window displays.
- From the Reassign To dropdown
menu, select the user
to whom to reassign the comparison.
- Click Finish
to complete the reassignment.
To open a Policy Checking comparison
for review, select it and click the View
 button to the left of the list. You can only open policy checking
comparisons with a status of Ready
or In-Progress on which you
are listed as the owner.
button to the left of the list. You can only open policy checking
comparisons with a status of Ready
or In-Progress on which you
are listed as the owner.
Note: If
a notification is set up to display when a policy check is complete,
you can also access the results by clicking the link in the notification
window.
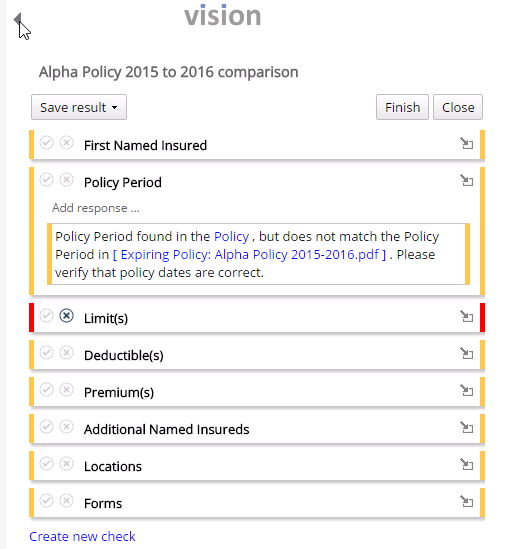
Reviewing the Policy
Checking Results
The Policy
Checking Results screen displays, with a side-by-side view of the
documents you submitted for comparison. You can page through the documents
or zoom in and out using the toolbar controls. Click the menu button  to view
or change settings related to your Coupa
account, or to view additional Help content specific to Coupa.
For an overview of the Coupa tools
and recommendations on how to use them in a number of common policy checking
scenarios, see Policy Checking
Workflow Basics.
to view
or change settings related to your Coupa
account, or to view additional Help content specific to Coupa.
For an overview of the Coupa tools
and recommendations on how to use them in a number of common policy checking
scenarios, see Policy Checking
Workflow Basics.
The document identified as the Policy
displays on the left by default. All other documents display in the right
pane, with a tab for each document. Click the double
arrow button  to display
additional tabs if necessary. Search
Terms that Policy Checking has
identified (i.e. items that you may want to examine in detail) are highlighted.
to display
additional tabs if necessary. Search
Terms that Policy Checking has
identified (i.e. items that you may want to examine in detail) are highlighted.
To change the document that displays in the
left pane, click the tab
for the Policy document and select
a different document from the dropdown menu.
To begin reviewing the results, hover
over the left margin of the screen to open the checklist.
Individual checklist items also display in
the lower right corner of the screen, where you can click the arrow  buttons to cycle through them.

- Click on a check
to expand it. The search terms are highlighted, and the documents
in the left and right panes jump to the location of the referenced
text. Colored lines in the scroll bar to the right of each document
indicate the locations of the search terms. Check results display
in snippets by default, which temporarily hide the rest of the document
from view. To view the entire page, click on the page.
To view the entire document, or the entire document with matched and
unmatched text marked, select Full
Document from the Snippet
View dropdown menu. To compare similar documents in detail,
select Match
View from the dropdown. Use the Highlight
all/Highlight dropdown menu in the upper right corner to remove
the highlights on matched items, partial matches, or un-matched areas
and/or moved paragraphs in the documents.
You can click and drag to select text, which enables you to copy your
selection to the clipboard, find other instances of the same text,
add a comment
to your selection, or add your selection to the
current check via the right-click menu.
- Complete each check by evaluating the compared text. If necessary,
you can search
for specific words or phrases in the documents.
- Select the checkmark
icon
 if the documents pass the check.
- Select the X
icon
 if the documents fail the check
(for example, if the limits are incorrect in one of the compared
documents). If you select one of these icons in error, click it
again to deselect it.
if the documents fail the check
(for example, if the limits are incorrect in one of the compared
documents). If you select one of these icons in error, click it
again to deselect it.
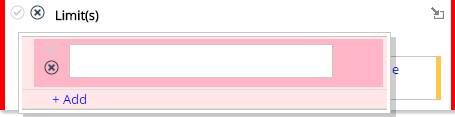
- Optionally enter an explanation
for the pass or failure.
- Click the Add
response link label.
- Enter your response in the text box.
You can select or deselect the checkmark or X icon to indicate a pass
or failure while adding responses. To delete a response, click the X in the upper
right corner of the Add response
popup.
- Press [Enter]
to complete your response, or click the +
Add link label to enter additional responses.
To leave the policy check In
Progress and continue it later, hover over the left margin
to display the checklist and click the Close
button at the top. Your work is saved automatically.
When you have completed all checks and are ready to mark the policy
check Complete, click the
Finish
button. This creates two additional attachments associated to the
selected client: the completed checklist (with passes, failures, and
any response notes you added) and a PDF of the compared documents.


 to cycle through the search results in the documents.