Note: This article contains printing instructions that are only applicable if Applied Epic is installed locally on your computer. If you access Epic through a web browser such as Google Chrome, Mozilla Firefox, or Microsoft Edge, you cannot print directly from within the system. See Printing for more information about the printing capabilities available from Epic Browser. All other steps in this article are applicable to both methods of accessing Epic unless stated otherwise.
To access the General Ledger from another area of the program, do one of the following:
To locate receipts that match specific criteria, use the search bar. Make a selection in each dropdown menu to locate the desired receipt. The fields vary, depending on the menu options you choose.
These are the choices in the first dropdown menu:
The choices available in the second dropdown menu vary, depending on the selection you made in the first dropdown.
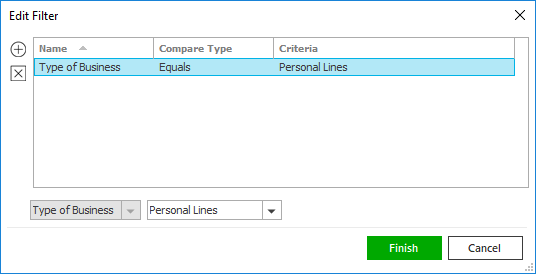
To see the filter that is currently applied to the list, hover over the Search where text.
You can apply multiple filters if necessary.
The Select Columns window displays.
Deselect the checkbox next to each column that should be removed from the list.
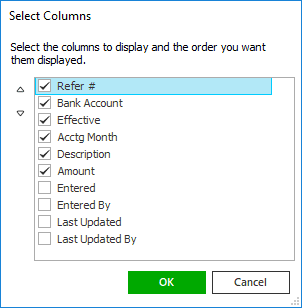
Click Cancel to close the window without saving your changes.
Note: When you select a receipt, its status displays in the bottom left corner of the screen.
Note: Receipts containing archived transactions can be opened for viewing, but they cannot be edited.
In the Summary view, all detail lines that share the same Type, Lookup Code, and Payment ID are rolled up into a single row. If the Payment ID is blank for multiple detail lines, they are considered to have the same payment ID. For this reason, using the Payment ID field to enter an identifying value (e.g. a check number) that will effectively group detail rows resulting from the same individual payment is recommended.
Each bank account detail line is a separate row in the Summary view, as are each interagency receivable and interagency payable detail line (created when the receipt is finalized).
The rows included in the Summary view (not including bank account or interagency rows) represent the rows that will display on the Summary layout of the Deposit Register report.
The only fields you can revise in the Summary view are the GL schedule, Method, Payment ID, Payment date, Routing #, and Description. A field must have the same value for all associated detail rows to be editable in the Summary view. If all detail rows associated to a summary row have the same GL schedule, for example, the GL schedule field is enabled. However, if the associated detail rows have different GL schedules, you cannot modify the GL schedule field for the summary row; instead, you must edit each detail row individually. Be aware that changing any value for a row on the Summary view automatically applies that change to every associated row in the Detail view. Similarly, deleting a row on the Summary view automatically deletes all associated rows in the Detail view.
You can do the following from here:
Do one of the following:
Click the Add button to the left of the list.
Press [Insert] on your keyboard.
Note: Items can be added only to suspended receipts, not to finalized receipts.
Note: The Miscellaneous option has no associated lookup field.
Three tabs are available on this screen:
The Items tab enables you to locate transactions with a direct bill commission receivable, premium payable, or broker commission payable balance for this particular company/broker.
Once you have located the items, you can pay balances or write them off.
Note: Items that display in bold have pending processes and cannot be paid.
To pay an item balance:
To write off an item balance, highlight the item and click Write-Off. The Writeoff Payable window displays. Modify the Description if necessary and click Finish.
Note: If you make a partial payment on an item and write off the remaining balance, the item displays only once in the Paid Items list. Deleting that item from the Paid Items list deletes both the partial payment and the write-off.
The Statements tab displays a list of direct bill commission, premium payable, or broker commission payable statements for this particular company/broker. To change the columns that display in the list or the order in which they display, click the Select Columns link label. You can sort the items by any column by clicking the column header. Click the column header again to sort in the reverse order.
To filter the statements that display in the Available Statements list, do any of the following:
To pay a statement balance, select the checkbox
next to the statement. The Total
applied and Unapplied
amount totals at the top of the screen
and the Total
at the bottom of the list are updated based
on the statement amount.
Note:
If you are searching for direct bill statements,
only statements associated to agencies that
are set up to recognize direct bill income
on an Accrual
basis in Accounting
Methods Configuration display in this
list.
The Cash On Account tab enables you to leave all or a portion of the receipt balance on account.
To add a Cash On Account row, click the Add button to the left of the list. A new row is added and selected by default. Modify the information in the frame below the list:
To modify a cash on account row, highlight the row and click the Edit button to the left of the list. The fields below the list are enabled for editing.
To delete a cash on account row, select the row and click the Delete button. You are prompted, “Do you wish to delete this record?” Click Yes.
You can use the same receipt detail line to pay items, pay statements, and leave cash on account. As you navigate between the tabs on the Pay Payables/Commissions popup, the selections you make on each tab are retained.
Three totals display at the top of the screen:
When you have finished allocating the receipt amount, click Finish. To close the Pay Payables/Commissions window without applying changes, click Cancel.
When you click Finish, new detail rows are added to the receipt based on the payables/commissions selected.
For items paid:
When a reconciliation statement is created by a receipt detail row, it is automatically paid. Its status defaults as Finalized or Approved based on the selection made in System Settings. The Approved status does not apply to direct bill commission statements, so a direct bill commission statement defaults as Finalized. This means that it cannot be edited. The statement Description matches the description of the receipt detail line, and contract/payment contact information is pulled from the receipt detail line as well.
The statement has the following settings, which cannot be modified:
The user who entered the statement and the time the statement was entered match the user who added the receipt detail line and the date the detail line was added.
The Associate GL Item, Remove Associated GL Item, Reopen Statement, and Reverse Statement actions cannot be performed on a statement created by a receipt.
For statements paid, a separate detail row is created for each statement. To view information on the statement paid by a detail row, select the row and click the Paid Statements link label next to the Apply to field.
For cash on account rows, a separate detail row is created to correspond to each row entered on the Cash On Account tab of the Pay Payables/Commissions popup.
For each agency indicated on a receipt detail row:
When the receipt is entered, all affected item payable balances and statement paid statuses are updated accordingly. If an item was partially paid, it will still be eligible to pay (for the remaining balance) on subsequent receipts or on a reconciliation statement. If an item was fully paid, its payable status will be updated to Closed and it will no longer be eligible to pay. No paid statements are available to pay on a subsequent GL entry.
If items were unapplied during the workflow, the associated receipt detail rows are deleted (if the receipt is suspended) or reversed (if the receipt is finalized). The corresponding payment transactions are deleted or reversed accordingly. All associated transaction process rows are also removed/reversed. The item/statement/account balances are restored to their values before the payments were originally applied.
If paid statements are unapplied and the receipt's original accounting month is now closed, a reversing statement that mirrors the original statement will be created. A new Unpaid statement that matches the original statement will exist in its place. The original receipt detail row will be linked to the original statement and the reversing row will be linked to the reversal statement.
Three tabs are available on this screen:
The Items tab enables you to pay transactions for the selected account that have a receivable balance.
You can filter the list by specifying search criteria. To locate debits or credits that match specific criteria, use the search bar.
Make a selection in each dropdown menu to locate the desired item(s). The fields vary, depending on the menu options you choose.
These are the options in the first dropdown menu:
The choices available in the second dropdown menu vary, depending on the selection you made in the first dropdown.
To see the filter that is currently applied to the list, hover over the Search where text.
You can apply multiple filters if necessary.
To change the columns that display in either list or the order in which they display, click the Select Columns link. You can sort the items by any column by clicking the column header. Click the column header again to sort in the reverse order.
The current PYMT transaction displays in the Credits list (if a credit amount) or the Debits list (if a debit amount). To apply debits to credits, do the following:
The Policy tab enables you to apply some or all of the payment to one or more policies for this account.
The Account tab enables you to apply some or all of the payment to the account associated to the receipt detail row, or to one or more client accounts (if the payment is for a broker, finance company, or other interest).
As you navigate between the tabs on the Pay Receivables popup, the selections you make on each tab are retained.
Three totals display at the top of the screen. If the receipt detail row is a credit amount, these totals display as positive numbers; if the receipt detail row is a debit amount, they display as negative numbers.
When you have allocated the entire payment amount and clicked Finish, new detail rows are added to the receipt based on the receivables selected:
If payments were unapplied during the workflow, the associated receipt detail rows are deleted (if the receipt is suspended) or reversed (if the receipt is finalized). The corresponding payment transaction is deleted or reversed accordingly. All associated transaction process rows are also removed/reversed. The item/policy/account balances are restored to their values before the payments were originally applied.
When the receipt is finalized, an interagency detail row is created for each agency on a detail line that is not associated to the receipt bank account. These rows automatically file for the bank account’s default agency.
The interagency detail rows have a default Description of Interagency receivables for Receipt #XXX and a default Apply to of General Ledger. Offsetting Interagency payables rows are also created to correspond to the Interagency receivables rows.
For example, a receipt is entered for bank account 102, which is associated to agencies INS and OSU. The bank account’s default agency is INS. The receipt contains premium payable detail lines for INS, OSU, PEN, and AGN.
Before the receipt is finalized, it contains the following detail rows:
Account | GL Account # | Agency | Debit | Credit |
Bank Account | 102 | INS | 1000 | |
Bank Account | 102 | OSU | 500 | |
Company Payables | 200 | INS | 800 | |
Company Payables | 200 | OSU | 500 | |
Company Payables | 200 | PEN | 400 | |
Company Payables | 200 | AGN | 200 |
Bank account rows are created to offset the INS and OSU premium payable detail lines, because these agencies are associated to the bank account. The INS bank account row also offsets all detail lines for agencies that are not associated to the bank account. In this example, PEN and AGN are not associated to the bank account, and these two detail lines have a net credit amount of 200. So the INS bank account row is debited an additional 200.
After the receipt is finalized, it contains the following detail rows:
Account | GL Account # | Agency | Debit | Credit |
Bank Account | 102 | INS | 1000 | |
Bank Account | 102 | OSU | 500 | |
Company Payables | 200 | INS | 800 | |
Company Payables | 200 | OSU | 500 | |
Company Payables | 200 | PEN | 400 | |
Company Payables | 200 | AGN | 200 | |
Interagency Receivables | 160 - INS | PEN | 400 | |
Interagency Receivables | 160 - AGN | INS | 200 | |
Interagency Payables | 260 - PEN | INS | 400 | |
Interagency Payables | 260 - INS | AGN | 200 |
This brings agencies INS, PEN, and AGN into balance. Agency OSU is associated to the bank account and is not the bank account’s default agency, so no additional rows are necessary to balance OSU.
Click a detail row in the list.
For all other detail rows, see the instructions below.
Note: Changing the Type, Account, Amount, Apply to, GL account, or associated structure on a receipt detail row effectively deletes the previous receipt detail row and creates a new one.
To change the account the receipt detail row is for, do the following:
If you are not changing the account the receipt detail row is for, do the following:
Three tabs are available on this screen:
The Items tab enables you to locate transactions with a direct bill commission receivable, premium payable, or broker commission payable balance for this particular company/broker.
Once you have located the items, you can pay balances or write them off.
Note: Items that display in bold have pending processes and cannot be paid.
To pay an item balance:
To write off an item balance, highlight the item and click Write-Off. The Writeoff Payable window displays. Modify the Description if necessary and click Finish.
Note: If you make a partial payment on an item and write off the remaining balance, the item displays only once in the Paid Items list. Deleting that item from the Paid Items list deletes both the partial payment and the write-off.
The Statements tab displays a list of direct bill commission, premium payable, or broker commission payable statements for this particular company/broker. To change the columns that display in the list or the order in which they display, click the Select Columns link label. You can sort the items by any column by clicking the column header. Click the column header again to sort in the reverse order.
To filter the statements that display in the Available Statements list, do any of the following:
To pay a statement balance, select the checkbox
next to the statement. The Total
applied and Unapplied
amount totals at the top of the screen
and the Total
at the bottom of the list are updated based
on the statement amount.
Note:
If you are searching for direct bill statements,
only statements associated to agencies that
are set up to recognize direct bill income
on an Accrual
basis in Accounting
Methods Configuration display in this
list.
The Cash On Account tab enables you to leave all or a portion of the receipt balance on account.
To add a Cash On Account row, click the Add button to the left of the list. A new row is added and selected by default. Modify the information in the frame below the list:
To modify a cash on account row, highlight the row and click the Edit button to the left of the list. The fields below the list are enabled for editing.
To delete a cash on account row, select the row and click the Delete button. You are prompted, “Do you wish to delete this record?” Click Yes.
You can use the same receipt detail line to pay items, pay statements, and leave cash on account. As you navigate between the tabs on the Pay Payables/Commissions popup, the selections you make on each tab are retained.
Three totals display at the top of t he screen:
When you have finished allocating the receipt amount, click Finish. To close the Pay Payables/Commissions window without applying changes, click Cancel.
When you click Finish, new detail rows are added to the receipt based on the payables/commissions selected.
For items paid:
When a reconciliation statement is created by a receipt detail row, it is automatically paid. Its status defaults as Finalized or Approved based on the selection made in System Settings. The Approved status does not apply to direct bill commission statements, so a direct bill commission statement defaults as Finalized. This means that it cannot be edited. The statement Description matches the description of the receipt detail line, and contract/payment contact information is pulled from the receipt detail line as well.
The statement has the following settings, which cannot be modified:
The user who entered the statement and the time the statement was entered match the user who added the receipt detail line and the date the detail line was added.
The Associate GL Item, Remove Associated GL Item, Reopen Statement, and Reverse Statement actions cannot be performed on a statement created by a receipt.
For statements paid, a separate detail row is created for each statement. To view information on the statement paid by a detail row, select the row and click the Paid Statements link label next to the Apply to field.
For cash on account rows, a separate detail row is created to correspond to each row entered on the Cash On Account tab of the Pay Payables/Commissions popup.
For each agency indicated on a receipt detail row:
When the receipt is entered, all affected item payable balances and statement paid statuses are updated accordingly. If an item was partially paid, it will still be eligible to pay (for the remaining balance) on subsequent receipts or on a reconciliation statement. If an item was fully paid, its payable status will be updated to Closed and it will no longer be eligible to pay. No paid statements are available to pay on a subsequent GL entry.
If items were unapplied during the workflow, the associated receipt detail rows are deleted (if the receipt is suspended) or reversed (if the receipt is finalized). The corresponding payment transactions are deleted or reversed accordingly. All associated transaction process rows are also removed/reversed. The item/statement/account balances are restored to their values before the payments were originally applied.
If paid statements are unapplied and the receipt's original accounting month is now closed, a reversing statement that mirrors the original statement will be created. A new Unpaid statement that matches the original statement will exist in its place. The original receipt detail row will be linked to the original statement and the reversing row will be linked to the reversal statement.
Three tabs are available on this screen:
The Items tab enables you to pay transactions for the selected account that have a receivable balance.
You can filter the list by specifying search criteria. To locate debits or credits that match specific criteria, use the search bar.
Make a selection in each dropdown menu to locate the desired item(s). The fields vary, depending on the menu options you choose.
These are the options in the first dropdown menu:
The choices available in the second dropdown menu vary, depending on the selection you made in the first dropdown.
To see the filter that is currently applied to the list, hover over the Search where text.
You can apply multiple filters if necessary.
To change the columns that display in either list or the order in which they display, click the Select Columns link. You can sort the items by any column by clicking the column header. Click the column header again to sort in the reverse order.
The current PYMT transaction displays in the Credits list (if a credit amount) or the Debits list (if a debit amount). To apply debits to credits, do the following:
The Policy tab enables you to apply some or all of the payment to one or more policies for this account.
The Account tab enables you to apply some or all of the payment to the account associated to the receipt detail row, or to one or more client accounts (if the payment is for a broker, finance company, or other interest).
As you navigate between the tabs on the Pay Receivables popup, the selections you make on each tab are retained.
Three totals display at the top of the screen. If the receipt detail row is a credit amount, these totals display as positive numbers; if the receipt detail row is a debit amount, they display as negative numbers.
When you have allocated the entire payment amount and clicked Finish, new detail rows are added to the receipt based on the receivables selected:
If payments were unapplied during the workflow, the associated receipt detail rows are deleted (if the receipt is suspended) or reversed (if the receipt is finalized). The corresponding payment transaction is deleted or reversed accordingly. All associated transaction process rows are also removed/reversed. The item/policy/account balances are restored to their values before the payments were originally applied.
When you unpay a previously paid item by editing the receipt detail row, the balance on the item is restored to its previous state and all associated transaction process rows are deleted.
When you unpay a previously paid statement by editing the receipt detail row, the statement’s status is changed to Unpaid.
Use this action to locate outstanding payments entered in the Transactions area or generated by the Print a Receipt for Payment option so that they can be processed on this receipt.
The Type, account, contact, and Amount for each detail line default from the corresponding payment and cannot be revised.
The GL schedule, Method, Payment ID, Payment date, Routing #, and Description also default from the corresponding payment, but you can revise them if necessary.
You cannot change the Apply to option for detail rows created by payment transactions. You also cannot change any of the Structure information.