Installation | |
These install instructions are included with the SDK documentation for the benefit of the LAN Agencies, who will need to install SDK locally. |
There are a few different options you have for setting up your environment; however, it is highly recommended that you have at least one test environment configured that is separate from your production environment. When setting up a test environment, you need to set up a test database that is separate from the database in your production environment. The test environment is then used to create and test new code, resolve any issues encountered in the production environment, and experiment with new versions of the Applied Epic SDK before you implement them in your production environment.
The following software requirements are needed for an Epic SDK environment
1. Central Server
2. Database Server
3. Infrastructure Server
4. Central Data Server
5. Application Server with Thin Client installed
6. Windows 2012 (with IIS8), Windows 2012 R2 (with IIS8.5), Windows 2016 Server(with IIS10) or Windows 2019 Server(with IIS10)
EpicSDK will no longer support Windows Server 2003 |
To install the Epic SDK, there are two main steps. First, you need to install and configure IIS on your server. Then you need to run the actual Epic SDK installation. Listed below you will find the steps needed to install and configure IIS on various versions of Windows.
Installation
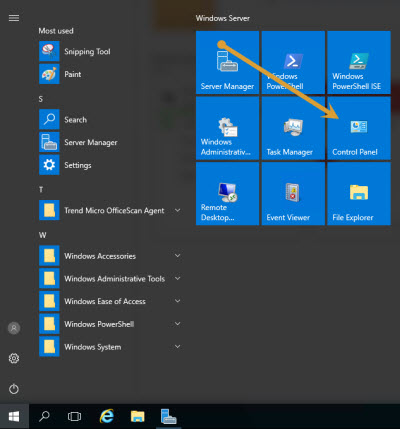
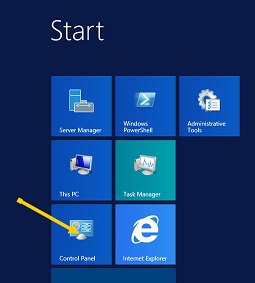
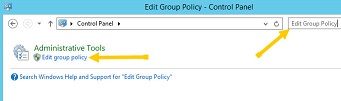
1. Click the start button to open the Windows Start screen. Open Control Panel.
2. In the top left corner, there is a search box with the text "Search Control Panel". In this box, type Edit Group Policy.
3. In top half of the list which appears on the left of the screen, under Computer Configuration select the > in order to expand Administrative Templates.
4. Under Administrative Templates, select System.
5. Scroll down the list on the right of the screen to near the bottom, and open (double click) Specify settings for optional component installation and component repair .
6. When open, turn on the Enable radio button
7. Select “ Download repair content and optional features directly from Windows Update instead of Windows Server Update Service (WSUS). ”
8. Click Apply.
9. Click OK, and close the Group Policy Editor.
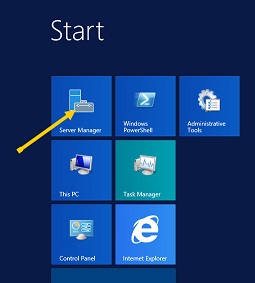
10. Click the start button to open the Windows Start screen. Open Server Manager.
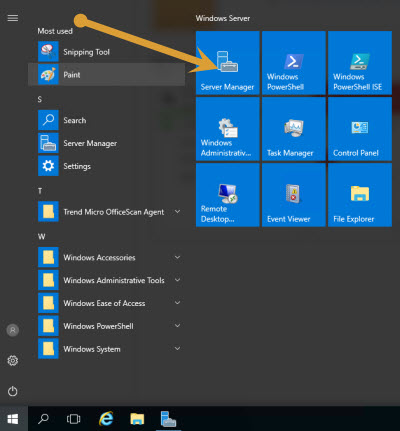
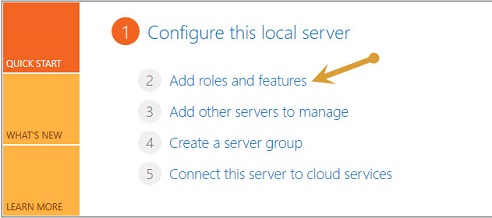
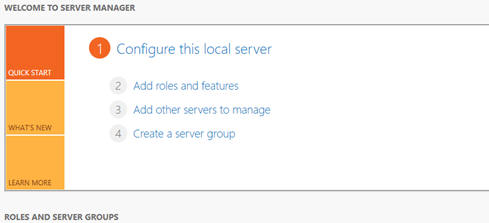
11. Select “Add roles and features”
12. In the “Add Roles and Features Wizard, Click Next on the “ Before You Begin ” node.
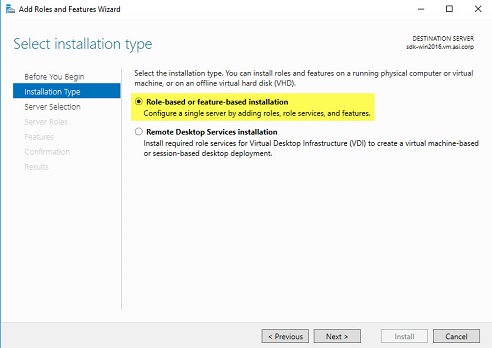
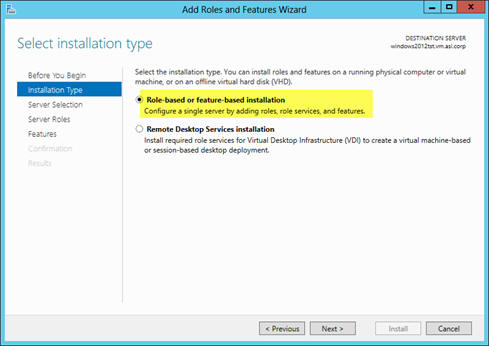
13. On the “Installation Type” node, select “ Role based or feature-based installation ” and click Next.
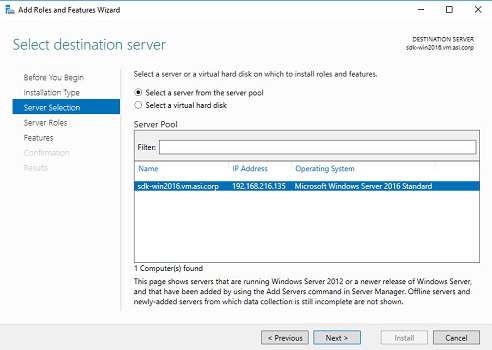
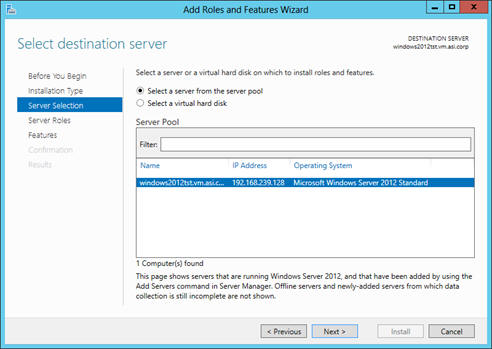
14. On the “Server Selection” node, select the server you are setting up from the Server Pool, and click Next.
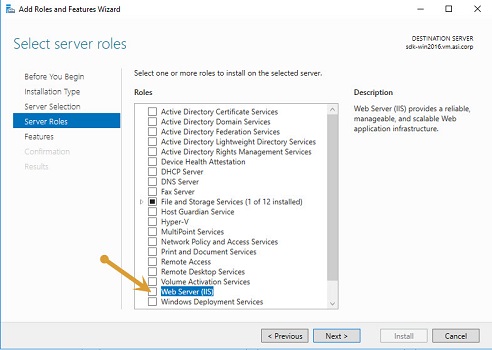
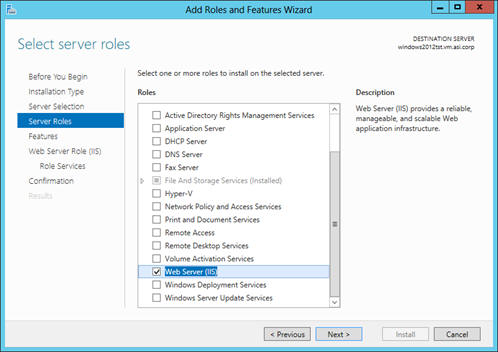
15. Select the Server Roles node in the tree view. A list of already installed roles will be displayed.
16. If Web Server (IIS) role is not selected, select the check box beside it.
17. If an “ Add Roles and Features dialog appears, click Add Features, and then when it returns you to the previous screen, click Next.
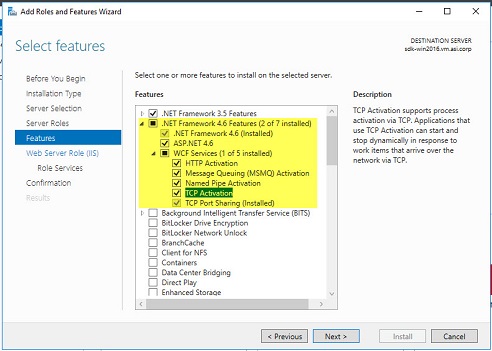
18. If installing on Windows 2016 Server, open the .NET Framework 4.6 Features node. If installing on Windows 2019 Server, open the .NET Framework 4.7 Features node.
19. Ensure that the appropriate check box beside ASP.NET 4.6 or ASP.NET 4.7 is checked. This is required for the installer to work.
20. Open WCF Services node.
21. Ensure that the HTTP Activation check box is checked, and when checking this, if prompted, always select Add Features. This is required to get past 404.3 errors when attempting to run the service and generate the WSDL. Click Next to continue.
22. This will return you to the Web Server Role node, click Next to continue.
23. On the “Select Role Services” node, click Next.
24. A Confirm Installation Selections screen displays, listing the options that have been selected to be installed.
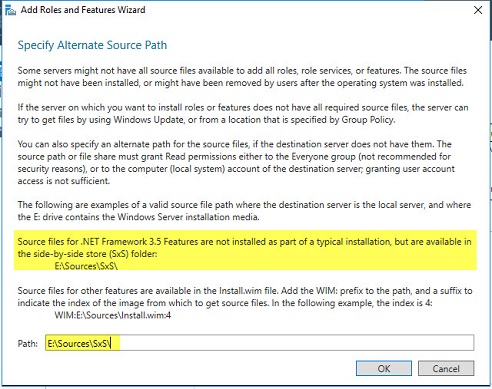
25. There may be a warning on the Confirm installation selections screen about missing source file. If so, please follow the instructions received when you click Specify an alternate source path.
26. Check “ Restart the destination server automatically if required.
28. Click Install (Windows Server may reboot when the installation is finished.)
27. If system did not reboot, click Close on the Installer.
Configuration
The following steps are required only if the Epic SDK is being used over SSL, which is the default and recommended setting. To disable SSL, refer to the Install the Epic SDK section. |
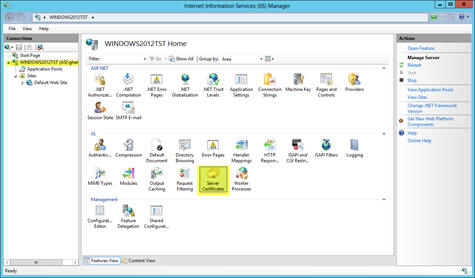
1. Open Internet Information Services (IIS) Manager ( Control Panel > Administrative Tools > Internet Information Services (IIS) Manager ).
2. Choose the current web server node.
3. Select Server Certificates .
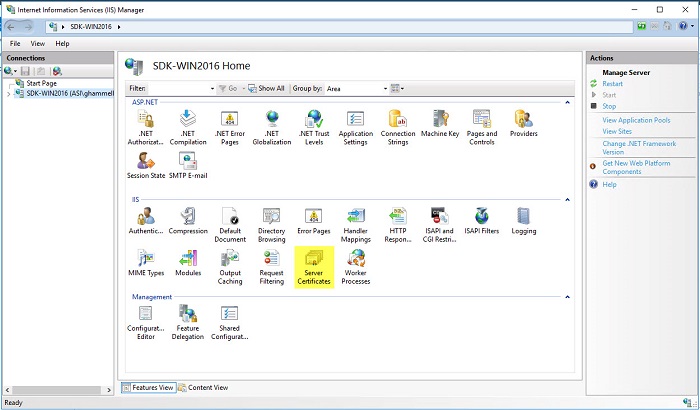
4. Select Open Feature on the right.
5. There are different options for installing the certificate:
It is possible to obtain a certificate from the local domain certificate server. The certificate issued by this server will be valid only in computers within the domain. This will be useful when the Epic SDK is used within an organization.
To obtain a domain certificate, click Create Domain Certificate and fill in your details. The common name should be based on how the website will be accessed and should also match the name of the server. For example, if your server name is MyServer, then the certificate should be issued with common name MyServer, and it will work only for links such as http://MyServer\SDK\Service.asmx. If someone tried to access the web service through an IP address, such as 255.255.255.255\SDK\service.asmx, it would fail.
Click Next and select the domain certificate authority. The certificate issued will then be recognized by all computers in the domain. Provide a name to associate with the certificate.
Click Finish.
If the web service needs to be exposed on the Internet or if there is no local domain certificate server, option (a) will not work. In this case, you need to purchase a certificate from an on-line vendor. The vendor will provide the necessary details to install the certificate.
7. Once the certificate is installed, go to the Sites node. All websites on the IIS server will be listed.
Select the Default Web Site or any other website name you have designated for the SDK.
Click Bindings in the column on the right.
8. If https is not listed in the Binding column, complete the following steps:
Click Add.
9. Under Type, select https.
Under SSL Certificate, select the common name you selected for the certificate in step 4.
Click OK.
Click Close.
10. Go to the web site node in IIS and double click SSL settings.
11. To force SSL on all connections, select Require SSL. Select Ignore Client Certificates. This step is optional, but recommended, particularly in internal environments.
12. Try to access the site in Internet Explorer. In the address bar, type https://[common name used in certificate]. The IIS test page should display. Make sure there are no errors on the test page.
If any errors are encountered, check first to make sure that the login used for the website has access to the correct folders and that the default identity (or the identity you have chosen) for the application pool has the necessary permissions. Also, ensure that IIS has been started on all levels (Server (see Manage Server on the right side of the screen..), application pools (status is displayed in grid, and each can be restarted by right clicking on them), web site ( see Manage Website on right side of screen.) |
Installation
1. Click the start button to open the Windows Start screen.
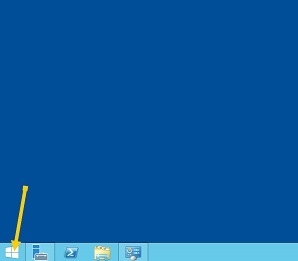
2. Open Control Panel.
3. In the top left corner, there is a search box with the text "Search Control Panel". In this box, type Edit Group Policy. Click Edit Group Policy under Administrative Tools.
4. In top half of the list which appears on the left of the screen, under Computer Configuration select the > in order to expand Administrative Templates.
5. Under Administrative Templates, select System.
6. Scroll down the list on the right of the screen to near the bottom, and open (double click) Specify settings for optional component installation and component repair .
7. When open, turn on the Enabled radio button.
8. Select “Download repair content and optional features directly from Windows Update instead of Windows Server Update Service (WSUS)”.
9. Click Apply.

10. Click OK, and close the Group Policy Editor.
11. Click the start button to open the Windows Start screen. Open Server Manager.
12. Select “Add roles and features”.
13. In the “Add Roles and Features Wizard, Click Next on the “Before You Begin” node.
14. On the “Installation Type” node, select “Role based or feature-based installation” and click Next.
15. On the “Server Selection” node, select the server you are setting up from the Server Pool, and click Next.
16. On the “Server Roles” node, a list of already installed roles will be displayed. If Web Server (IIS) role is not selected, select the check box beside it.
17. If an “Add Roles and Features" dialog appears, click Add Features to return to the previous screen. Click Next.
18. Open the .NET Framework 4.5 Features node.
19. Ensure that the check box beside ASP.NET 4.5 is checked. This is required for the installer to work.
20. Open the WCF Services node.
21. Ensure that the HTTP Activation check box is checked, and when checking this, if prompted, always select Add Features. This is required to get past 404.3 errors when attempting to run the service and generate the WSDL. Click Next to continue.
22. This will return you to the Web Server Role node, click Next to continue.
23. On the “Select Role Services” node, click Next.
24. A Confirm Installation Selections screen displays, listing the options that have been selected to be installed.
25. There may be a warning on the Confirm installation selections screen about missing source file. If so, please follow the instructions received when you click Specify an alternate source path.
26. Check “Restart the destination server automatically if required". Click Yes to the corresponding dialog box.
27. Click Install. Windows Server 2012 R2 may reboot when the installation is finished.
28. If system did not reboot, click Close on the Installer.
Configuration
The following steps are required only if the Epic SDK is being used over SSL, which is the default and recommended setting. To disable SSL, refer to the Install the Epic SDK section. |
1. Open Internet Information Services (IIS) Manager ( Control Panel > Administrative Tools > Internet Information Services (IIS) Manager ).
2. Choose the current web server node.
3. Select Server Certificates.
4. Select Open Feature on the right.
5. There are different options for installing the certificate:
It is possible to obtain a certificate from the local domain certificate server. The certificate issued by this server will be valid only in computers within the domain. This will be useful when the Epic SDK is used within an organization.
To obtain a domain certificate, click Create Domain Certificate and fill in your details. The common name should be based on how the website will be accessed and should also match the name of the server. For example, if your server name is MyServer, then the certificate should be issued with common name MyServer, and it will work only for links such as http://MyServer\SDK\Service.asmx. If someone tried to access the web service through an IP address, such as 255.255.255.255\SDK\service.asmx, it would fail.
Click Next and select the domain certificate authority. The certificate issued will then be recognized by all computers in the domain. Provide a name to associate with the certificate.
Click Finish.
If the web service needs to be exposed on the Internet or if there is no local domain certificate server, option (a) will not work. In this case, you need to purchase a certificate from an on-line vendor. The vendor will provide the necessary details to install the certificate.
7. Once the certificate is installed, go to the Sites node. All websites on the IIS server will be listed.
Select the Default Web Site or any other website name you have designated for the SDK.
Click Bindings in the column on the right.
8. If https is not listed in the Binding column, complete the following steps:
Click Add.
Under Type, select https.
Under SSL Certificate, select the common name you selected for the certificate in step 4.
Click OK.
Click Close.
9. Go to the web site node in IIS and double click SSL settings.
10. To force SSL on all connections, select Require SSL. Select Ignore Client Certificates. This step is optional, but recommended, particularly in internal environments.
11. Try to access the site in Internet Explorer. In the address bar, type https://[common name used in certificate]. The IIS test page should display. Make sure there are no errors on the test page.
If any errors are encountered, check first to make sure that the login used for the website has access to the correct folders and that the default identity (or the identity you have chosen) for the application pool has the necessary permissions. Also, ensure that IIS has been started on all levels (Server (see Manage Server on the right side of the screen..), application pools (status is displayed in grid, and each can be restarted by right clicking on them), web site ( see Manage Website on right side of screen.) |
Installation
1. On the menu which appears on the left of the screen when you move the mouse to the lower left of the screen, Click on search button > Click on settings (under the applications) > (2012 – Everywhere) Type “Edit Group Policy” / Click on the application.
2. Navigate to: Computer Configuration > Administrative Templates > System
3. In System, open Specify settings for optional component installation and component repair .
4. When open: Enable radio button
5. Click on “ Contact Windows Update Directly to Download repair content instead of Windows Server Update Services(WSUS)”
6. Click Apply.
7. Click OK, and close the Group Policy Editor.
8. Go to Server Manager (icon in lower right corner of Desktop)
9. Select “Add roles and features” (Windows Server 2012)
10. In the “Add Roles and Features Wizard, Click Next on the “ Before You Begin ” node.
11. On the “Installation Type” node, select “ Role based or feature-based installation ” and click Next.
12. On the “Server Selection” node, select the server you are setting up from the Server Pool, and click Next.
13. Select the Server Roles node in the tree view. A list of already installed roles will be displayed.
14. If Web Server (IIS) role is not selected, select the check box beside it.
15. If an “ Add Features dialog appears, click Add Features, and then when it returns you to the previous screen, click Next.

16. Open .NET Framework 4.5 Features node.
17. Ensure that the check box beside ASP.NET 4.5 is checked. This is required for the installer to work.
18. Open WCF Services node.
19. Ensure that the HTTP Activation check box is checked, and when checking this, if prompted, always select Add Features. This is required to get past 404.3 errors when attempting to run the service and generate the WSDL. Click
20. This will return you to the Web Server Role node, click Next to continue.
21. On the “Select Role Services” node, click Next.
22. A Confirm Installation Selections screen displays, listing the options that have been selected to be installed.
23. (Windows 2012R2 Only) Check “ Restart the destination server automatically if required.
24. Click Install (Windows Server 2012 may reboot when the installation is finished.)
25. If system did not reboot, click Close on the Installer.
Configuration
The following steps are required only if the Epic SDK is being used over SSL, which is the default and recommended setting. To disable SSL, refer to the Install the Epic SDK section. |
1. Open Internet Information Services (IIS) Manager ( Control Panel > Administrative Tools > Internet Information Services (IIS) Manager ).
2. Choose the current web server node.
3. Click No on the pop-up screen.
4. Select Server Certificates .
5. Select Open Feature on the right.
6. There are different options for installing the certificate:
It is possible to obtain a certificate from the local domain certificate server. The certificate issued by this server will be valid only in computers within the domain. This will be useful when the Epic SDK is used within an organization.
To obtain a domain certificate, click Create Domain Certificate and fill in your details. The common name should be based on how the website will be accessed and should also match the name of the server. For example, if your server name is MyServer, then the certificate should be issued with common name MyServer, and it will work only for links such as http://MyServer\SDK\Service.asmx. If someone tried to access the web service through an IP address, such as 255.255.255.255\SDK\service.asmx, it would fail.
Click Next and select the domain certificate authority. The certificate issued will then be recognized by all computers in the domain. Provide a name to associate with the certificate.
Click Finish.
If the web service needs to be exposed on the Internet or if there is no local domain certificate server, option (a) will not work. In this case, you need to purchase a certificate from an on-line vendor. The vendor will provide the necessary details to install the certificate.
7. Once the certificate is installed, go to the Sites node. All websites on the IIS server will be listed.
Select the Default Web Site or any other website name you have designated for the SDK.
Click Bindings in the column on the right.
8. If https is not listed in the Binding column, complete the following steps:
Click Add.
9. Under Type, select https.
Under SSL Certificate, select the common name you selected for the certificate in step 4.
Click OK.
Click Close.
10. Go to the web site node in IIS and double click SSL settings.
11. To force SSL on all connections, select Require SSL. Select Ignore Client Certificates. This step is optional, but recommended, particularly in internal environments.
12. Try to access the site in Internet Explorer. In the address bar, type https://[common name used in certificate]. The IIS test page should display. Make sure there are no errors on the test page.
Note:If any errors are encountered, check first to make sure that the login used for the website has access to the correct folders and that the default identity (or the identity you have chosen) for the application pool has the necessary permissions. Also, ensure that IIS has been started on all levels (Server (see Manage Server on the right side of the screen..), application pools (status is displayed in grid, and each can be restarted by right clicking on them), web site ( see Manage Website on right side of screen.) |
EpicSDK will no longer support Windows Server 2003, and any attempt to install it, or upgrade from a previous version on this operating system will fail. When the SDK server is in an unsupported OS and update fails, the user will get the following exception ID: - IDNOTSET-1TB-DST-LLJ-N8SB-5DK o The first 4 will remain constant o The 5th section will vary depending on the SDK version o The last part will depend on the timestamp . This exception file will never be shipped to Applied, since the listener service will be shut down, and a corresponding exception log will not be found in AsiCentral. |
Once IIS is configured, the AppliedEpic SDK server can be installed. SSL is recommended and is the default for SDK. The Applied Epic SDK server can be installed before SSL is enabled; however, the web service cannot be used until a valid certificate is installed. If you want to use SDK without SSL, you need to disable it at each SDK server using ASI.SMART.Tools.WebConfiguration.exe. This utility is available at X:\ASI\ASI.TAM\SDKServer\Software\Bin (X is the drive where SDK has been installed).
In order to maintain the highest level of security and prevent malicious activities, Applied Epic SDK server requires that only TLS 1.2 and higher communication protocols are enabled on the server. Before installing, make sure that less secure protocols (e.g. SSL 2.0, SSL 3.0, TLS 1.0 and TLS 1.1) are disabled. |
The steps to install the Applied Epic SDK server are as follows:
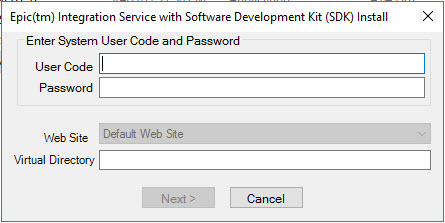
1. Run the setup from the network location (if the central service is located in a different machine, for example, \\<MachineName>\InitialInstalls_CentralServer\SDKServerInstaller_<MachineName>) or from the local directory (for example, C:\Asi\ASI.TAM\CentralServer\WebInstalls\SDKInstaller_<MachineName>).
2. Provide a valid Epic System Administrator user name and password. The website under which the Epic SDK server needs to be installed can also be chosen at this screen (if only one website is hosted on the server, this will be disabled). The website chosen should be the one where the SSL certificate was/will be installed. Provide a name for the Epic SDK server virtual directory.
3. If SSL is not enabled in the chosen website, a message displays.
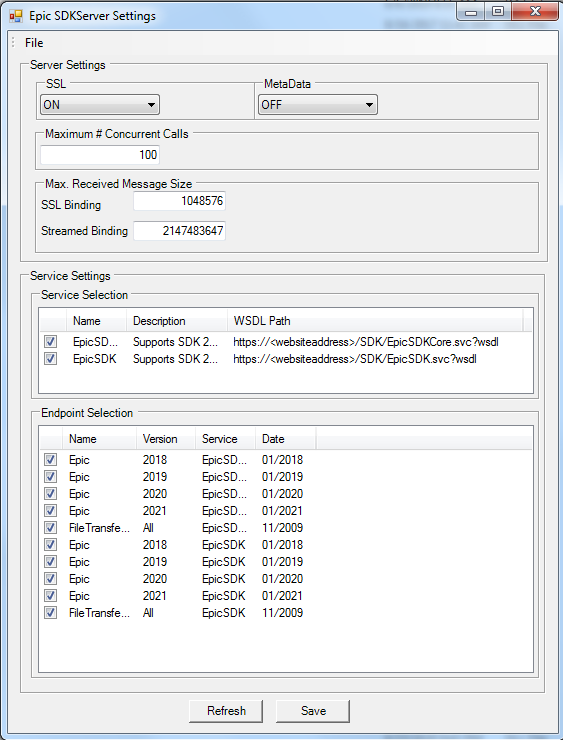
4. The Epic SDK Server Settings screen displays. Make any necessary changes, then click Save and click the X in the top right corner to close the screen.
A new application pool is created when Applied Epic SDK is installed. The application pool will prevent the SDK from timing out and needing to be restarted.
The SDK Configuration tool allows the end user to choose which SDK endpoints are run as part of the application. If unused endpoints are turned off, the amount of time it takes to for the SDK application to start is reduced.
5. The setup will install the Epic SDK server and configure the required IIS components. The setup also creates a default system user (with Enterprise Administrator credentials) in Epic.
Metadata publishing option on the SDK Configuration tool is turned off by default. If you need to access the service like below and do not have access to the tool please contact AppliedSystems. |
6. The web service may then be accessed from the following URL: https://<websitename>/<virtual directory name>/EpicSDK.svc.
7. The WSDL is available at: https://<websitename>/<virtual directory name>/EpicSDK.svc?wsdl. WSDL is an XML based standard for web applications.
8. After the SDK install, it may be necessary for a user to be set up for the application pool in IIS. This is only necessary if the service cannot be connected to through the browser, or a proxy cannot be generated.
a. Open Internet Information Services (IIS) Manager from the Control Panel / Administrative Tools menu.
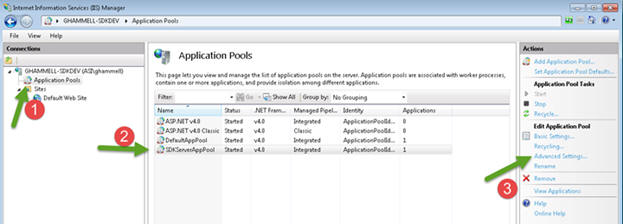
b. Navigate to the Application Pool node.
c. Select the SDKServerAppPool
d. On the menu on the right hand side of the screen, click Advanced Settings
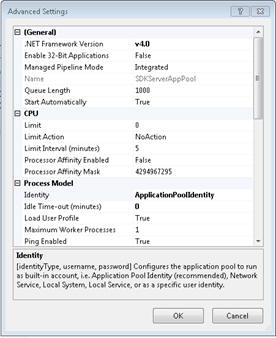
e. Select Identity on the Advanced Settings pop-up dialog.
f. Click on the button, at the right hand edge of the line.
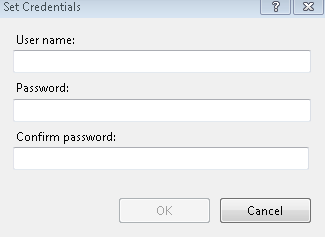
g. Click the Custom Account radio button. And then click on the Set button.
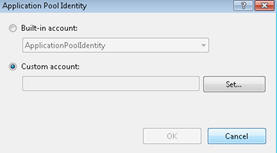
h. Enter the required information, and click OK.
i. Continue to click OK, until the original IIS Manager screen is reached, and then close that screen as well.
There are several things in the Applied Epic SDK that must be maintained and updated occasionally.
Server Certificate
The server certificate has an expiration date and may be revoked at any time. A valid certificate is required to run the Applied Epic SDK, so before the certificate expires it should be renewed or a new certificate issued to ensure there is no downtime for your integration applications. If you are using a local or domain certificate, here are the steps to renew it:Navigate to Server Certificates in IIS Manager.
Select Renew for your current certificate.
Following the steps on the screen.
Enabling Metadata Publishing (when needed)
After upgrading to EpicSDK 2020 MU2 or beyond, metadata publishing is disabled by default. This prevents anyone from generating the proxy against the URL of the SDK server. |
Navigate to the SDK Server folder (C:\ASI\ASI.TAM\SDKServer\Software\bin).
Launch ASI.SMART.Tools.WebConfiguration.exe.
Select 'ON' under MetaData.
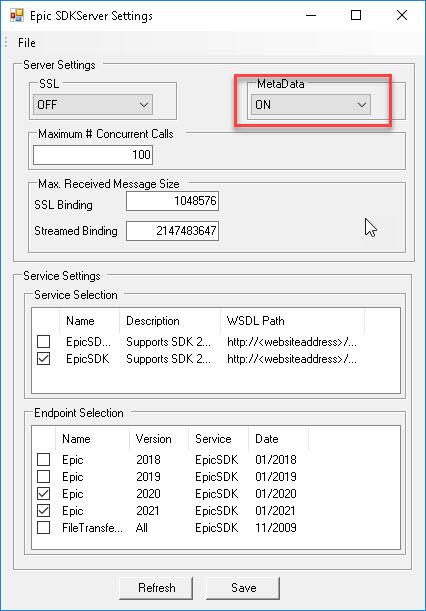
Click Save.
Scan Through the Important Changes
SDK is primarily backwards compatible so most often no changes to existing integrations are required when upgrading the version of EpicSDK. However, there are rare scenarios where changes are required. Please read through that list before every upgrade to verify that none of the items apply to the SDK applications. Only the applicable breaking changes that are marked as affecting all endpoints would require immediate integration code changes. For more information, refer to the Important Changes page. In cases where an integration is using an endpoint that is being retired, it will be neccessary to upgrade that integration to consume a newer endpoint. For more information about when and how to upgrade integrations to a newer endpoint, refer to Upgrading an Integration to a Later Endpoint.