Data Grouping
To access the Data Grouping window, from Report Designer, do any of the following:
- Click Report > Data Grouping on the menubar.
- Click the Data Grouping button
 on the toolbar.
- Right click anywhere on the canvas and select Data Grouping from the menu that displays.
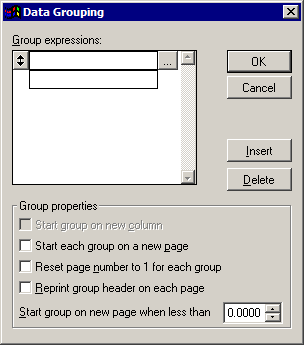
Here you can determine how the data should be grouped in your output.
The expressions in the Group expressions list determine when there will be breaks between groups of data. When the value of the field or expression entered changes, a new group begins. The order in which the expressions are listed indicates the group nesting order. For example, if the Agency field expression preceded the Branch field expression, records would be grouped by agency with subgroups by branch. To change the group nesting order, highlight a group and click and drag the double-sided arrow to change its position in the list.
Each added via the Data Grouping tool also adds a new band to the report layout. This is a group band, and it is preceded by a group header and followed by a group footer.
Note that the data grouping function is not a sorting tool. It does not change the order in which the records display; it merely determines when breaks between groups occur. For example, if you wished to group records by state, you would want to ensure that your data was already sorted by state before accessing Data Grouping. To sort data before entering Report Designer, from the Data Preview screen, click Options, Sort Result.
- To define a data group, highlight the group in the Group expressions list. (Initially, all entries in the list may be blank, as in the image above. Select the top row.) When a group is selected, a double-sided arrow displays in the box to the left of the group name.
- Type the group name.
- To set the expression that will determine what data is included in this group, click the ellipsis button to the right of the group name. The Expression Builder screen displays. Here you can select a field (for example, if you wanted to group report output by CSR, you would simply select that field) or enter a more complex expression. See Expression Builder for more information.
Note: Rather than clicking the ellipsis to open Expression Builder, you could type the name of the field in the space available. The file structure for your report provides you with a list of available field names.
- Set the properties for the selected group in the Group properties frame.
- Determine whether you would like to Start group on new column, Start each group on a new page, Reset page number to 1 for each group, and/or Reprint group header on each page.
- Use the Start group on new page when less than field to determine the minimum length (in inches) of a group that you would like to print at the bottom of a page. For example, if you leave the default of 0, the selected group will begin printing on the current page if there is less than one inch of space available. If you enter a value of 1.0000, the selected group will begin printing on the next page if there is less than one inch of space available.
- These properties need to be determined for each of the groups individually.
- To move a group in the Group expressions list, click and drag the box displaying the double-sided arrow.
To insert a group above the currently selected group, click Insert.
To remove the selected group from the Group expressions list, click Delete.
- When you have finished revising data grouping information, click OK.