 in
the far left column. To show or hide the lines under all package policies
in the list, click the Expand
All or Collapse
All link label.
in
the far left column. To show or hide the lines under all package policies
in the list, click the Expand
All or Collapse
All link label. In the Policies area, you can enter and view a client’s policy information and perform servicing workflows.
To access the Policies area, follow the steps below.
The components of the Policies screen give you quick access to current, expired, and marketed policies, important policy/line information at a glance, and shortcuts to select workflows.
Policies for the selected client display in the list below the options
bar. Policies display either collapsed or expanded, depending on the Default policy list as collapsed
selection in System
Settings. To show or hide all lines under a package policy in the
list, click the arrow
button in
the far left column. To show or hide the lines under all package policies
in the list, click the Expand
All or Collapse
All link label.
Note: Depending on the Policy List options selected in System Settings, your Expand All or Collapse All selection may default the next time you access a client’s Policies list.
To view updated information about policies in the list (for example, if a policy’s stage has been updated from Submitted to Issued since you last accessed the list), click the Refresh link label in the Policies header.
To change the kind of policies that display in the list, click the word Policies in the view filter and make a selection:
Use the search bar to display policies that meet specific criteria.
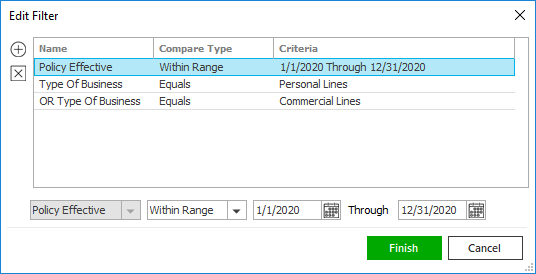
Apply a single
filter (using the search fields) or multiple
filters (using the Edit
Filter button  ) to narrow the list of policies.
To save your currently applied filters as a default for the selected
client or all clients, create Filter
Defaults. Filter defaults are unavailable for the
Marketed and Marketed
(History) lists and for Policies
lists opened from the Access
menu (as Access > Policies
already provides a filtered view).
Your filter defaults are unique to your user code and will not affect other
users’ saved defaults.
To sort by a different column, click the column heading by which you want to sort. Click one more time to change the sort order (from ascending to descending, or vice versa).
You can attach files or email directly onto policies or lines in the list. Just select the policy or line, then drag and drop the attachment into the list. See Add an Attachment for details.
The eServicing ribbon contains hyperlinks for each transaction type the selected policy’s issuing company supports, giving you one-click access to Policy Inquiry, Billing Inquiry, Company Inquiry, and Claim Inquiry. If the issuing company does not support any of these transaction types, or if the policy has no issuing company, the ribbon does not display.
Transaction types only display if the Real-Time account is configured for them. To update the list of transactions in the eServicing ribbon after completing an account update, click Refresh in the Policies header.
When you perform a Real-Time transaction using the ribbon, be aware of the following:
For more detailed instructions on setting up and using Real-Time, click here.
Relevant detail information for the selected policy displays in the Policy Detail/Plan Detail section.
To view a multi-carrier schedule or multi-commissions for the selected policy, click the Multi-Carrier Schedule or Multi-Commissions link. Click the Close button to close the Multi-Carrier Schedule or Multi-Commissions window.
To create a new quote (a blank policy with no risk data) in Applied Rating Services or to export and rate policy information (an existing policy with risk data) directly into Applied Rating Services for the selected policy, click the Export to Applied Rating Services button. This option only displays for ARS users and when an ARS-supported line is selected in the list. For more information on this workflow, see Quoting Rating Services in Real-Time.
Relevant detail information for the selected line displays in the Line Detail section. Some fields may contain confidential information. The information in these fields is concealed by replacing the actual values with X’s. The number of X’s displayed in a field does not necessarily reflect the actual length of the value.
To perform calculations for commissions weighted by premium for Benefits and Life & Health plans, click the Weighted Commissions link label. Health benefits insurance insurers sometimes pay different commissions for similar plans and send a single, combined commission payment for all of them. The Weighted Commissions link label enables you to see how a insurer’s commission is divided among its plans and apply automatic calculations to a plan’s commission fields.
To view the Plan/Rate tab information for Benefit and Life & Health policies, click Rate/Premium Schedule. Clicking this link displays all plans and rate schedules for the selected line.
To view in-process and suspended workflows for the selected line, click the In Process/Suspended Workflows link. Clicking Suspend History shows all suspensions for the selected workflow. Clicking a suspension shows its Comments. Click Close to return to the myEpic - Workflows window. Click the Close button to close the myEpic - Associated Workflows window.
To view the servicing contacts for the selected line, click the Servicing Contacts link label. Click the Close button to close the LOB Servicing Contacts window.
The Service Summary provides a historical record of servicing information about the selected policy. Each row documents a change to the policy, indicating the Action taken and the resulting Stage of the policy (such as Issued or Cancelled).
By default, the Service Summary displays in reverse chronological order, with the first row reflecting the most recent change to the policy (either current or future). To sort it by a different column, click the column heading by which you want to sort. Click the column heading again to change the sort order (from ascending to descending, or vice versa).
Depending on the options selected in System Settings, policies open to either the most recent Service Summary row or the current, in-force Service Summary row when you select them in the Policies list.
An Expand All/Collapse All link label displays in the header of the Service Summary, which provides you with a view of events on the policy at a glance. Click the link label to display all endorsement rows for the policy; click it again to collapse them. This expanded view is especially helpful when multiple endorsements from Download are effective the same day and you need to view rows that have been replaced by Download. The system retains your setting for any other policies you access until you change it.
Performing policy actions updates existing Service Summary rows or creates new ones. The following Stages are possible. Some Stages limit the actions you can take or the changes you can make to policy details.
The policy’s Service Summary Action and Stage determine which servicing workflows you can perform on it from the Actions menu. For information on Service Summary requirements for a specific policy action (as well as any other requirements), see the help article for that action.
The footer is located at the bottom of the screen. Some of the information it displays varies depending on the area of Applied Epic you are viewing.
The footer always displays the version of Epic you are running, the database you are accessing, and the name of the current screen. On some screens, the footer also displays the entity type, status, and current account balance, as in the example below.

 to add filters.
