- To access Accounts from the Home screen, do one of the following:
- Click Accounts on the navigation panel.
- Click Areas > Accounts on the menubar.
- Click the down arrow next to Home on the options bar and select Accounts.
- Click Locate on the options bar.
To access Accounts from another area of the program, do one of the following:
- Click Home > Accounts on the menubar.
- Click the down arrow next to Home on the options bar and select Accounts.
- Click Locate on the options bar.
- In the Locate account dropdown menu, select Client.
- In the Locate by dropdown menu, select the appropriate option.
- Select the suitable checkbox or checkboxes to the right:
- Insureds
- Prospects
- Active
- Inactive
- Enter the first few letters of the name, lookup code, phone
number, etc. (depending on the selection in the Locate
by dropdown menu) and press [Enter]
or click Locate.
Note: Location by phone number searches all phone numbers associated with client and contact accounts (e.g., residential, mobile, fax). - The Results list displays all of the accounts that match the criteria you entered. Click on a column heading to sort the list by that category. For example, click the Last Name column heading to sort by last name in ascending order. To sort in descending order, click the Last Name column heading again.
- Highlight the desired item in the Results list.
- Click Opportunities
on the navigation panel or Areas
> Opportunities on the menubar.
Note: You can access opportunities from the Account Detail screen in the same manner.
- Click the Add
button
 on the Opportunities
screen.
on the Opportunities
screen. - Click the New > Opportunity on the options bar.
- Click File on the menubar and select New > Opportunity.
- The Target close date helps you track the opportunity. An entry in this field is necessary to display the opportunity in the Opportunities list and Dashboards on the Home screen and on Opportunities Reports.
- The Source menu populates with the options set up in Account Source Configuration.
 to the right of the field to
locate the
SIC code. Hover over the SIC
field to display the description of the selected code.
to the right of the field to
locate the
SIC code. Hover over the SIC
field to display the description of the selected code.
- In the Search By frame, select a Category, or search by <All> categories.
- Enter a Search term (required if you search by <All> categories), or leave the Search field blank to view all SIC codes for the category you selected.
- Click Search
or press [Enter].
To sort the codes in your search results by popularity (as determined by Market Appetite), click the Rank column heading. If you are an Applied Epic On-Premises user, your organization must have the Identity Provider (IDP) service configured to display the Rank column. - Select the desired code in the list and click Finish, or click Cancel to close the SIC Lookup window without selecting a code.
Note: You can set up Group and Stage field defaults for the Opportunity Add Workflow in Field Default Configuration.
Note: Only stages in the selected Group populate in the Stage dropdown menu.
- Click Add to add an additional opportunity for the same account.
- Click Detail
to enter additional information about this opportunity: for example,
information that may assist you in acquiring this business or
provide detail in reports. Applied recommends entering this information
now while it is fresh in your mind.
The following sections are available in Opportunity Detail:
- Detail/Summary
Edit the Opportunity Detail and Structure information if necessary. You can also add or update information on the following tabs:
- Detail
- Optionally update the information in the Estimated Value section: Estimated Premium, Revenue, # of policies, # of risks, and/or # of client contracts. The estimated Premium and/or Revenue values are multiplied by the Probability associated with each opportunity stage, so the Estimated Value of the opportunity increases as it moves through the sales pipeline. The Estimated Value is used to track progress toward individual and team sales targets on Dashboards and Opportunities Reports.
- Optionally associate the opportunity to a Sales team and an Owner. The Sales manager associated to the team you select will default. Entries in these fields are required to display the opportunity in the Opportunities list on the Home screen and to track it accurately on Dashboards and reports.
- Stage Details cannot be edited.
- Optionally add Comments.
- Categories
Use this section to apply agency-defined categories to an account. For instructions on adding new agency-defined categories to the system, see Agency Defined Categories Configuration.
- To apply a new category to this account,
do one of the following in the Agency
Defined Categories section:
- Click the Add
button
 .
. - With focus on the Agency Defined Categories list, press [Insert] on your keyboard.
- Click the Add
button
- The Agency Defined Category window displays.
- Filter
the list of categories if necessary.
Use the search bar to display categories that meet specific criteria. Apply a single filter (using the search fields) or multiple filters (using the Edit Filter button
 )
to narrow the list of categories.
)
to narrow the list of categories.
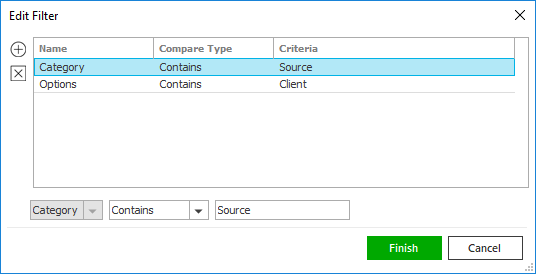
- Click the Edit
Filter button .
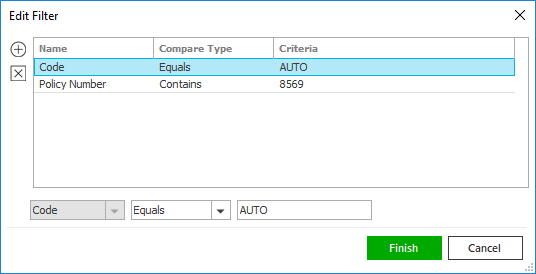
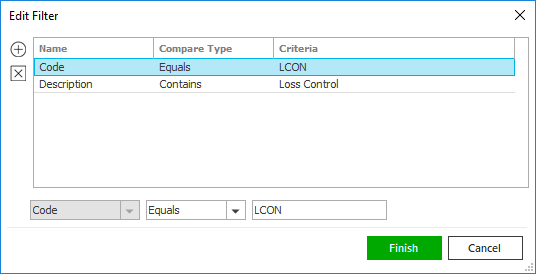
- The Edit
Filter pop-up window
displays. Click the Add
button to
add filters.
- Select and/or enter search criteria using the dropdown menus and fields. Click the Add button again to apply additional filters. Enter additional search criteria.
Click the Delete button to remove a filter from the list.
- Click Finish when you have applied all of your desired filters.
Hover over the Search where text to see the filter that is currently applied to the list.
To clear the currently applied filter and start over, click the Clear Filter link label. The search bar displays in blue when filters are applied and gray when filters are cleared.

- Make a selection in the first dropdown menu.
- The choices available in the second dropdown menu vary, depending on your selection in the first dropdown menu:
- Contains: Enter at least one character of the search criterion (e.g., part of a category) in the field to the right.
- Click Find
to apply the filter. Hover
over the Search
where text to see the
filter that is currently applied
to the list.
To clear the currently applied filter and start over, click the Clear Filter link label. The search bar displays in blue when filters are applied and in gray when filters are cleared.
- Click the Edit
Filter button
- Select the checkbox beside each category you want to apply to this account. To select all of the items listed, click the Select all checkbox.
- Click
Finish to add the
category and close the Agency Defined Category window.
To remove a category from the list, highlight it and click the Delete button or press
[Delete] on your keyboard.
You are prompted, "Do you wish to
delete this record?" Click Yes.
button or press
[Delete] on your keyboard.
You are prompted, "Do you wish to
delete this record?" Click Yes.
- To apply a new category to this account,
do one of the following in the Agency
Defined Categories section:
- Detail
- Contact/Business
Info
Narrow the list of contacts for the selected account if necessary.
Use the search bar to display contacts that meet specific criteria. Apply a single filter (using the search fields) or multiple filters (using the Edit Filter button
) to
narrow the list of contacts. 
- Click the Edit
Filter button .
- The Edit
Filter pop-up window displays.
Click the Add
button to add filters.
- Select and/or enter search criteria using the dropdown menus and fields. Click the Add button again to apply additional filters. Enter additional search criteria.
Click the Delete button to remove a filter from the list.
- Click Finish when you have applied all of your desired filters.
Hover over the Search where text to see the filter that is currently applied to the list.
To clear the currently applied filter and start over, click the Clear Filter link label. The search bar displays in blue when filters are applied and gray when filters are cleared.
- Make a selection in the first dropdown menu.
- The choices available in the second dropdown menu vary, depending on your selection in the first dropdown menu:
- Equals: Enter the search criterion (e.g., the full name or description) in the field to the right, or select a date from the dropdown calendar (if applicable).
- Contains: Enter at least one character of the search criterion (e.g., part of a name or description) in the field to the right.
- Click Find
to apply the filter. Hover over the Search where
text to see the filter that is currently
applied to the list.
To clear the currently applied filter and start over, click the Clear Filter link label. The search bar displays in blue when filters are applied and in gray when filters are cleared.
You can do the following:
- Add
a Contact to the Opportunity
- Do one of the following:
- Click the Add
button .
- Click New on the options bar and select Add a Contact.
- Press [Insert] on your keyboard.
- Select one of the following radio button options, and then click Continue.
- Add
new contact
This option adds a new contact to the account and associates it to the opportunity.
- Select the Individual or Business radio button.
- For a business, enter a business Name. The Name field is required. For an individual, select a Prefix; enter a First, Middle, and Last name; and select a Suffix. The Last name field is required.
- Select the Contact only, Policy only, or Both Contact & Policy radio button in the Category frame.
- Contact only: The contact will be unavailable for selection on Policy Detail screens (e.g., as a Driver or Employee).
- Policy only: The contact will be unavailable for selection as a Contact on Activities, Claims, Invoices, etc.
- Both Contact & Policy: The contact will be available in any area where a Client Contact can be looked up.
- Optionally select a Description for the contact.
- In the Address section, select the Use account address checkbox if the contact's address is the same as the account address.
- If you do not select the Use account address checkbox, select the checkbox(es) to indicate the Type of address:
- Mailing
- Billing
- Note: The billing address does not default when you add a transaction. However, you can use this address description to assist you in locating the appropriate contact/address.
- If you want to pull an
address into this record from
an existing policy application,
click the lookup
button in the corner of the
Address field to
open the Address
Lookup.
The Address Lookup pulls information in from the following areas:
- Business Owners Premises
- Canadian Habitational Applicant and Locations
- Contact Details
- Com AP Premises
- Flood Applicant
- Ontario Auto Applicant
- Personal AP Locations
- Worker’s Compensation Locations
Follow the steps below on the Address Lookup screen.
- Click the Include history policies checkbox if you want to include history policies in the list.
- Optionally
use
the search bar to
narrow the list.
- Make a
selection
in the first
dropdown menu:
- Contact Name
- Policy Type
- Policy Number
- Site ID
- Make a
selection
in the second
dropdown menu:
- Equals: Enter the entire contact name, policy type, or policy number in the field provided.
- Contains: Enter at least one letter of the contact name, policy type, or policy number in the field provided.
- Click Find or press [Enter].
- Make a
selection
in the first
dropdown menu:
- Click on the correct item in the list.
- Click Finish to pull the selected address into the contact's account detail.
Click Cancel to close the window without pulling an address into the contact detail.
- To enter an address manually, click in the large field in the Address/Phone Number section. Enter the Street, City, State/Province, and County (if applicable) in the highlighted fields that display.
- Enter the ZIP/Postal code, or click the lookup button to look up the code.
- From the second dropdown, select Begins with or Contains.
- Enter at least one character of the desired zip code or city and click Locate or press [Enter]. If more than 500 results are found, you must enter more than one character.
- Optionally enter a Description
for the address, or select
a new Description
from the dropdown menu.
Note: Typing a description might not be an option, depending on how your agency has set up address descriptions. See Contact Description Configuration for more information. - Enter a Site
ID if applicable.
Note: Site IDs allow you to enter specific address location numbers. This user-defined number is available throughout the system for servicing, billing, and reporting purposes. - In the Primary Number/Email section, select Business, Fax, Mobile, Other, or Residence from the dropdown menu.
- Tab to or click in the Number field and edit the information if necessary. For international phone numbers, tab to or click in the Number field. Click on Country and select the correct country from the dropdown menu.
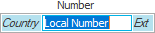
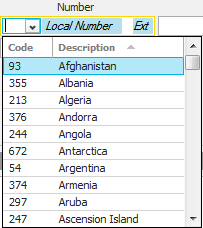
- Enter the remainder of
the phone number in the field.
Note: See Telephone Country Codes Configuration for instructions on adding, editing, or removing a country code. - If applicable, click in or tab to the Ext field and enter the extension.
- If the contact has opted
in to receive SMS messages
at this number and you have
enabled SMS messaging in System
Settings, select the SMS
checkbox. You are prompted,
"Would you like to enable
conversational SMS for this
contact?" Click Yes
if the client wants to engage
in individual text conversations
with users at your agency.
The Conversational
SMS checkbox is selected
in the SMS
Opt-Ins frame.
Important! You must obtain a contact’s consent before sending SMS messages. Familiarize yourself with U.S. laws on text communications before you begin using this functionality. - Optionally enter a Description of the phone number (e.g. Home or Cell).
- Make a selection in the Permission dropdown menu to indicate whether you have permission to call the contact at this number:
- Did Not Obtain
- Obtained
- Please Do Not Call
- In the Opt-Ins frame, make selections to indicate the kinds of texts the contact wants to receive:
- Marketing SMS: Select this checkbox if the contact wants to receive bulk texts of any kind (account notices, weather alerts, and/or marketing campaigns). You must use the Bulk SMS Opt-In Status link on the Contact Info tab of Contact Detail to obtain the contact’s consent for each message type they want to receive before you can begin sending the contact bulk texts of any kind.
- Conversational SMS: Select this checkbox if the contact would like to communicate with your agency on an individual basis via SMS messaging. This selection applies to text conversations unique to this client, not to templated bulk SMS messages.
- Enter the contact's Email
address and a Description
for the email address.
Note: To email the contact from this screen, click the Email button to the right of the email
field. An email opens with
that address in the To
field.
to the right of the email
field. An email opens with
that address in the To
field. - You can click Finish
or press [Enter]
to end the workflow at this
point. However, it is advisable
to click Detail
and add the rest of the contact
information at this time.
Click Cancel or press [Esc] to exit the workflow without saving the information. You are prompted, "Do you wish to discard changes?" Click Yes. Click Detail to add more information.
- Add
existing contact
This option associates a contact already on the account to the opportunity.
- The Available
Contacts screen displays
a list of all contacts associated
to the account. Use
the search bar to narrow the
list of contacts if necessary.
Use the search bar to display contacts that meet specific criteria. Apply a single filter (using the search fields) or multiple filters (using the Edit Filter button
) to narrow
the list of contacts.
- Click the Edit
Filter
button .
- The Edit
Filter
pop-up window
displays. Click
the Add
button to
add filters.
- Select and/or enter search criteria using the dropdown menus and fields. Click the Add button again to apply additional filters. Enter additional search criteria.
Click the Delete button to remove a filter from the list.
- Click Finish when you have applied all of your desired filters.
Hover over the Search where text to see the filter that is currently applied to the list.
To clear the currently applied filter and start over, click the Clear Filter link label. The search bar displays in blue when filters are applied and gray when filters are cleared.
- Make a selection in the first dropdown menu.
- The choices available in the second dropdown menu vary, depending on your selection in the first dropdown menu:
- Equals: Enter the search criterion (e.g., the full name or description) in the field to the right, or select a date from the dropdown calendar (if applicable).
- Contains: Enter at least one character of the search criterion (e.g., part of a name or description) in the field to the right.
- Click Find
to apply the filter.
Hover over the
Search
where text
to see the filter
that is currently
applied to the
list.
To clear the currently applied filter and start over, click the Clear Filter link label. The search bar displays in blue when filters are applied and in gray when filters are cleared.
- Click the Edit
Filter
button
- Select the contact(s) you want to add to the opportunity. To select all contacts in the list, check the Select All checkbox.
- Click Finish
or press [Enter]
to add the selected contacts
to the opportunity.
Click Cancel or press [Esc] to exit the workflow without adding any contacts.
- The Available
Contacts screen displays
a list of all contacts associated
to the account. Use
the search bar to narrow the
list of contacts if necessary.
- Edit
Information for an Existing Contact
- Select the contact in the list and
then do one of the following:
- Click the Edit
button
 to the left
of the list.
to the left
of the list. - Double click the contact.
- Click the Edit
button
- The Contact Detail screen displays. Edit this information as necessary.
- Click Finish
or press [Enter]
to save your changes and close the Contact Detail
screen.
Click Cancel or press [Esc] to exit the Contact Detail screen without saving your changes.
- Select the contact in the list and
then do one of the following:
- Change
the Preferred Opportunity Contact
- Select the contact you want to assign as the preferred opportunity contact in the list.
- Click Actions > Assign as Preferred Contact on the menubar or options bar.
You are prompted to confirm the change to the preferred opportunity contact. Click Yes to make the change or No to cancel the action.
- Delete
a Contact
- Select the contact in the list and
do one of the following:
- Click the Delete
button
 to the left
of the list.
to the left
of the list. - Press [Delete] on your keyboard.
- Click the Delete
button
- Select the contact in the list and
do one of the following:
- Print
a List of Contacts Associated to the Opportunity
- Click the Print
button
 to the left of the list.
 - The Print window displays. Print the list as you would any other document.
- Click the Print
button
- Click the Edit
Filter button
- Associated
Items
- To associate a marketing submission, policy,
or client contract service to the opportunity,
click the Add
button or press [Insert]. The Find Associations
screen displays.
- Select the desired item type:
- Marketing
Submission
- A list of available Master Marketing Submissions displays. If you want to view historical as well as current Master Marketing Submissions, select the Include history checkbox.
- Limit
the items that display in this list
if necessary.
Use the search bar to display marketing submissions that meet specific criteria. Apply a single filter (using the search fields) or multiple filters (using the Edit Filter button
)
to narrow the list of marketing
submissions. 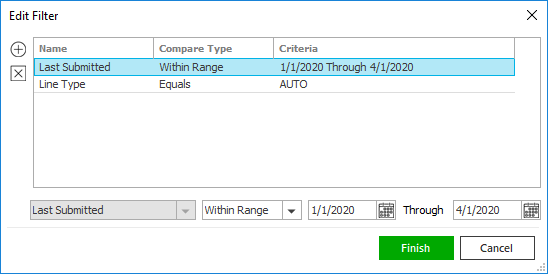
- Click
the Edit
Filter button .
- The
Edit
Filter pop-up window
displays. Click the Add
button to
add filters.
- Select
and/or enter search criteria
using the dropdown menus
and fields. Click the
Add
button again to apply
additional filters. Enter
additional search criteria.
Click the Delete button to remove a filter from the list. - Click
Finish
when you have applied
all of your desired filters.
Hover over the Search where text to see the filter that is currently applied to the list.
To clear the currently applied filter and start over, click the Clear Filter link label. The search bar displays in blue when filters are applied and in gray when filters are cleared.

- Make a selection in the first dropdown menu.
- The choices available in the second dropdown menu vary, depending on your selection in the first dropdown menu:
- Equals: Enter the search criterion (e.g., the full master marketing submission) in the field to the right, or select a date from the dropdown calendar (if applicable).
- Contains: Enter at least one character of the search criterion (e.g., part of the master marketing submission) in the field to the right.
- Within Range: Search between two calendar dates. Click the down arrow to the right of each field to choose dates from the dropdown calendars.
- Click Find
to apply the filter. Hover
over the Search
where text to see
the filter that is currently
applied to the list.
To clear the currently applied filter and start over, click the Clear Filter link label. The search bar displays in blue when filters are applied and in gray when filters are cleared.
- Click
the Edit
Filter button
- Select each item to which you would like to associate the opportunity in the list. To select all items in the list, click the Select All link. To deselect them, click the link again.
- Policy
- A list of Policies displays. If you want to view historical as well as current policies, select the Include history checkbox.
- Limit
the items that display in this list
if necessary.
Use the search bar to display policies that meet specific criteria. Apply a single filter (using the search fields) or multiple filters (using the Edit Filter button
)
to narrow the list of policies.
- Click
the Edit
Filter button .
- The
Edit
Filter pop-up window
displays. Click the Add
button to
add filters.
- Select
and/or enter search criteria
using the dropdown menus
and fields. Click the
Add
button again to apply
additional filters. Enter
additional search criteria.
Click the Delete button to remove a filter from the list. - Click
Finish
when you have applied
all of your desired filters.
Hover over the Search where text to see the filter that is currently applied to the list.
To clear the currently applied filter and start over, click the Clear Filter link label. The search bar displays in blue when filters are applied and in gray when filters are cleared.

- Make a selection in the first dropdown menu.
- The choices available in the second dropdown menu vary, depending on your selection in the first dropdown menu:
- Equals: Enter the search criterion (e.g., the full description) in the field to the right, or select a date from the dropdown calendar (if applicable).
- Contains: Enter at least one character of the search criterion (e.g., part of the description) in the field to the right.
- Within Range: Search between two calendar dates. Click the down arrow to the right of each field to choose dates from the dropdown calendars.
- Click Find
to apply the filter. Hover
over the Search
where text to see
the filter that is currently
applied to the list.
To clear the currently applied filter and start over, click the Clear Filter link label. The search bar displays in blue when filters are applied and in gray when filters are cleared.
- Click
the Edit
Filter button
- Service
- A list of Services displays. To view closed as well as open services, select the Include closed checkbox.
- Limit
the items that display in this list
if necessary.
Use the search bar to display services that meet specific criteria. Apply a single filter (using the search fields) or multiple filters (using the Edit Filter button
)
to narrow the list of services.
- Click
the Edit
Filter button .
- The
Edit
Filter pop-up window
displays. Click the Add
button to
add filters.
- Select
and/or enter search criteria
using the dropdown menus
and fields. Click the
Add
button again to apply
additional filters. Enter
additional search criteria.
Click the Delete button to remove a filter from the list. - Click
Finish
when you have applied
all of your desired filters.
Hover over the Search where text to see the filter that is currently applied to the list.
To clear the currently applied filter and start over, click the Clear Filter link label. The search bar displays in blue when filters are applied and in gray when filters are cleared.
- Make a selection in the first dropdown menu.
- The choices available in the second dropdown menu vary, depending on your selection in the first dropdown menu:
- Equals: Enter the search criterion (e.g., the full description) in the field to the right, or select a date from the dropdown calendar (if applicable).
- Contains: Enter at least one character of the search criterion (e.g., part of the description) in the field to the right.
- Within Range: Search between two calendar dates. Click the down arrow to the right of each field to choose dates from the dropdown calendars.
- Click Find
to apply the filter. Hover
over the Search
where text to see
the filter that is currently
applied to the list.
To clear the currently applied filter and start over, click the Clear Filter link label. The search bar displays in blue when filters are applied and in gray when filters are cleared.
- Click
the Edit
Filter button
- Select each item to which you would like to associate the opportunity in the list. To select all items in the list, click the Select All link. To deselect them, click the link again.
- Click Add
to save the association(s) and immediately add
another (e.g., of a different Item type).
Click Finish to save the association(s) and close the Find Associations screen.
Click Cancel to discard your changes and close the Find Associations screen.
- To associate a marketing submission, policy,
or client contract service to the opportunity,
click the Add
button
- Attachments
- To add an attachment to the opportunity, click Attachments on the navigation panel.
- Click the Add button.
In the Add Attachment window, select the appropriate radio button and click Continue.
- Email
Note: Your agency's email program must be integrated with Applied Epic to attach emails to items in Applied Epic.
- Click the Browse button.
- In the Attach Existing File window, click on the email that you would like to attach.
- If the email contains an attachment, the Save attached files checkbox is selected by default. If you do not want to add the email's attachment(s), deselect the checkbox.
- Click Finish.
- In the Attach Existing File window, select the Delete original after attaching checkbox if you want to remove the email from your email program.
- Click Finish or press [Enter] to add the attachment.
Click Cancel or press [Esc] to exit the workflow without adding the attachment. You are prompted, "Do you wish to discard changes?" Click Yes.
- Existing
client document
- In the Available Attachments window, select the checkboxes for all of the attachments you want to add. If needed, you can filter the list to locate the correct attachments more easily.
- Click Finish or press [Enter] to add the attachment(s).
Click Cancel or press [Esc] to exit the workflow without adding the attachment(s). You are prompted, "Do you wish to discard changes?" Click Yes.
- Existing
file
- Click the Browse button.
- Locate the file or files you want to attach and click Open. You can select multiple files by holding the [Shift] or [Ctrl] key while clicking.
- Enter or modify the Description of each attachment.
- If Applied Epic is installed locally on your computer, you can remove the files from their original locations by selecting the Delete original after attaching checkbox for each attachment. If you access Epic through a web browser, you must delete the files manually after completing the workflow if you no longer need the originals.
- Click Finish or press [Enter] to add the attachment.
Click Cancel or press [Esc] to exit the workflow without adding the attachment. You are prompted, "Do you wish to discard changes?" Click Yes.
- Email
- To remove an attachment from the opportunity,
click to highlight the attachment
and click Delete
.
Note: You can also add attachments to an opportunity by clicking New > Attachment in the options bar and selecting the correct attachment type.
- Detail/Summary
- Click Finish or press [Enter] to add the opportunity without completing the details.
- Click Cancel or press [Esc] to discard the opportunity. You are prompted, “Do you wish to discard changes?” Click Yes. Any opportunities you have added before this one are still saved, however.