- To access Accounts from the Home screen, do one of the following:
Click Accounts on the navigation panel.
Click Areas > Accounts on the menubar.
Click the down arrow next to Home on the options bar and select Accounts.
Click Locate on the options bar.
To access Accounts from another area of the program, do one of the following:
Click Home > Accounts on the menubar.
Click the down arrow next to Home on the options bar and select Accounts.
Click Locate on the options bar.
- Select Client in the Locate Account dropdown menu of the Account Locate screen.
- In the Locate by
dropdown menu, select the appropriate option.
Note: Location by phone number searches all phone numbers associated with client and contact accounts (e.g., residential, mobile, fax). - Select the suitable checkbox
or checkboxes
to the right.
- Insureds
- Prospects
- Active
- Inactive
- Enter the first few letters of the name, lookup code, phone number, etc. (depending on the selection in the Locate by dropdown menu) and click Locate or press [Enter].
- The list displays all of the accounts that match the criteria you entered. Click on a column heading to sort the list by that category. For example, click the Last Name column heading to sort by last name in ascending order. To sort in descending order, click the Last Name column heading again.
- Click the Edit
button
 to
the left of the list.
to
the left of the list. - Click File > Open on the menubar.
- Click Account Detail on the navigation panel.
- Double click the client.
- Press [Ctrl]+O.
- Press [Enter].
From the Account section, you can do the following:
Revise the Account name, Lookup code, and Account source if necessary.
Ensure that the checkbox is selected for each Type of business that applies to this client's account.
Select the Do not Purge checkbox. The Do not purge checkbox indicates whether attachments for this account are exempt from the Attachment Purge utility. When this checkbox is selected, the account’s attachments are excluded from the purge even if they meet the purge criteria.
-
The Account tab contains the following sections:
- Address
- To change the address, click in the large field in the Address/Phone Number section. Enter the Street, City, State/Province, and County (if applicable) in the highlighted fields that display.
- Enter the
ZIP/Postal
code, or click the lookup
button
 to look up
the code.
to look up
the code.
- Make a selection from the Search where
dropdown to indicate your preferred search
method.
- If you selected ZIP Code/Postal Code or City:
- From the second dropdown, select Begins with or Contains.
- Enter at least one character of the desired zip code or city and click Locate or press [Enter]. If more than 500 results are found, you must enter more than one character.
- If you selected State Code or Province Code, the second dropdown defaults to Equals and cannot be changed. Enter the two-character abbreviation for the state/province and click Find or press [Enter].
- Click to highlight the appropriate zip code in the list and click OK or press [Enter].
- Make a selection from the Search where
dropdown to indicate your preferred search
method.
- Optionally enter a Description for the address, or select a new Description from the dropdown menu.
Note: Typing a description might not be an option, depending on how your organization has set up address descriptions. See Contact Description Configuration for more information.
- Enter a Site
ID if applicable.
Note: Site IDs allow you to enter specific address location numbers for clients’ properties. This user-defined number is available throughout the system for servicing, billing, and reporting purposes. - If necessary, click the Apply Address
to Other Items button to push
the currently displayed address to other contacts,
policy lines, and/or associated transactions.
Make sure you review the address carefully before
proceeding, as it will copy to other areas exactly
as it displays here. Toggling the Use account's address
checkbox or changing anything in the address itself
cause the Apply
Address to Other Items popup to display,
because updating either one resets the contact's
address.
The Apply Address to Other Items pop-up window displays. Perform the following steps:
- Select any contacts to whom you want to apply the address, or click the Select All link label to apply the address to all contacts listed. Only contacts who do not have the Use account’s address checkbox selected display in the list. Click Next to continue.
- Select any policies to which you want to apply the address, or click the Select All link label to apply the address to all policies listed. Click Next to continue.
- You can apply the address to both open and future items:
- The Open and future transactions on client contracts and Open and future transactions at the account level checkboxes are selected by default. Deselect them if you do not want to apply the address to these items.
- If you selected any policies in the previous step, the Open and future transactions associated to selected policies checkbox defaults selected. Deselect it if necessary.
- Do one of the following:
- Click Cancel to exit the workflow and close the pop-up window without making any changes.
- Click Previous to change your selections in a previous step. Your current selections are retained.
- When you are sure that you are ready to apply the address change to the options you have selected, click Finish. The Apply Address Update pop-up window displays a progress bar, with options to Minimize or Cancel. However, Applied does not recommend clicking Cancel, as it may not undo an address change in progress, and there is no way to audit which parts of the action have been completed.
Once the address updates are complete, an Address Change Results spreadsheet that documents the changes made is added to the account’s Attachments list. The spreadsheet contains separate worksheets for updated contacts, lines, and transactions, as well as any items that failed to update.
- Structure
- Click the Add
button
 to add a new
structure. The Structure
window displays.
to add a new
structure. The Structure
window displays. - Select the Agency and Branch.
- If you have more than one structure to add,
click Add
to add the structure and keep the Structure
window open.
Click Finish to add the structure and close the window.
Click Cancel to close the Structure window without adding the new structure. - To remove a structure from the list, highlight
it and click the Delete
 button or press [Delete]
on your keyboard. You are prompted, "Do you
wish to delete this record?" Click Yes.
button or press [Delete]
on your keyboard. You are prompted, "Do you
wish to delete this record?" Click Yes.
- Click the Add
button
- Phone
Number
- Enter the Number, Extension, and Description for the client's phone number (e.g., Home or Cell).
- Make a selection in the Permission dropdown menu to indicate whether you have permission to call the client at this number:
- Did Not Obtain Permission
- Obtained Permission
- Please Do Not Call
- Repeat steps a and b for the Fax number (Business clients only).
- Enter the address of the company’s Website (Business clients only).
- Comments
Add comments in this section.
- Relationships
The relationship feature allows you to keep track of accounts that are related to one another, such as a main account and subaccount. For information on making changes to the available relationships in the system, see Define Relationships.
You can do the following in this section:
- Add
a Relationship to the Account
- Do one of the following:
- Click the Add
button .
- With focus on the list, press [Insert] on your keyboard.
- Click the Add
button
- On the Add
Relationship screen, begin by identifying
the account to which the selected account
is related. Make a selection in the first
dropdown menu of the search bar:
- Lookup Code
- Account Name
- Account Type
- Make a selection in the second dropdown
menu:
- Equals: Enter the entire lookup code, account name, or account type in the field provided.
- Contains: Enter at least one letter of the lookup code, account name, or account type in the field provided.
- Click Find or press [Enter] to bring up a list of matching accounts.
- Click on the appropriate account in the list and click the down arrow button to move the account to the Selected list. To select all accounts in the list, click the double down arrow button.
Note: Press the [Ctrl] or [Shift] key as you click on accounts in the list to choose more than one. To remove an account from the Selected list, click on the account and then click the Delete button to the left of the Selected list.
- Choose the relationship Type.
- Choose the Role of the account that you are editing.
- Click Finish to add the new relationship.
Click Add to add the new relationship and begin adding another.
Click Cancel to close the window without saving any changes.
- Do one of the following:
- Edit
a Relationship associated with the account
- Click on the relationship.
- Click the Edit
button
 .
.
Note: If you double click a related account in this list, the detail screen for the related account displays.
- Choose the relationship Type.
- Choose the Role of the account that you are editing.
- Click Finish to amend the relationship.
Click Cancel to close the window without saving changes.
- Remove
a Relationship from the account
- Click on the relationship.
- Click the Delete
button .
Note: If you double click a related account in this list, the detail screen for the related account displays.
- You are prompted, "Do you wish to delete this record?" Click Yes.
- Print
a List of Relationships Associated with the Account
- To print the list of relationships
associated with the account, click the
Print
button
 to the left
of the list. The Print
window displays.
to the left
of the list. The Print
window displays. - Print this list as you would any other document.
- To print the list of relationships
associated with the account, click the
Print
button
- Add
a Relationship to the Account
- Agency
Defined Categories
Use this section to apply agency-defined categories to an account. For instructions on adding new agency-defined categories to the system, see Agency Defined Categories Configuration.
Use the search bar to display agency-defined categories that meet specific criteria. Apply a single filter (using the search fields) or multiple filters (using the Edit Filter button
 ) to narrow
the list of agency-defined categories.
) to narrow
the list of agency-defined categories.Selecting multiple criteria performs an "and" search (for example, agency-defined categories that contain a specific Category and a specific Option). Making multiple selections for the same criterion performs an "or" search for that criterion (for example, agency-defined categories with either of two Categories). You can make up to three selections for the Category criterion and up to nine selections for the Option criterion.
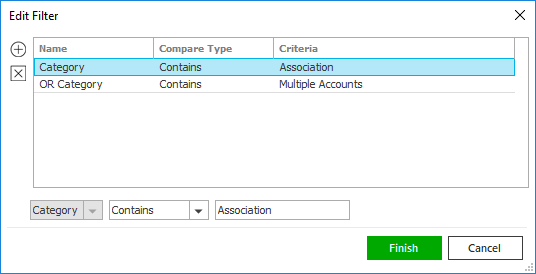
Click the Edit Filter button
.The Edit Filter pop-up window displays. Click the Add button
 to
add filters.
to
add filters.Select and/or enter search criteria using the dropdown menus and fields. Click the Add button again to apply additional filters. Enter additional search criteria.
Click the Delete button to remove a filter from the list.Click Finish when you have applied all of your desired filters.
Hover over the Search where text to see the filter that is currently applied to the list.
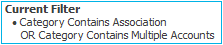
To clear the currently applied filter (for the current session only) and start over, click the Clear Filter link label. The search bar displays in blue when filters are applied and in gray when filters are cleared.
Make a selection in the first dropdown menu.
Enter at least one character of the search criterion (e.g., part of the category) in the field to the right.
Click Find to apply the filter. Hover over the Search where text to see the filter that is currently applied to the list.
To clear the currently applied filter (for the current session only) and start over, click the Clear Filter link label. The search bar displays in blue when filters are applied and in gray when filters are cleared.
To save your currently applied filters as a default for the selected client account or all client accounts, create Filter Defaults. Changing the view filter selection (Client, All, or Line) clears any filter defaults applied to the list.
Your filter defaults are unique to your user code and do not affect other users’ saved defaults.Click the Filter Defaults link label.
Select the Use as default checkbox to save your selected filters as the default for all client accounts that do not already have a filter default saved.
To replace existing filter defaults for all client accounts (including those that already have other filter defaults saved), select the Override existing filters for clients checkbox.Click OK to apply the filter default.
To clear a filter default, click the Clear Filter link label, click the Filter Defaults link label, select the appropriate checkboxes in the Filter Defaults window, and click OK.
- To apply a new category to this account, do one of the following in the Agency Defined Categories section:
- Click the Add
button .
- With focus on the Agency Defined Categories list, press [Insert] on your keyboard.
- The Agency Defined Category window displays.
- Filter
the list of categories if necessary
Use the search bar to display agency-defined categories that meet specific criteria. Apply a single filter (using the search fields) or multiple filters (using the Edit Filter button
)
to narrow the list of agency-defined categories.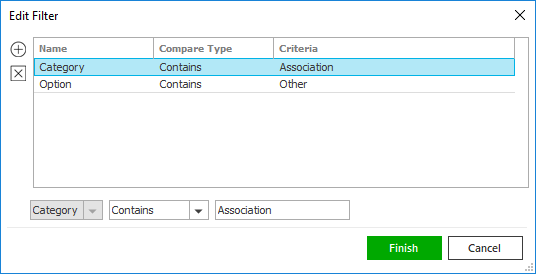
Click the Edit Filter button
.The Edit Filter pop-up window displays. Click the Add button
to
add filters.Select and/or enter search criteria using the dropdown menus and fields. Click the Add button again to apply additional filters. Enter additional search criteria.
Click the Delete button to remove a filter from the list.Click Finish when you have applied all of your desired filters.
Hover over the Search where text to see the filter that is currently applied to the list.
To clear the currently applied filter (for the current session only) and start over, click the Clear Filter link label. The search bar displays in blue when filters are applied and in gray when filters are cleared.
Make a selection in the first dropdown menu.
Enter at least one character of the search criterion (e.g., part of the category) in the field to the right.
Click Find to apply the filter. Hover over the Search where text to see the filter that is currently applied to the list.
To clear the currently applied filter (for the current session only) and start over, click the Clear Filter link label. The search bar displays in blue when filters are applied and in gray when filters are cleared.
- Select the checkbox beside each category you want to apply to this account. To select all of the items listed, click the Select all checkbox.
- Click
Finish to add the category
and close the Agency
Defined Category
window.
To remove a category from the list, highlight it and click the Delete button or press [Delete] on your keyboard. You
are prompted, "Do you wish to delete this
record?" Click Yes.
button or press [Delete] on your keyboard. You
are prompted, "Do you wish to delete this
record?" Click Yes.
- Address
-
- Choose the appropriate entities in the dropdown boxes in the Servicing Contacts section.
- Optionally add a Description in the field to the right of each selection.
-
The Billing tab contains the following sections:
- Associated
Accounts
This section gives you quick access to broker detail for accounts that are associated with this one, if applicable.
Select the Broker for the related account in the dropdown list provided. The Bill broker net checkbox defaults based on the setting in the broker's account detail, but you may override it.
Use the Broker Details link label on the right to view broker detail for this account.
- Billing
This section allows you to select a statement format and invoice setup for the account. It also enables you to specify whether or not service charges should be applied to overdue balances for this account.
- Optionally
make a selection in the Invoice
page break
dropdown to indicate where you would like the
page breaks to occur when the company's invoices
print:
- Client: Create one invoice for the account.
- Item: Create a separate invoice for each item.
- Policy:
Create a separate invoice for each policy.
Note: All contact information must be the same in order for the invoice page break to be applied.
- If you want to set a specific invoice layout as the default layout for this account, choose an Invoice layout from the dropdown menu. For instructions on adding an invoice layout, see Invoice Layout Configuration.
- Select the Apply late charges on overdue balances checkbox if the account should be subject to fees for late payments.
- Indicate where
you would like the Statement
page break to occur:
- Account
- Contact
Note: If the Page Break is set to Contact, the contact information must be the same in order to apply the page break. Contact information includes street address, city, state, and zip/postal code, and address description. If the preferred distribution method is Email or Fax, the contact information also include an email address or fax number.
If the statement page break is by Contact, the entire address, including address description, is used to group items for statements. This means that if all but one of the address/contact information fields are identical, the items will be on separate statements.
If the Page Break is set to Account, the contact information is not used.- If
you want to set a specific statement layout as
the default layout for this account, make a selection
in the Statement
layout
dropdown. For instructions on adding a statement
layout, see Statement
Layout Configuration.
Note: If Statement Layout is set to No Statement, the system will not generate a statement for the account. If a statement is needed when the account is set up this way, the billing associate can generate the statement at the Transaction level.
- Optionally
make a selection in the Invoice
page break
dropdown to indicate where you would like the
page breaks to occur when the company's invoices
print:
- Split
Receivable Templates
If transactions billed to this client will often have receivables split among multiple related accounts or multiple contacts, you can enter split receivable templates in this area. When selected during the Add a Transaction workflow, the templates will automatically allocate the transaction total accordingly.
You can do the following in this section:
- Add
a Split Receivable Template
- Do
one of the following:
- Click the Add
button to the left
of the list.
- With focus on the list, press [Insert].
- With focus on the list, press [Ctrl] + [N].
- Click the Add
button
- Enter a Description for the template.
- Determine whether the template will be split by Account or by Contact. When you split by account, you can select only those accounts that have a relationship defined with the current account. (See instructions below, under Categories/History.) If splitting by contact, you can select contacts only for the current account.
- Determine whether the splits will be calculated based on the Percent or Amount entered for each account/contact. If you select Amount, you must enter a Total amount. The system calculates the Split Percent for each account/contact by dividing the Split Amount by the Total amount.
- To
add a split, do the following:
- Click
the Add
button .
- The Generate Invoice checkbox defaults checked. Uncheck it if an invoice should not print for the transaction generated by this split.
- If
Generate
invoice is selected, make an
Invoice
grouping selection:
- Account Page Break: The transaction is placed on an invoice according to the Invoice page break selected in the account detail.
- New invoice: The transaction is placed on its own invoice regardless of the grouping selected in account detail.
- If you are splitting by account, select an Account from the dropdown.
- The
primary contact for the account defaults.
To locate an alternate billing contact,
click the lookup
button next to the Contact
field. The contact’s address, email,
and/or fax information defaults.
Note: Any changes made to this contact information in the Contacts area will automatically update any split receivable templates on which the contact is used. - Enter a Loan # if applicable.
- Select a Delivery method for the invoice.
- Optionally enter an Invoice Message. You can click the Select Message link label in the upper right corner of the screen to choose a predefined message from your Message Gallery.
- Enter a Percent or Amount in the Split Value frame. This percentage or amount is deducted from the Parent percent or Parent amount, which represents the percentage/amount to be billed to the parent receivable when this template is used. The Parent percent and Parent amount display as placeholders only; they cannot be modified directly.
- Click
the Add
button
- Repeat step d until you have added all splits. You can allocate up to 100% (if using percentages) or up to the Total amount (if using amounts).
- When you have finished entering split information, click the red X in the navigation panel to close the template.
- Do
one of the following:
- Copy
a Split Receivable Template
- Select the desired template.
- Click Actions > Copy Split Receivable Template on the menubar or options bar.
- You are prompted, “Do you wish to copy the selected split receivable template?” Click Yes.
A copy of the template is added to the list, with the default description Copy of [template description]. To make changes to the copy, see the Edit a Split Receivable Template instructions below.
- Edit
a Split Receivable Template
- Select the desired template.
- Do one of the following:
- Click the Edit
button to the left
of the list.
- Double click the template.
- Press [Enter].
- Press [Ctrl] + [O].
- Click the Edit
button
- Make any necessary modifications to
the Description,
Split by, Split value, and Total
amount (if applicable) fields.
Note: Changing the Split by selection clears all existing splits. Changing the Split value from Amount to Percent clears the Split Amount and Total amount values but retains the Split Percent values. If you change the Split value from Percent to Amount, you are prompted to enter a Total amount. The Split Amount values are then calculated based on the Split Percent entries. - To add a new split, click the Add
button
and fill in the detail fields below the
list. See the Add
a Split Receivable Template instructions
above for more information.
To modify an existing split, select the split and make any necessary changes to the fields below.
To remove a split from the list, select the split and click the Delete button
or press [Delete]
on your keyboard. You are prompted, “Do
you wish to delete this record?” Click
Yes. - When you have finished modifying the template, click the red X in the navigation panel to close the template. Your changes are saved automatically.
- Delete
a Split Receivable Template
You cannot delete a split receivable template that has been used on a transaction. If the template should no longer be available for use, you can inactivate it. (See the instructions under Inactivate/Reactivate a Split Receivable Template.)
- Select the desired template.
- Do one of the following:
- Click the Delete
button to the left
of the list.
- Press [Delete] on your keyboard.
- Press [Ctrl] + [D].
- Click the Delete
button
- You are prompted, “Do you wish to delete this record?” Click Yes.
- Inactivate/Reactivate
a Split Receivable Template
Inactive split receivable templates cannot be selected when you are adding a transaction. They also do not display by default in client detail. To view inactive templates, click the Include Inactive link label. Click Exclude Inactive to remove them from the list.
To inactivate a split receivable template, do the following:
- Select the desired template.
- Click Actions > Inactivate/Reactivate Split Receivable Template on the menubar or options bar.
- You are prompted, “Do you wish to inactivate the selected split receivable template?” or “Do you wish to reactivate this entry?” Click Yes.
- Print
a List of Split Receivable Templates
- Do one of the following:
- Click the Print
button
 to the left
of the list.
to the left
of the list. - With focus on the list, press [Ctrl] + [P].
- Click the Print
button
- The Print window displays. Print this as you would any other document.
- Do one of the following:
- Add
a Split Receivable Template
- Associated
Accounts
-
See Confidential Client Access Configuration for instructions on creating confidential client access groups.
- If only specific employees or groups should have access
to this client, click the Selected
radio button. To allow all employees to access the client,
leave the All
radio button selected.
Note: Anyone assigned a role for this account on the Servicing tab will have access, regardless of your selections here. - To grant access to this account to an employee or group,
do one of the following:
- Click the Add
button .
- With focus on the Confidential Client Access tab, press [Insert] on your keyboard.
- Click the Add
button
- The Add Confidential Client Access pop-up window displays. Select the Confidential Client Access Group or Employee radio button.
- Narrow
the list that displays if necessary.
Use the search bar above the list to specify the groups or employees that you want to see.

The choices in the first dropdown menu vary, depending on the radio button selected:
- Name
- Lookup Code
- Department
- Job Title
The following choices are available in the second dropdown menu:
Equals: Enter the search criterion (e.g., the full job title or name) in the field to the right, or select the correct date from the dropdown calendar (if applicable). Click Find.
- Contains: Enter at least one letter or number of the search criterion (e.g., part of the job title or name) in the field to the right. Click Find.
To see the filter that is currently applied to the list, hover over the Search where text.
- Click to highlight the desired employee or group.
- Click Add
to add the selection and choose another.
Click Finish of you are done making selections.
Click Cancel to close the window without saving your changes. - To remove an entity from the Confidential
Client Access list, click the entity
and then click the Delete
button or press [Delete]
on your keyboard.
The Account Servicing Roles client access group cannot be removed, as this group ensures that any employees assigned to servicing roles on the client's account can access it.
- If only specific employees or groups should have access
to this client, click the Selected
radio button. To allow all employees to access the client,
leave the All
radio button selected.
-
- The Account Retention frame shows the date the account was added. This date cannot be revised.
- The Data Conversion frame pertains to accounts that have been transferred from another system. If this account falls into that category, enter the Date converted or click the down arrow to select a date from the dropdown calendar.
- Enter the Prior Account ID.
-
If you provide benefits to your staff, the Employee Benefits tab provides you a cohesive view of employee benefits information and enables you to provide more efficient service to Benefits clients.
Account-level employee Benefits information only defaults on new benefits policies. When you renew an existing policy, the information from the expiring policy populates instead.
Applied recommends updating this information at the account level the next time a client’s policies are up for renewal, so you can perform the updates in a controlled manner, rather than all at once.
The Employee Benefits tab contains the following sections:
- Background
Information
All of the information entered here will default into the corresponding fields of the Policy Information section on new benefits policies.
For each of the following statistics, enter the number the employer reported and the date on which they reported it:
- Number of employees
- Full time equivalent
- Number eligible
- Number of retirees
The other fields in the Background Information section are specific to the United States only.
- Employee
Class
Entering employee class information at the account level enables you to create new benefit policies more efficiently. Once you enter the information at the account level, it automatically defaults into the detail for new benefits policies.
You may only be able to enter information via lookup fields on the Employee Class pop-up window if your administrator has set them to be read-only.
You can do the following in this section:
- Add
an Employee Class
Adding an account-level employee class does not add it to an existing policy in the Associated Employee Class list. If necessary, you must add it manually from the Policy Information section in Policy Detail.
- Do one of the following:
- Click the Add
button beside
the list.
- With focus on the list, press [Insert].
- With focus on the list, press [Ctrl] + [N].
- Enter the Employee
class, or click the lookup button
 , and
select one from the Employee
Class list. Click Finish.
, and
select one from the Employee
Class list. Click Finish. - Enter the Status,
or click the lookup
button , and select
one from the Employee
Status list. Click Finish.
- Enter the Payroll
cycle, or click the lookup button
,
and select one from the Payroll
Cycle list. Click Finish.
- Enter the amount of Time worked, and select the duration from the per dropdown menu.
- Enter the Total count number; then enter the as of date, or select it from the calendar dropdown menu.
- Enter the Eligibility,
or click the lookup
button , and select
it from the Eligibility
list. Click Finish.
- Enter the Coverage
start, or click the lookup button
,
and select it from the Beginning
list. Click Finish.
- Enter the Waiting
period, or click the lookup button
,
and select it from the Waiting
period list. Click Finish.
- Enter the Coverage
end, or click the lookup button
,
and select it from the Benefit
Termination list. Click Finish.
- Click Finish to add the employee class.
- Repeat steps a through k to add additional employee classes.
- Edit
an Employee Class
Editing an account-level employee class does not update the existing employee class on a policy if it displays in the Associated Employee Class list. Instead, a new employee class is created with your changes. If necessary, to remove the existing employee class and/or add the revised employee class, go to the Policy Information section in Policy Detail, and make the changes to the Associated Employee Class list.
- Select an employee class in the list.
- Do one of the following:
- Click the Edit
button beside the
list.
- Double-click the employee class.
- Press [Enter].
- Press [Ctrl] + [O].
- Revise the Employee
class manually, or click the lookup
button , and select
an employee
class from the Employee
Class list. Click Finish.
- Revise the Status
manually, or click the lookup button
,
and select a status
from the Employee
Status list. Click Finish.
- Revise the Payroll
cycle manually, or click the
lookup button ,
and select a payroll
cycle from the Payroll
Cycle list. Click Finish.
- Revise the Time worked number; then and select a duration from the per dropdown menu.
- Revise the Total count number; then enter a date or select one from the calendar dropdown menu in the as of field.
- Revise the Eligibility
manually, or click the
lookup button ,
and select an eligibility
from the Eligibility
list. Click Finish.
- Revise the Coverage
start manually, or click the lookup
button , and select
a coverage
start from the Beginning
list. Click Finish.
- Revise the Waiting
period manually, or click the
lookup button ,
and select a waiting
period from the Waiting
period list. Click Finish.
- Revise the Coverage
end manually, or click the lookup
button , and select
a coverage
end from the Benefit
Termination list. Click Finish.
- Click Finish to update the employee class.
- Delete
an Employee Class
Deleting an account-level employee class does not remove it from an existing policy if the employee class displays in the Associated Employee Class list. To remove it, you must go to the Policy Information section in Policy Detail.
- Do one of the following:
- Click the Delete
button beside the
list.
- Press [Delete].
- Press [Ctrl] + [D].
- You are prompted, Do you wish to delete this record?. Click Yes.
- Print
a List of Employee Classes
- Do one of the following:
- Click the Print
button beside the
list.
- With focus on the list, press [Ctrl] + [P].
- The Print window displays. Print the list as you would any other document.
- Add
an Employee Class
- Background
Information
Click Save on the options bar.
Click File > Save on the menubar.
Press [Ctrl]+S.
