Add a Contact

To learn more about this capability, click the Launch video button.

Launch video

Adding contacts to an account helps to ensure that you have all of their information available for reference. Depending on the type of account and the contact’s relationship to that account, you can add both Individual and Business contacts. In addition to information like addresses and phone numbers, you can define a wide range of options, such as marketing and text message opt-ins and contact classifications. This article will assist you in creating a contact for an account. If you need to update an existing contact, see Edit Contact Detail.

  1. Access the Accounts area and locate the entity with which to associate the contact.
  2. Highlight the desired item in the Results list.
  3.  Do one of the following:
  4. Do one of the following on the Contacts screen:
  5. Select the Individual or Business radio button.
  6. Enter the contact's name. For a business, enter a business Name. The Name field is outlined in red to indicate that it is required.

    For an individual, select a Prefix; enter a First, Middle and Last name; and select a Suffix for the Primary contact. The Last name field is outlined in red to indicate that it is required. For more information on capitalization settings that may be applied to proper names automatically, click here.

    Note: If you have enabled the Default Formal option for the Contact Add Workflow in Field Defaults Configuration, and entered both a Prefix and a Last name, the Formal value populates automatically based on those entries (e.g., Ms. Smith).

    The Formal value updates automatically when you update the Prefix or Last name. However, manually editing the Formal field entry so that it no longer matches the values in those fields disables the automatic updates.
  7. If you are adding a contact to a Client account, select the Contact only, Policy only, or Both Contact & Policy radio button in the Category frame.
  8. Optionally enter a Description for the contact.
  9. In the Address section, select the Use account address checkbox if the contact's address is the same as the account address.
  10. If you do not select the Use account address checkbox, select the checkbox(es) to indicate the Type of address:

Note: These checkboxes only identify the address as a mailing and/or billing address in Contact Detail. Use the address Description to assist you in locating the appropriate mailing or billing address when looking up contacts and/or addresses in other areas of the system.

  1. If you want to pull an address into this record from an existing ACORD form, click the lookup button in the corner of the Address field to open the Address Lookup.

    To enter an address manually, click in the large field in the
    Address/Phone Number section. Enter the Street, City, State/Province, and County (if applicable) in the highlighted fields.
  2. Enter the ZIP/Postal code, or click the lookup button to look up the code.
  3. Optionally enter a Description for that address, or select a new Description from the dropdown menu.

    Note: Typing a description might not be an option, depending on how your organization has set up address descriptions. See Contact Description Configuration for more information.
  4. Enter a Site ID if applicable.

    Note: Site IDs allow you to enter specific address location numbers. This user-defined number is available throughout the system for servicing, billing, and reporting purposes.
  5. In the Primary Number section, select Business, Fax, Mobile, Other, or Residence from the dropdown menu.
  6. Enter the contact's Number.

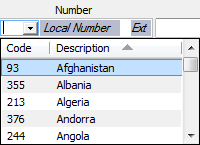
    Phone numbers require a Country code in addition to the local number. The Country code for the United States and Canada is 1. To locate a different country code, click on Country and select the correct country in the dropdown menu.

Enter the remainder of the phone number in the field.

Note: See Telephone Country Codes Configuration for instructions on adding, editing, or removing a country code.

  1. If the contact has opted in to receive SMS messages at this number and you have enabled SMS messaging in System Settings, select the SMS checkbox. You are prompted, “Would you like to enable conversational SMS for this contact?” Click Yes, if the contact wants to engage in individual text conversations with users at your agency.

    Important! You must obtain a contact’s consent before sending them SMS messages. Familiarize yourself with Canadian laws on text communications before you begin using this functionality.
  2. Optionally enter a Description of the phone number (e.g., Home or Cell).
  3. Repeat steps 15-18 to enter a Fax number.
  4. Make a selection in the Permission dropdown menu to indicate whether you have permission to call the contact at this number:
  5. In the SMS Opt-Ins frame, select Conversational SMS if the contact would like to communicate with your brokerage on an individual basis via SMS messaging.
  6. If the contact wants to receive bulk texts of any kind (account notices, weather alerts, and/or marketing campaigns), select Marketing SMS. You must use the Bulk SMS Opt-In Status link on the Contact Info tab obtain the contact’s consent for each message type they want to receive before you can begin sending the contact bulk texts of any kind.
  7. In the Primary Email section, enter the contact's Email address and a Description for it.

    Note: To email the contact from this screen, click the Email button beside the email field. An email opens with that address in the To field.
  8. Classifications describe the contact's association with the account. Assigning classifications allows you to identify contacts on activities and in reporting options. To add a classification, click the Add button in the Classifications section, or press [Insert] with focus on the section. A list of all available classifications displays in the Add Classifications pop-up window. Select the checkbox for each classification you want to add to the contact.
  9. Enter Comments about the contact if necessary.
  10. You can click Finish or press [Enter] to end the workflow at this point. However, it is advisable to click Detail and add the rest of the contact information at this time.

    Click Cancel or press [Esc] to exit the workflow without saving the information. You are prompted, "Do you wish to discard changes?" Click Yes.

    Click Detail to add more information. Continue to step 27.
  11. The top half of the Contact Detail screen has Contact, Address, Classifications, and Comments sections. The tabs on this screen vary, depending on whether the contact is an individual or a business.
  12. Close the screen when you have made the desired changes. Your changes are saved automatically.

See Also