To learn more about this capability, click the Launch video button.

The following options are available from the menubar on the Home screen:
- File
- New
- Activity List
- Barcode
- Display Options
- Exit
- Edit
- Areas
- Locate
- Actions
- On Demand
- Access
- Links
- myEpic
- Help
- Applied Epic Help
- Applied KnowledgeBase
- Applied Epic Release Notes
- Online Chat / Log a Case
- About Applied Epic 2023

The following options are available from the options bar of the Home screen:
- Home
- Locate
- Actions
- On Demand
- Access
- Links
- myEpic
- SMS
- New
- Activity List
- Barcode
- Refresh
Note: The Home and Locate buttons display with arrows next to them. Clicking the Home or Locate button opens the corresponding area of Applied Epic; clicking the arrow opens a menu containing additional navigation options. The Actions, Access, New, and Print buttons each display an arrow when you hover over them. Click the button or the arrow to display menu containing additional options.
The navigation panel is on the left side of the screen.
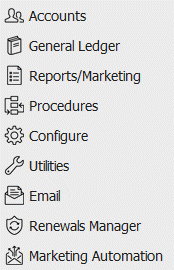
The navigation panel consists of the following buttons.
- Accounts
- General Ledger
- Reports/Marketing
- Procedures
- Configure
- Utilities
- Renewals Manager
- Marketing Automation
You can use the splitter to the of the navigation panel to minimize it, reduce it to icons without text, or completely hide it from view. Click and drag the splitter to the left to make the navigation panel smaller; click and drag it to the right to enlarge it or to display it again (if hidden).
The Dashboards provide a graphical representation of your individual progress—or your sales team’s progress, if you are a sales manager—toward your sales targets.
- To determine the Dashboard charts that display and the
data included in them, select a Perspective
from the dropdown menu in the Dashboards
header bar.
The following perspectives are available: - Me [All Teams]: Data for all opportunities on which you are listed as the Owner, regardless of the associated sales team.
- Me [name of sales team]: Data for all opportunities on which you are listed as the Owner and which are associated to a particular sales team. Perspectives are available for every sales team associated to an opportunity on which you are listed as the Owner.
- Executive Dashboard (Executives only): Data for all opportunities across for multiple sales teams or the entire organization.
- [Name of sales team] (Sales managers only): A perspective is available for every sales team on which you are listed as the Sales Manager.
- [Name of sales team member]: In addition to the team-level perspectives, sales managers can also select individual perspectives for each member of the team(s) they manage.
Depending on the option you select, the sales team name, [Unassigned], or [All Teams] displays in the bar below the Dashboards header.
Individual Dashboards
The following dashboard charts are available for individual employees/brokers:
- Combined Sales: This stacked bar chart shows the monetary value of your pipeline for both new business and renewal opportunities, as well as expiring policies. The chart is separated into three bars representing opportunities with targeted close dates and policies with expiry dates within 0-30, 31-60, and 61-90-day time frames. Each bar shows the monetary value of the total pipeline, segmented by type of business, over its specified time frame.
- New Business Year-to-Date: This gauge indicates your progress toward your yearly sales target, based on a comparison of the value of the new business opportunities you have closed as Won and the total of your sales targets configured in Employee/Broker Detail. As you make progress toward your sales targets throughout the year, the needle will move toward the green area on the right.
- New Business Pipeline: This funnel displays your new business opportunities segmented by Stage, providing insight into the stage in the sales process in which your opportunities are concentrated and the value of the opportunities in each stage.
- Renewal Pipeline: This funnel displays your expiring Policies or renewal Opportunities, segmented by expiry dates within the next 30, 60, and 90 days, and the premium value of those policies or opportunities.
- Hit Ratio: This pie chart displays the ratio of won opportunities to lost opportunities, based on the original estimated value of each opportunity.
Team Dashboards
The following sales team-level dashboard charts are available for sales managers:
- Combined Sales: This stacked bar chart shows the total value of the team’s pipeline for both new business and renewal opportunities, as well as expiring policies. The chart is separated into three bars representing opportunities with targeted close dates and policies with expiry dates within 0-30, 31-60, and 61-90-day time frames. Each bar shows the value of the total pipeline, segmented by type of business, over its specified time frame.
- New Business Year-to-Date: This gauge indicates the team’s progress toward its yearly sales target (the sum of all individual team members Sales Targets associated to that team), based on a comparison of the monetary value of the new business opportunities that team members have closed as Won and the total of their sales targets configured in Employee/Broker Detail. As the team makes progress toward its sales targets throughout the year, the needle will move toward the green area on the right.
- Sales Pipeline: This grouped bar chart shows the stage premium and stage revenue side by side for each sales team member. The dashboard footer indicates the number of days selected.
- Management Summary: This stacked bar chart shows the value of closed won opportunities over closed lost opportunities for each sales team member. The won/lost percentage (based on opportunity count) displays above each sales team member’s bar.
- Producer Support: This bar chart shows the count of open opportunities for each sales team member within a selected range of Target Close dates and provides a comparison of their workloads.
- Hit Ratio: This pie chart shows the ratio of won opportunities to lost opportunities for the team, based on the original estimated value of each opportunity.
Executive Dashboards
The following Executive-level dashboard charts are available for executives:
- Sales Pipeline: This grouped bar chart shows the stage premium and stage revenue side by side for each sales team.
- Summary – Opportunity Close Rate (per team): This stacked bar chart compares opportunities closed as Won and Lost for each sales team. The percentage of opportunities closed as Won for each sales team member within the selected date range displays above the sales team member's bar.
- New/Renewal Business Year-to-Date: This gauge indicates the organization’s progress (all Won Opportunities within the calendar year) toward its yearly sales target (the sum for all sales target defined for the team’s for the current year), based on a comparison of the value of the new/renewal business opportunities that team members have closed as Won and the total of their sales targets configured in Employee/Broker Detail. As the organization makes progress toward its sales targets throughout the year, the needle will move toward the green area on the right.
- Top 5 Opportunities (next 30 days): This dashboard lists the five open opportunities with the highest revenue value (across the entire organization) closing within the next 30 days, making it easy for executives to identify high-value opportunities that they may be able to assist with.
- Top 10 Reps YTD: This dashboard lists the top ten sales representatives in your organization ranked by revenue generated from won opportunities for the current year.
- Hit Ratio: This pie chart shows the ratio of won opportunities to lost opportunities for the organization or selected sales teams based on the original estimated value of each opportunity.
To view each chart in greater detail and access additional filtering options, click on it. For additional information on the individual charts and filtering options, see Dashboard Charts.
To view dashboards for specific teams or groups, click on the Options button and select the teams/groups whose data you want to see.
To update the data displayed in the dashboards (for example, if a salesperson on a team you manage has won an opportunity since you last opened the Home screen), click the Refresh button on the bar below the Dashboards header.
This list displays activities assigned to you or to a work group to which you belong (unless you have opted to exclude activities owned by work groups on the Activities tab in Customize Home). To change the activities that display in the list, click the word Activities in the view filter.
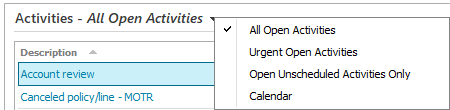
There are four choices. Click on the appropriate selection:
All Open Activities
Urgent Open Activities
Open Unscheduled Activities Only
Calendar
The Activities list displays all open activities for your view filter selection that meet at least one of the following date criteria, based on the date range defined on the Activities tab in Customize Home:
Activities on which you or one of your work groups is the Who/Owner, with a Follow up/Start date within the range defined.
Tasks on which you are the Owner with a start date within the range defined.
Tasks on which you are the Owner without a Start date, but with a Due date (or an activity Follow up/Start date) within the range defined.
If you need to see another employee's activities in your list, see View Other Employees' Activities/Tasks.
To view more information for an activity in the list, double click on it. If you are a task owner on the activity, the first open task displays by default.
To perform actions on an activity or multiple activities, select the activity or activities in the list and right click the selection. The following actions are available:
- Close
- Add Note
- Add Task
- Change
Follow-Up Date/Time
This action displays a popup window from which you can change the Follow-Up/Start date for the selected activity.
The Follow up/Start date is required. All other fields are optional.
Click Finish to change the Follow-Up/Start date/time or Cancel to discard your changes.
- Change Who/Owner
- View All Notes
- Take
Ownership
This action allows you assign an activity to yourself that is currently assigned to a work group or another person whose activities you can view. Taking ownership removes the activity from the work group or other owner’s activities list.
To add an attachment to an activity, drag and drop it onto the activity in the list. The Attach To screen displays. Complete the fields on the screen as described in Add an Attachment.
To change the columns that display in the list, click the Select Columns link on the Activities header.
Select the checkbox for each column you want to include in the list.
The Contact Name and Contact Via columns allow you to identify the contact associated with each activity and their preferred contact method. If their preferred method is email or SMS, you can click the hyperlink in the Contact Via column to begin a new message to them.
To change the order in which the list columns display, click a column name and then click the up arrow
 or down
arrow
or down
arrow  .
.
The activity calendar shows your activities in a calendar format.

Use the arrow buttons to scroll forward or backwards.
Click the Today button to return to the current date.
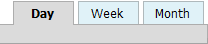
There are three different calendar views: Day, Week, and Month. Click the tabs to change the view.
In the Week and Month views, activities that take multiple days to complete span multiple days on the calendar. This gives you a visual representation of how long your activities will take.
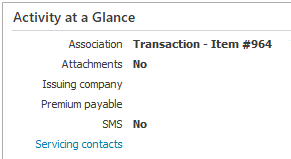
Basic information for activities selected in the Activities list displays in the Activity at a Glance pane.
Click the Servicing Contacts link label to view servicing contacts.
You can resize this panel. To change the height, click and drag the top of the panel up or down. To change the width, click and drag the left or right edge of the panel. Although increasing the height of any panel will correspondingly decrease the height of the panel below it, you can then enlarge these panels, and the Home screen will expand to accommodate them. If you resize this panel to expand the size of Home beyond the display size of your monitor, a vertical scroll bar displays.
This section displays either the tasks for the activity selected in the list above or the last note entered for that activity. Tasks display by default.
If the activity selected in the Activities list has any open tasks that are assigned to you, they display here. If you are granted permission, you can also view tasks on the activities assigned to other employees. See View Other Employees' Activities/Tasks for more information.
To edit a task, right click the task and click Edit. You can apply the same change(s) to multiple tasks by selecting the tasks, right clicking the selection, and clicking Edit.

To view the last note entered for the selected activity, select Last Note Entered from the view filter. The Tasks or Last Note Entered view filter selection is saved and will default the next time you log in.

The list also displays the last note entered for activities assigned to other employees, if you have been granted permission to see them.
You can resize this panel. To change the height, click and drag the top of the panel up or down. To change the width, click and drag the left edge of the panel. Although increasing the height of any panel will correspondingly decrease the height of the panel below it, you can then enlarge these panels, and the Home screen will expand to accommodate them. If you resize this panel to expand the size of Home beyond the display size of your monitor, a vertical scroll bar displays.
The Opportunities list displays open opportunities on which you are listed as the Owner.
To change the opportunities that display in the list, click the word Opportunities in the view filter and select from the following options:
- Next 30 Days
- Next 60 Days
- Next 90 Days
- Next 120 Days
- Next 150 Days
Click on the appropriate selection. The list is filtered to display only opportunities whose Target close date falls within the range you select.
To change the columns that display in the list, click the Select Columns link on the Activities header.
Select the checkbox for each column you want to include in the list.
The Contact Name and Contact Via columns allow you to identify the contact associated with each activity and their preferred contact method. If their preferred method is email or SMS, you can click the hyperlink in the Contact Via column to begin a new message to them.
To change the order in which the list columns display, click a column name and then click the up arrow
or down
arrow .
If you need to view another user's opportunities, click the View Others’ Opportunities link in the header. See View Others’ Opportunities for more information.
Each opportunity’s Description functions as a link. Click it (or double click elsewhere in the opportunity’s row) to navigate directly to its detail.
To perform actions on an opportunity, right click the opportunity in the list. The following actions are available:
- Add Activity
- Change Stage
- Close
- Renew
To add an attachment to an opportunity, drag and drop it onto the opportunity in the list. The Attach To screen displays. Complete the fields on this screen as described in Add an Attachment.
Report Quick View gives you easy access to frequently run reports.
The Report Quick View area consists of a list of link. Clicking a link generates a print preview of the report with which it is associated.
If no reports are set up to deliver as Report Quick View links for an employee code, the message "No items found" displays in the Report Quick View section.
See Deliver Report as Report Quick View for instructions on adding a report to this area.
You can resize this panel. To change its height, click and drag the bottom of the panel up or down. To change its width, click and drag the left or right edge of the panel. Although increasing the height of any panel will correspondingly decrease the height of the panel below it, you can then enlarge these panels, and the Home screen will expand to accommodate them. If you resize this panel so that not all text is viewable, a horizontal scroll bar displays. If you resize this panel to expand the size of Home beyond the display size of your monitor, a vertical scroll bar displays.
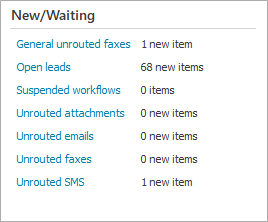
This section displays attachments and faxes that have been scanned or received and assigned to you, the number of suspended myEpic workflows, and any new unrouted SMS messages. You can specify the items that display here in Customize Homebase.
Click the Open leads link to access Leads Inbox, where you can import open leads to the appropriate accounts.
Click the Suspended workflows link to access the myEpic Management area to view or edit Comments on suspended workflows, or to reassign, continue, discontinue, or suspend a workflow.
Click the Unrouted attachments link to access the Unrouted Attachments area, where you can attach the files to the appropriate account or activity.
Click the Unrouted faxes link to access the Unrouted Faxes area, where you can attach the faxes to the appropriate account, activity, policy, or claim. If you are granted access to the general unrouted fax queue, you may see a General unrouted faxes link as well.
Click the Unrouted emails link to access the Unrouted Emails area, where you can attach emails sent to generic email addresses to accounts/policies.
Click the Unrouted SMS link to access the Unrouted Messages area, where you can route the SMS and MMS messages to the appropriate account.
You can resize this panel. To change its height, click and drag the bottom of the panel up or down. To change its width, click and drag the left or right edge of the panel. Although increasing the height of any panel will correspondingly decrease the height of the panel below it, you can then enlarge these panels, and the Home screen will expand to accommodate them. If you resize this panel so that not all text is viewable, a horizontal scroll bar displays. If you resize this panel to expand the size of Home beyond the display size of your monitor, a vertical scroll bar displays.
This area displays activity reminders and barcode notifications.
Items that display in this area can be specified by users with the proper security.
Click an item in this section to view detail or a dialogue box for it.
You can resize this panel. To change its height, click and drag the bottom of the panel up or down. To change its width, click and drag the left edge of the panel to the right or left. Although increasing the height of any panel will correspondingly decrease the height of the panel below it, you can then enlarge these panels, and the Home screen will expand to accommodate them.
If your system is set up for notifications, a notification window displays in the bottom right corner of the screen when the Distribution Manager has sent—or has not sent—a document, and/or when a file has been attached—or fails to attach—to an item in Applied Epic.
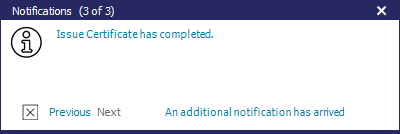
To scroll through the notifications, click Previous or Next.
To delete a notification, click the Delete
button  .
.
To review your notifications, click the notification icon  on the task bar to bring
up the window.
on the task bar to bring
up the window.